Introduction
- Item Name : Rose Billing - Accounting, CRM and POS Software
- Documentation : Applicable to v 3.0 +
- Author : UltimateKode
- Support : http://helpdesk.ultimatekode.com/
First of all, Thank you so much for purchasing this application and for being
our
loyal customer.
You are awesome!
You are entitled to get free lifetime updates to this product +
exceptional support from the author directly.
This documentation is to help you regarding each step of usages. Please go through the documentation carefully to understand how this application is work. PHP with Laravel, HTML, CSS, JS and MySQL knowledge is required to customize this application. You may learn basics here, here.
Be careful while editing the
application. If not edited properly, the logical and design layout may
break completely.
No support is provided for faulty customization.
Other Available Guides:
1. Translation guide to improve translation.
2. Troubleshoot guide to troubleshoot and help.
3. Update guide to update.
4. How to videos guide on youtube.
1. App setup
To get started, you need to do the following:
Requirements
You will need the following requirements to install this application.
- Hosting Account with good RAM(memory) - minimum memory requirement to host a Laravel Project is 512MB
- FTP Tool to upload files to Server (eg: FileZilla)
- Web Browser to run the application (eg: Google Chrome or Mozilla Firefox)
- Server should have at least PHP 7.2 or greater and MySQL 5.6+ version
2. Installation
2.A cPanel Install
- Video Guide youtube.com/watch?v=-LUAlxLcOI0
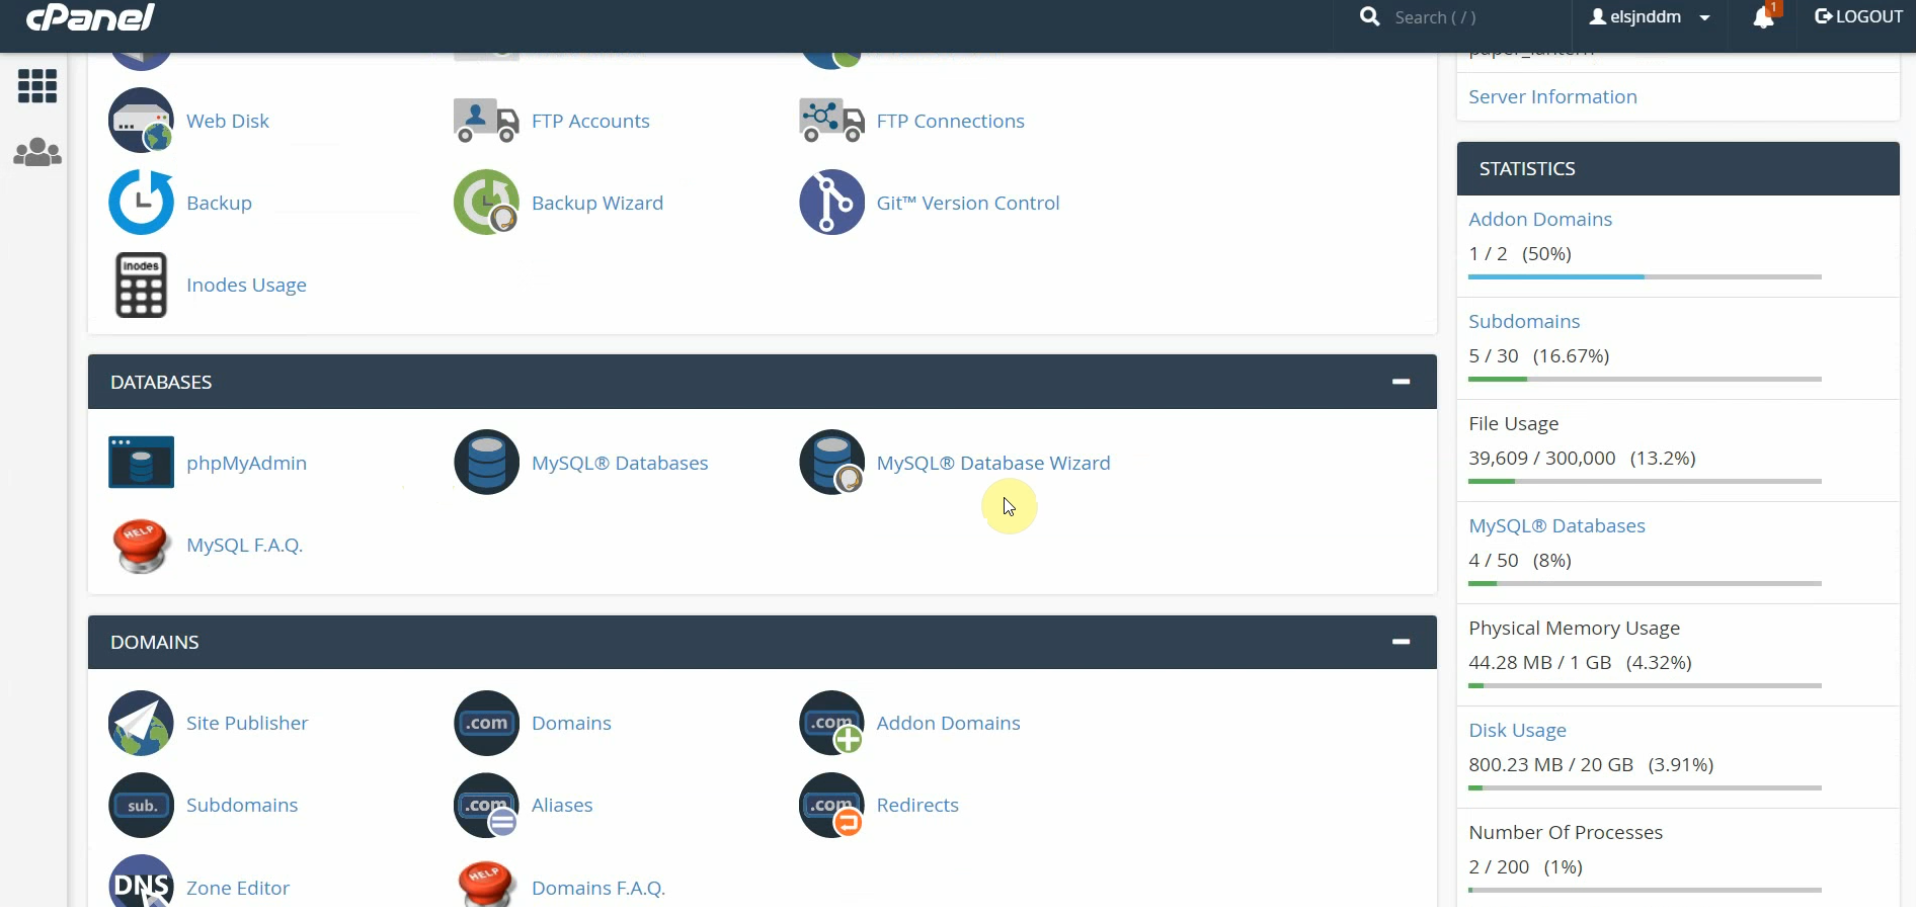
- Login to you cPanel
- Create a sub-domain
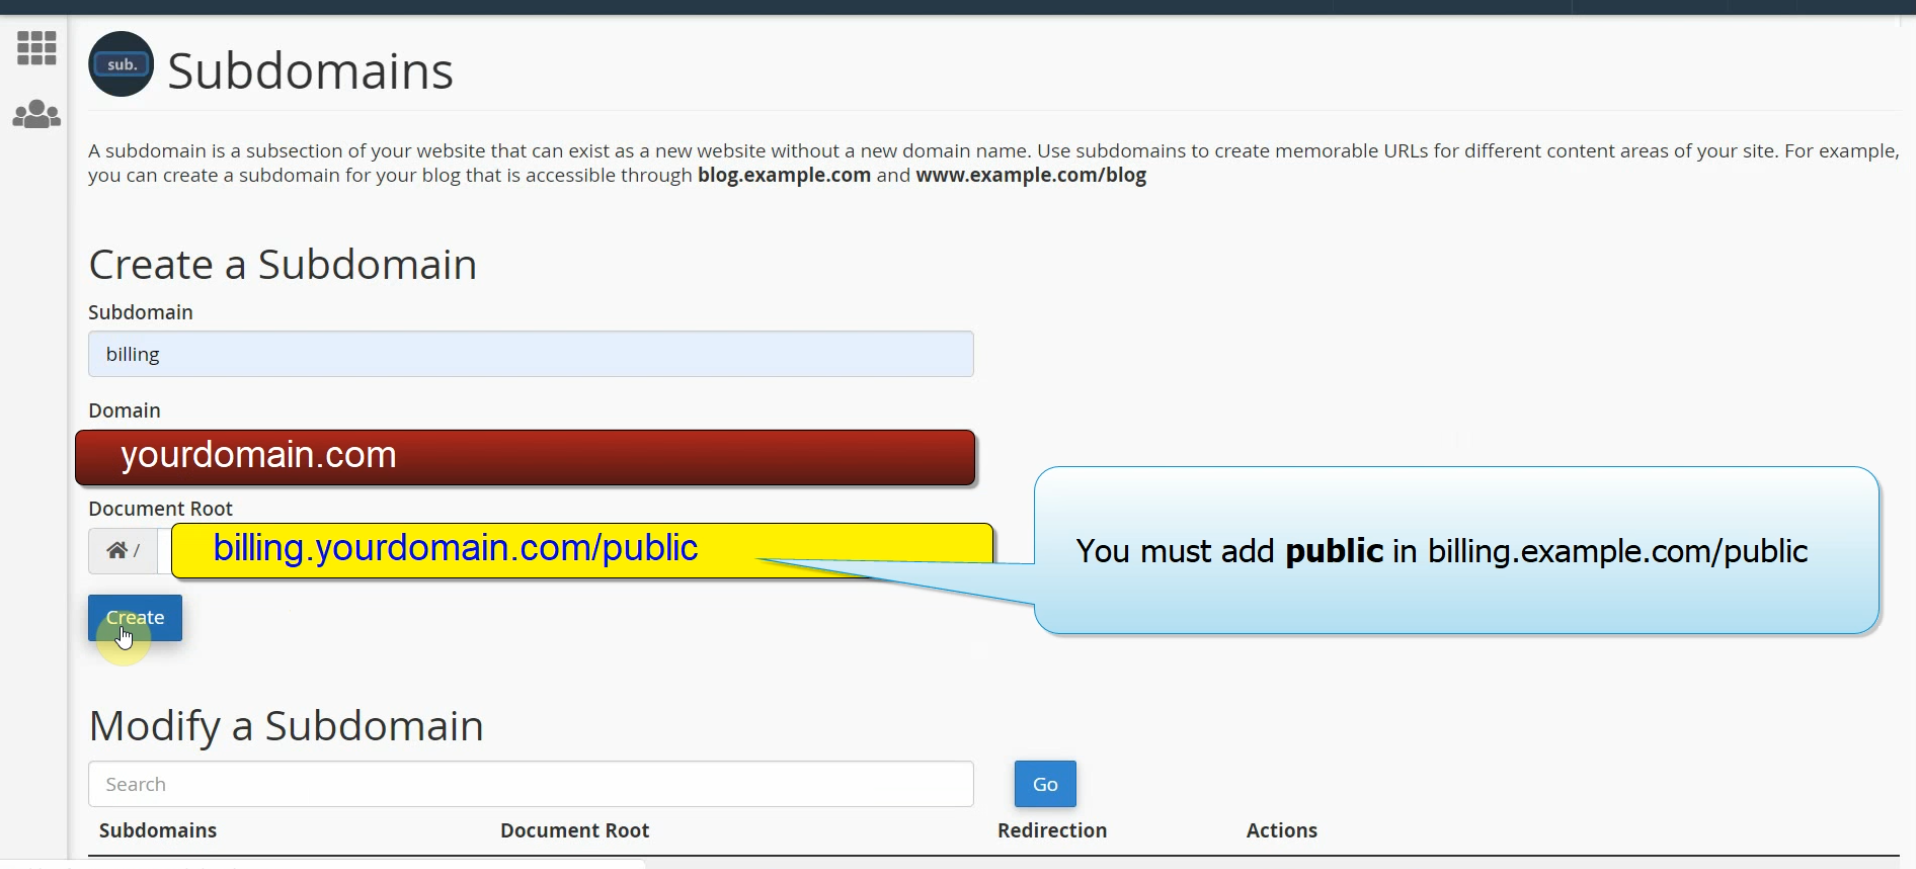
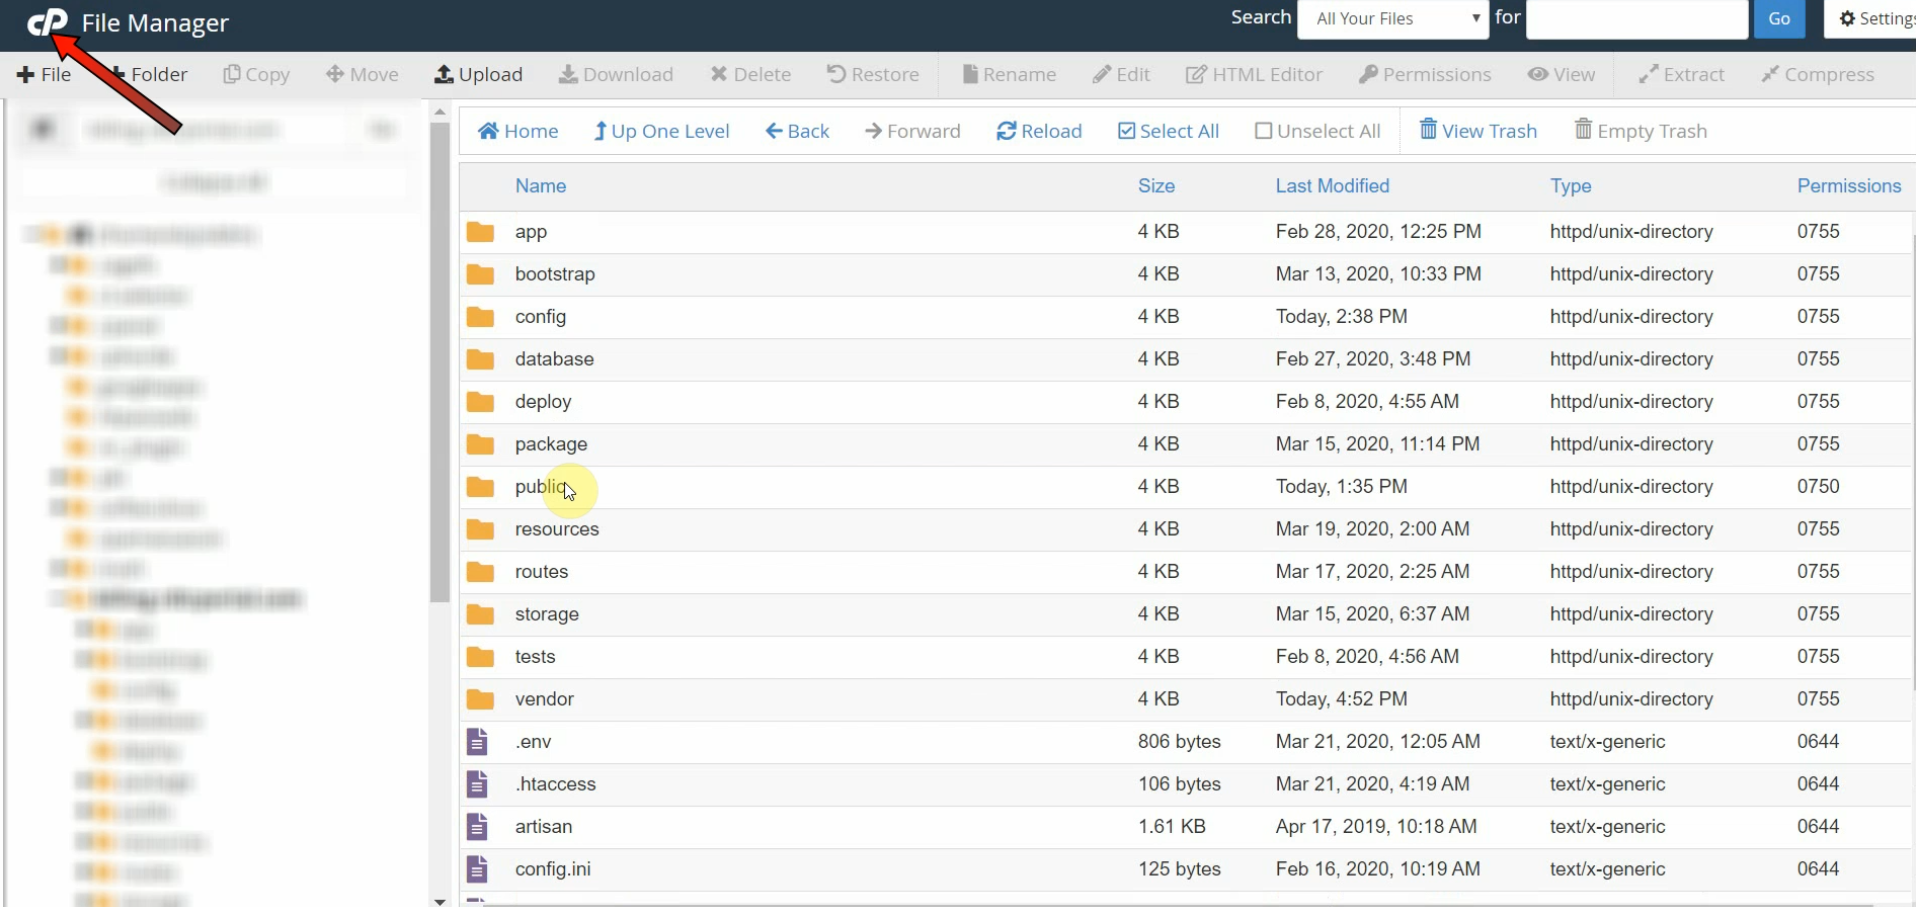
- Go to file manager and your sub-domain document root
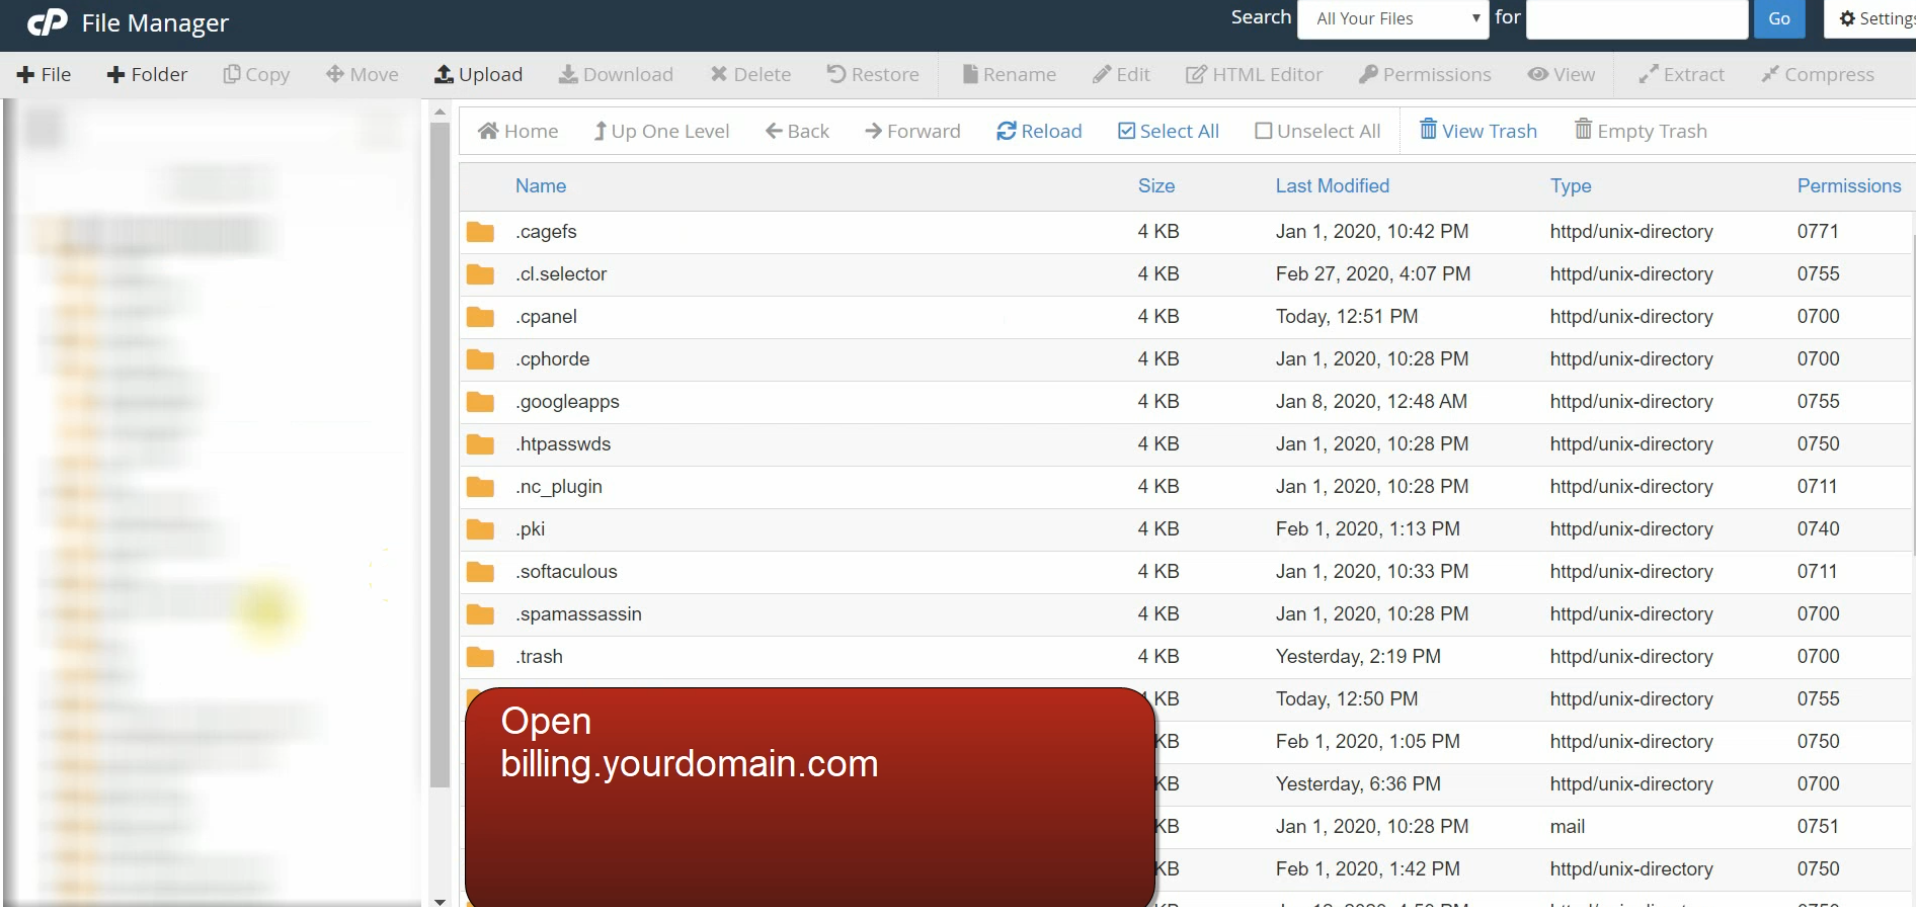
- Upload & Extract files_to_upload from rose setup to billing.yourdomain.com folder
- create a database -
- Jump to section C Here
2.B. Simple Mode XAMPP Install (only for testing)
- Download and Install XAMPP - Do not (never) Install in C Drive
- Open your xampp/htdocs folder
- Empty htdocs folder
- Extract files_to_upload from rose setup to htdocs folder
- Open XAMPP From Start Menu -> Start Apache and MySQL
- Visit localhost/phpmyadmin -> create a database - default database user name is root and password is blank
- Visit http://localhost/public -> it will start the installation
- Enter your details installation process
- Jump to section C Here
2.C. Advanced XAMPP Install (with virtual-host setup)
- Download and Install XAMPP - Do not (never) Install in C Drive , Install it D drive
- Download notepad++
- Navigate to D:/xampp/apache/conf/extra

- Open and edit httpd-vhosts.conf with notepad++
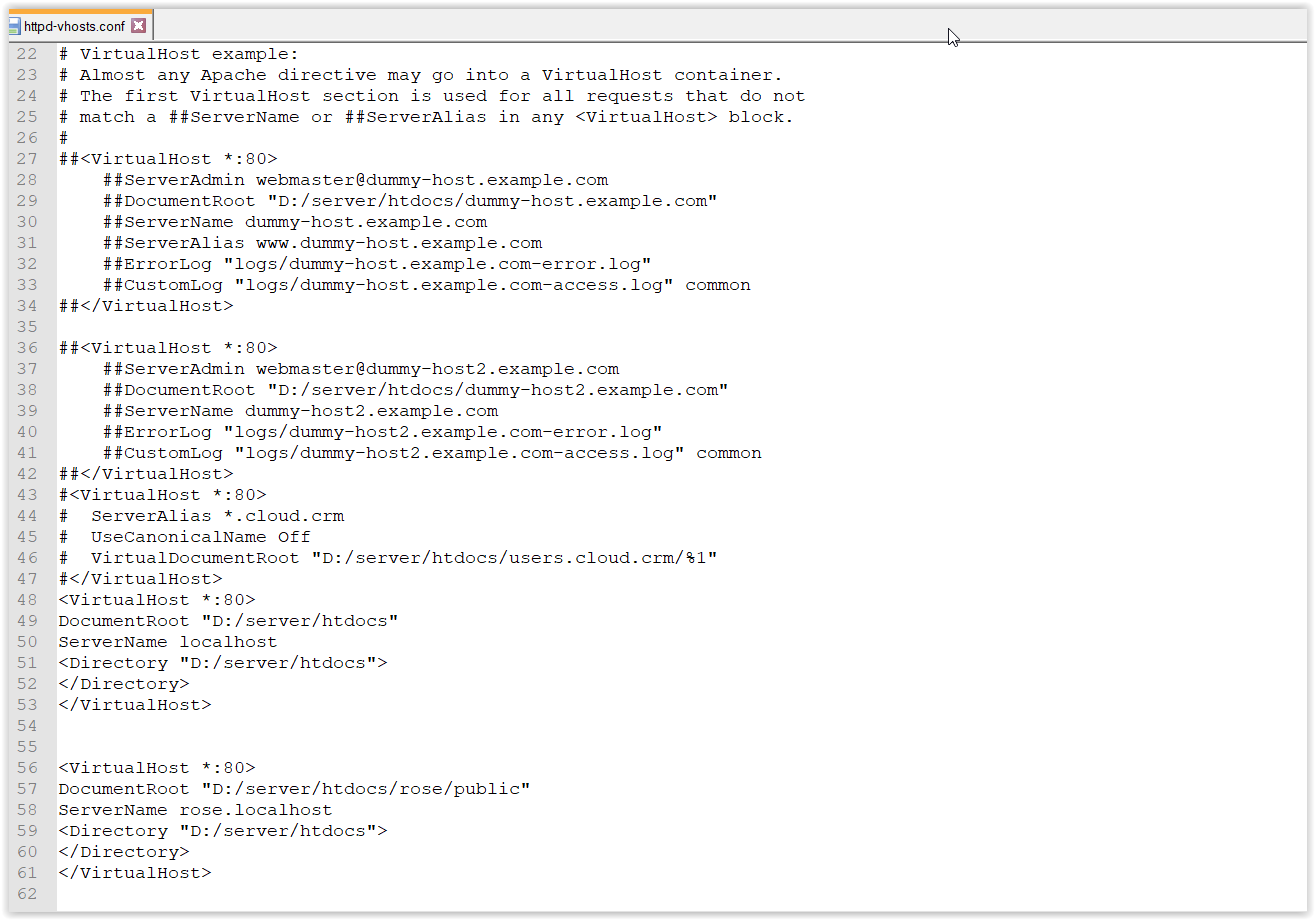
<VirtualHost *:80> DocumentRoot "D:/server/htdocs" ServerName localhost <Directory "D:/server/htdocs"> </Directory> </VirtualHost> <VirtualHost *:80> DocumentRoot "D:/server/htdocs/rose/public" ServerName rose.localhost <Directory "D:/server/htdocs"> </Directory> </VirtualHost> - Go to start -menu , right click on notepad+++ and run as administrator
- in NotePad++ > File Menu > Open and Navigate to C:\Windows\System32\drivers\etc\hosts file
- Paste below code save
127.0.0.1 localhost 127.0.0.1 rose.localhost - Open XAMPP From Start Menu -> Re-Start Apache and MySQL
- Jump to section C Here
2.D. Linux Install (with virtual-host setup)
- Download and Install XAMPP/LAMP Here
- Enable custom virtual hosts Open Terminal >
sudo gedit /opt/lampp/etc/httpd.conf - Search
Change# Virtual hosts #Include etc/extra/httpd-vhosts.conf#Include to Includeand save - Enable custom virtual hosts Open Terminal >
sudo gedit /opt/lampp/etc/httpd-vhosts.conf
<VirtualHost *:80> DocumentRoot "/opt/lampp/htdocs" ServerName localhost <Directory "/opt/lampp/htdocs"> </Directory> </VirtualHost> <VirtualHost *:80> DocumentRoot "/opt/lampp/htdocs/public" ServerName rose.localhost <Directory "/opt/lampp/htdocs/public"> </Directory> </VirtualHost>- Go to terminal and enter
sudo gedit /etc/hosts - Paste below code save
127.0.0.1 localhost 127.0.0.1 rose.localhost - Re-Start Apache and MySQLTerminal >
sudo /opt/lampp/xampp stopsudo /opt/lampp/xampp start - Jump to section C Here
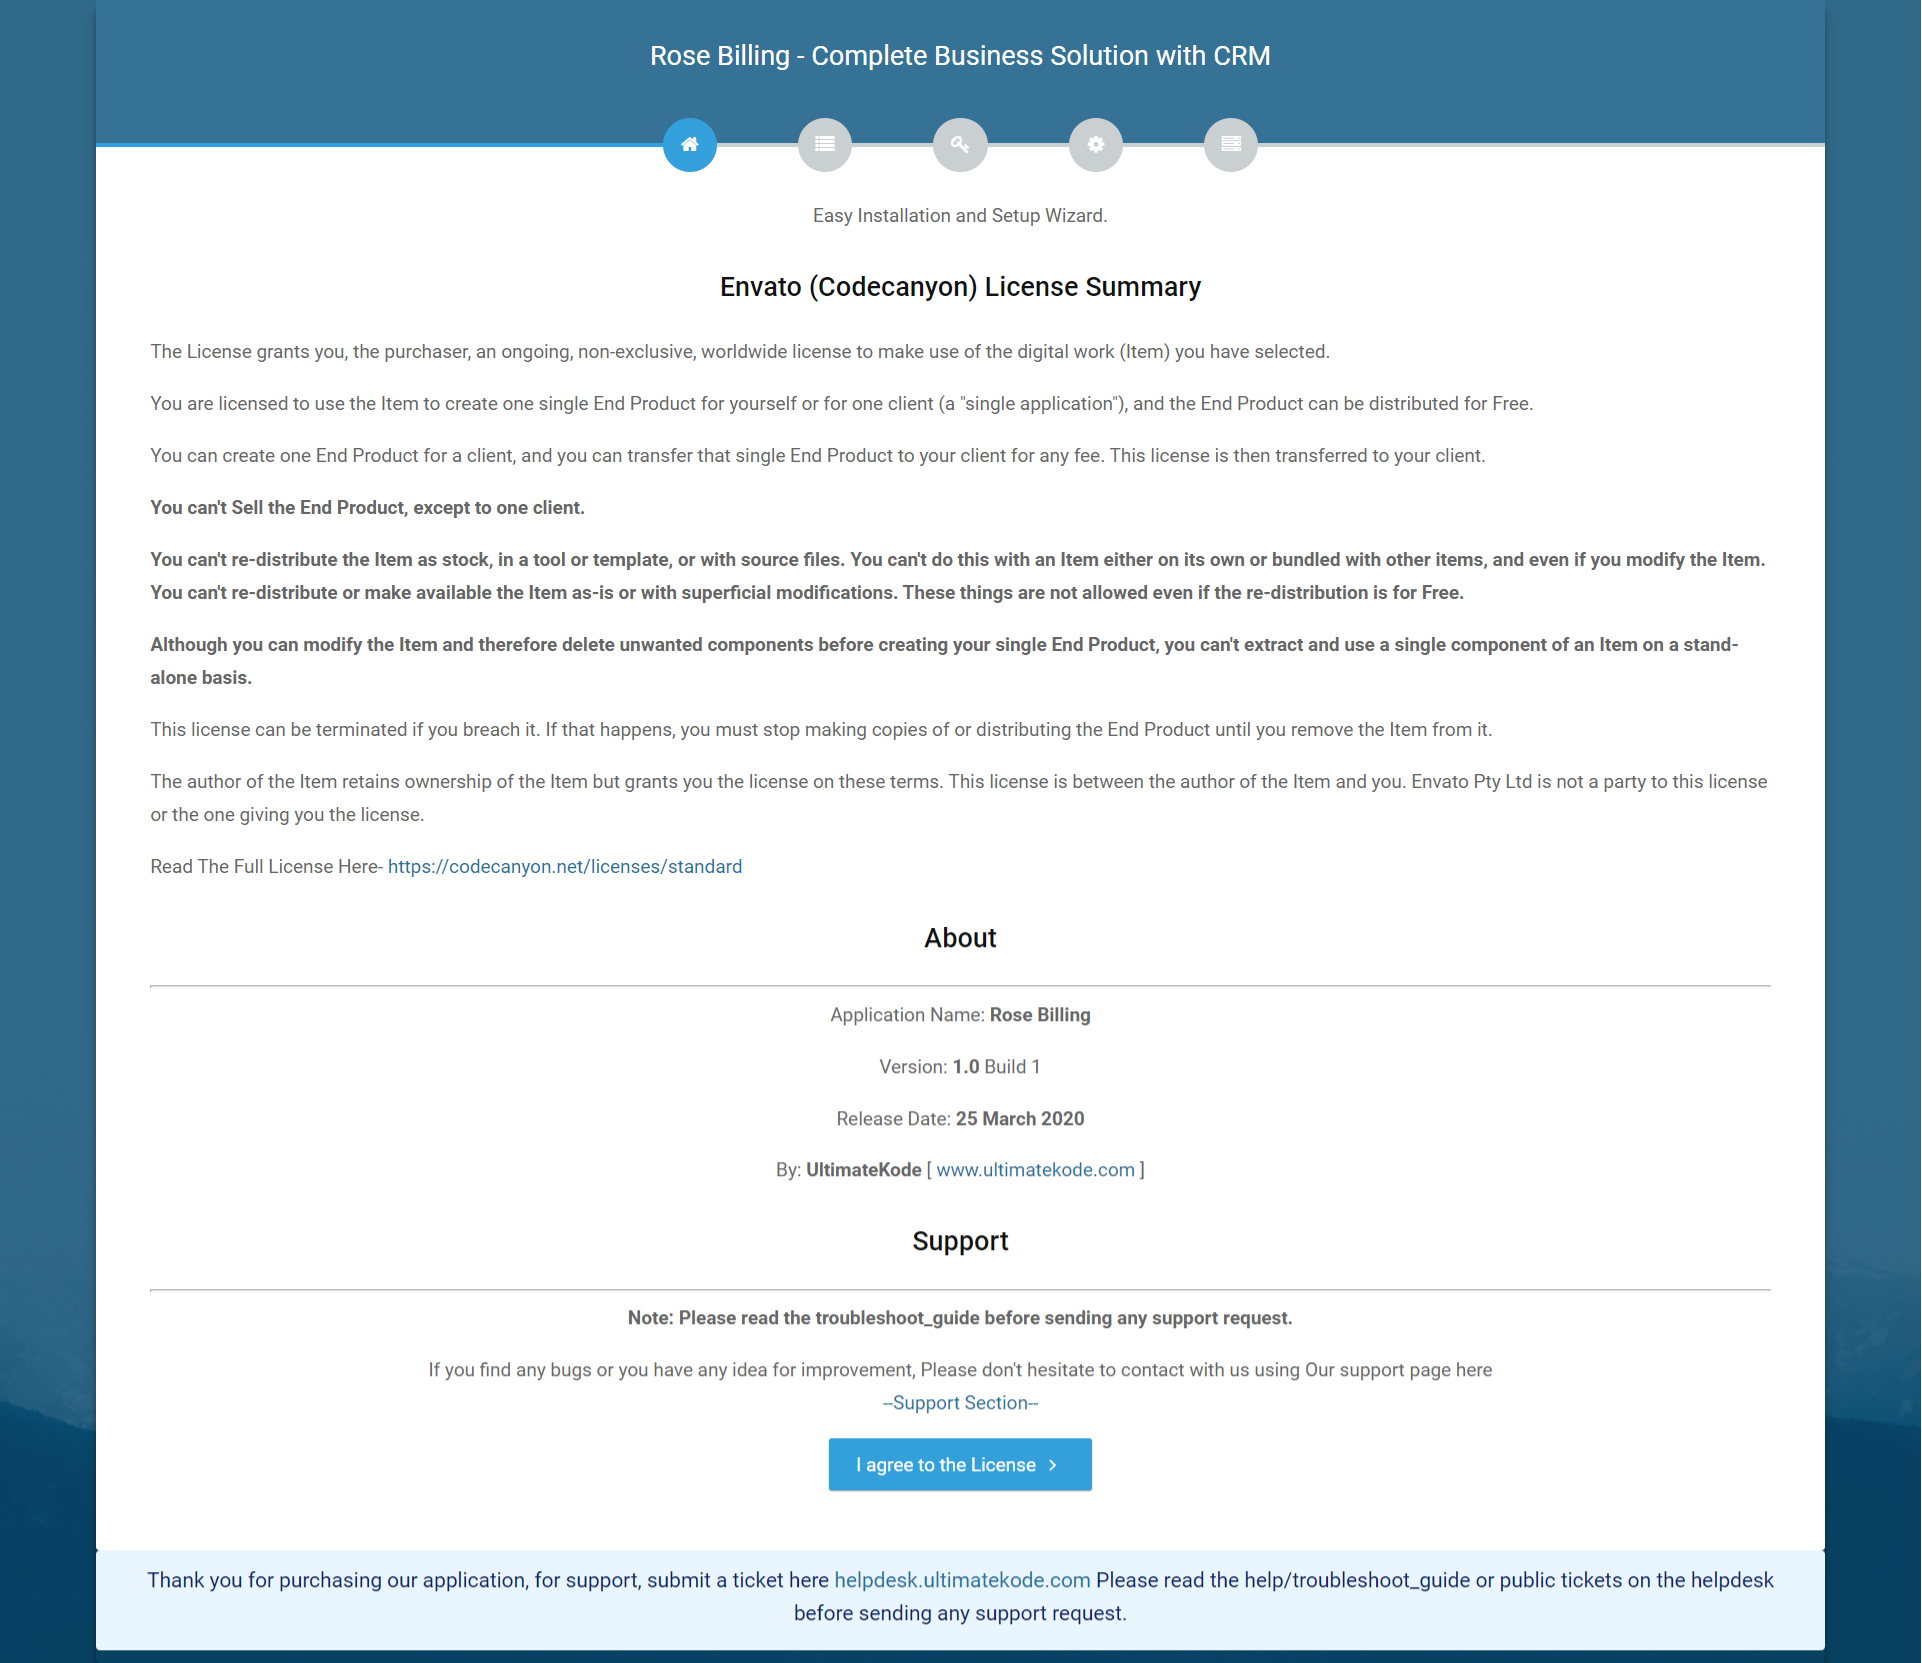
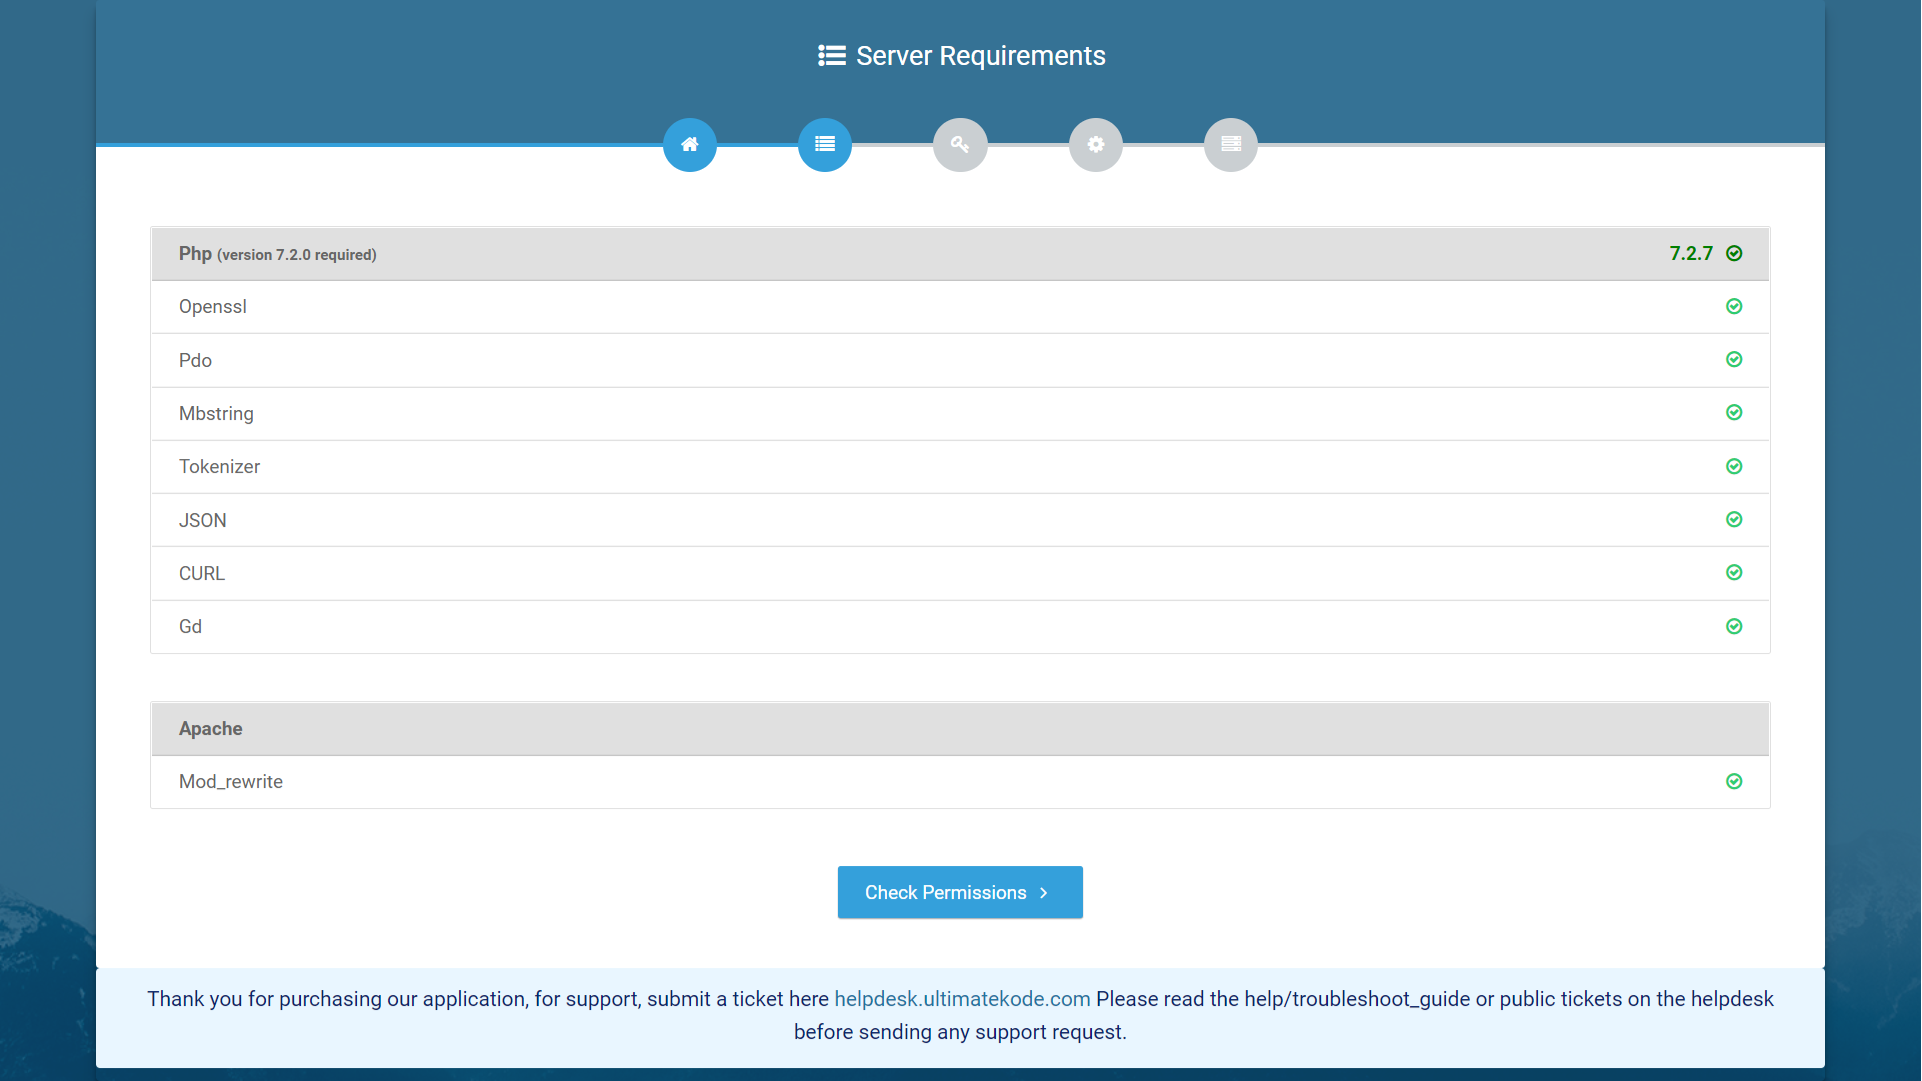
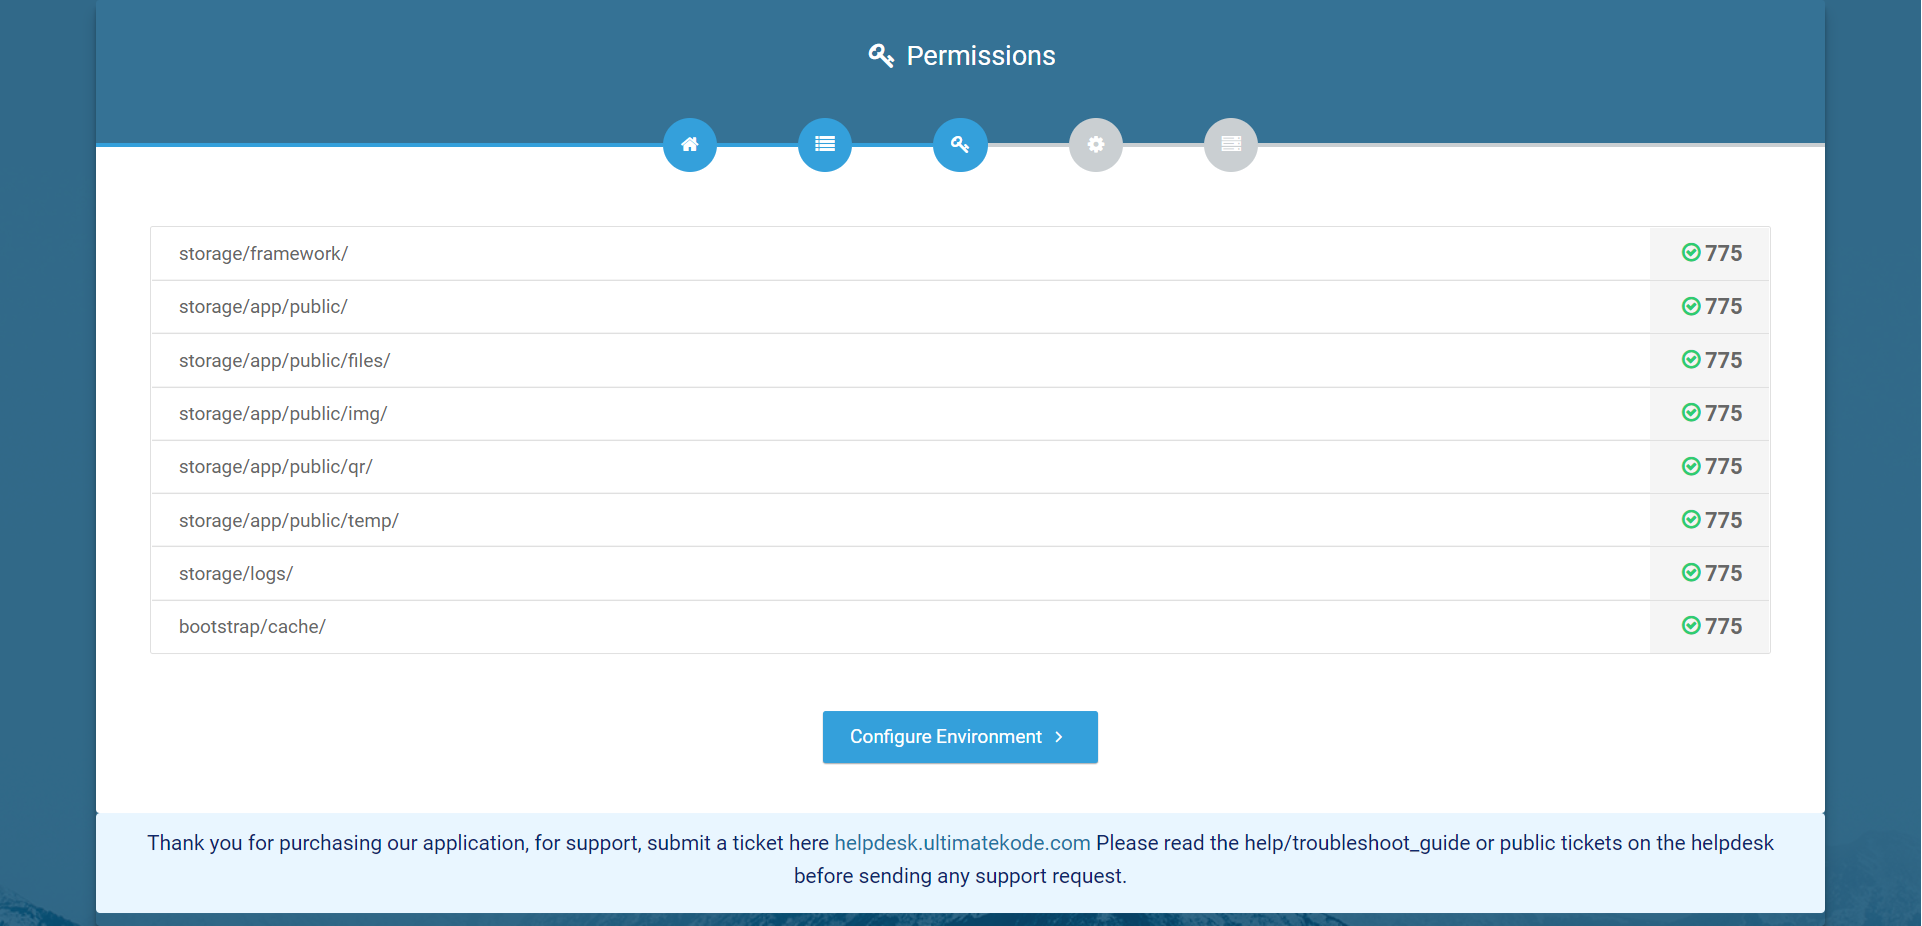
Installation Process
Close the all browser tabs and clear your cache or open an Incognito window (Chrome Users: Press Ctrl + Shift + n)
Open http(s)://yourdomain.com
Step 1 - Read and agree to the license
Step 2 - Check Requirements
Step 3 - Check Permissions
3. App Login
After successful installation you will redirected login section, use your email that entered during the installation with the default password 123456
4. App Dashboard Details
After successful login you will redirected the dashboard

- 4.1 - Admin Settings - settings Related to the company/business - Only Business Owner can access it
- 4.2 - Choose your language
- 4.3 - Logged user account management - You can edit your profile or change the password
- 4.4 - Today Income - The total amount you received with all payments methods , total income can be different from total sales - total sales is gross invoice value while total income is actual incoming payment including only paid/partial paid invoices
- 4.5 - Today Expense - Total outgoing amount
- 4.6 - Revenue is Today Income - Today Expense
- 4.7 - Income vs Expense of the the month
- 4.8 - Your recent tasks
- 4.9 - Low stock products list
Tip: You can define the income and expense transactions category in admin settings
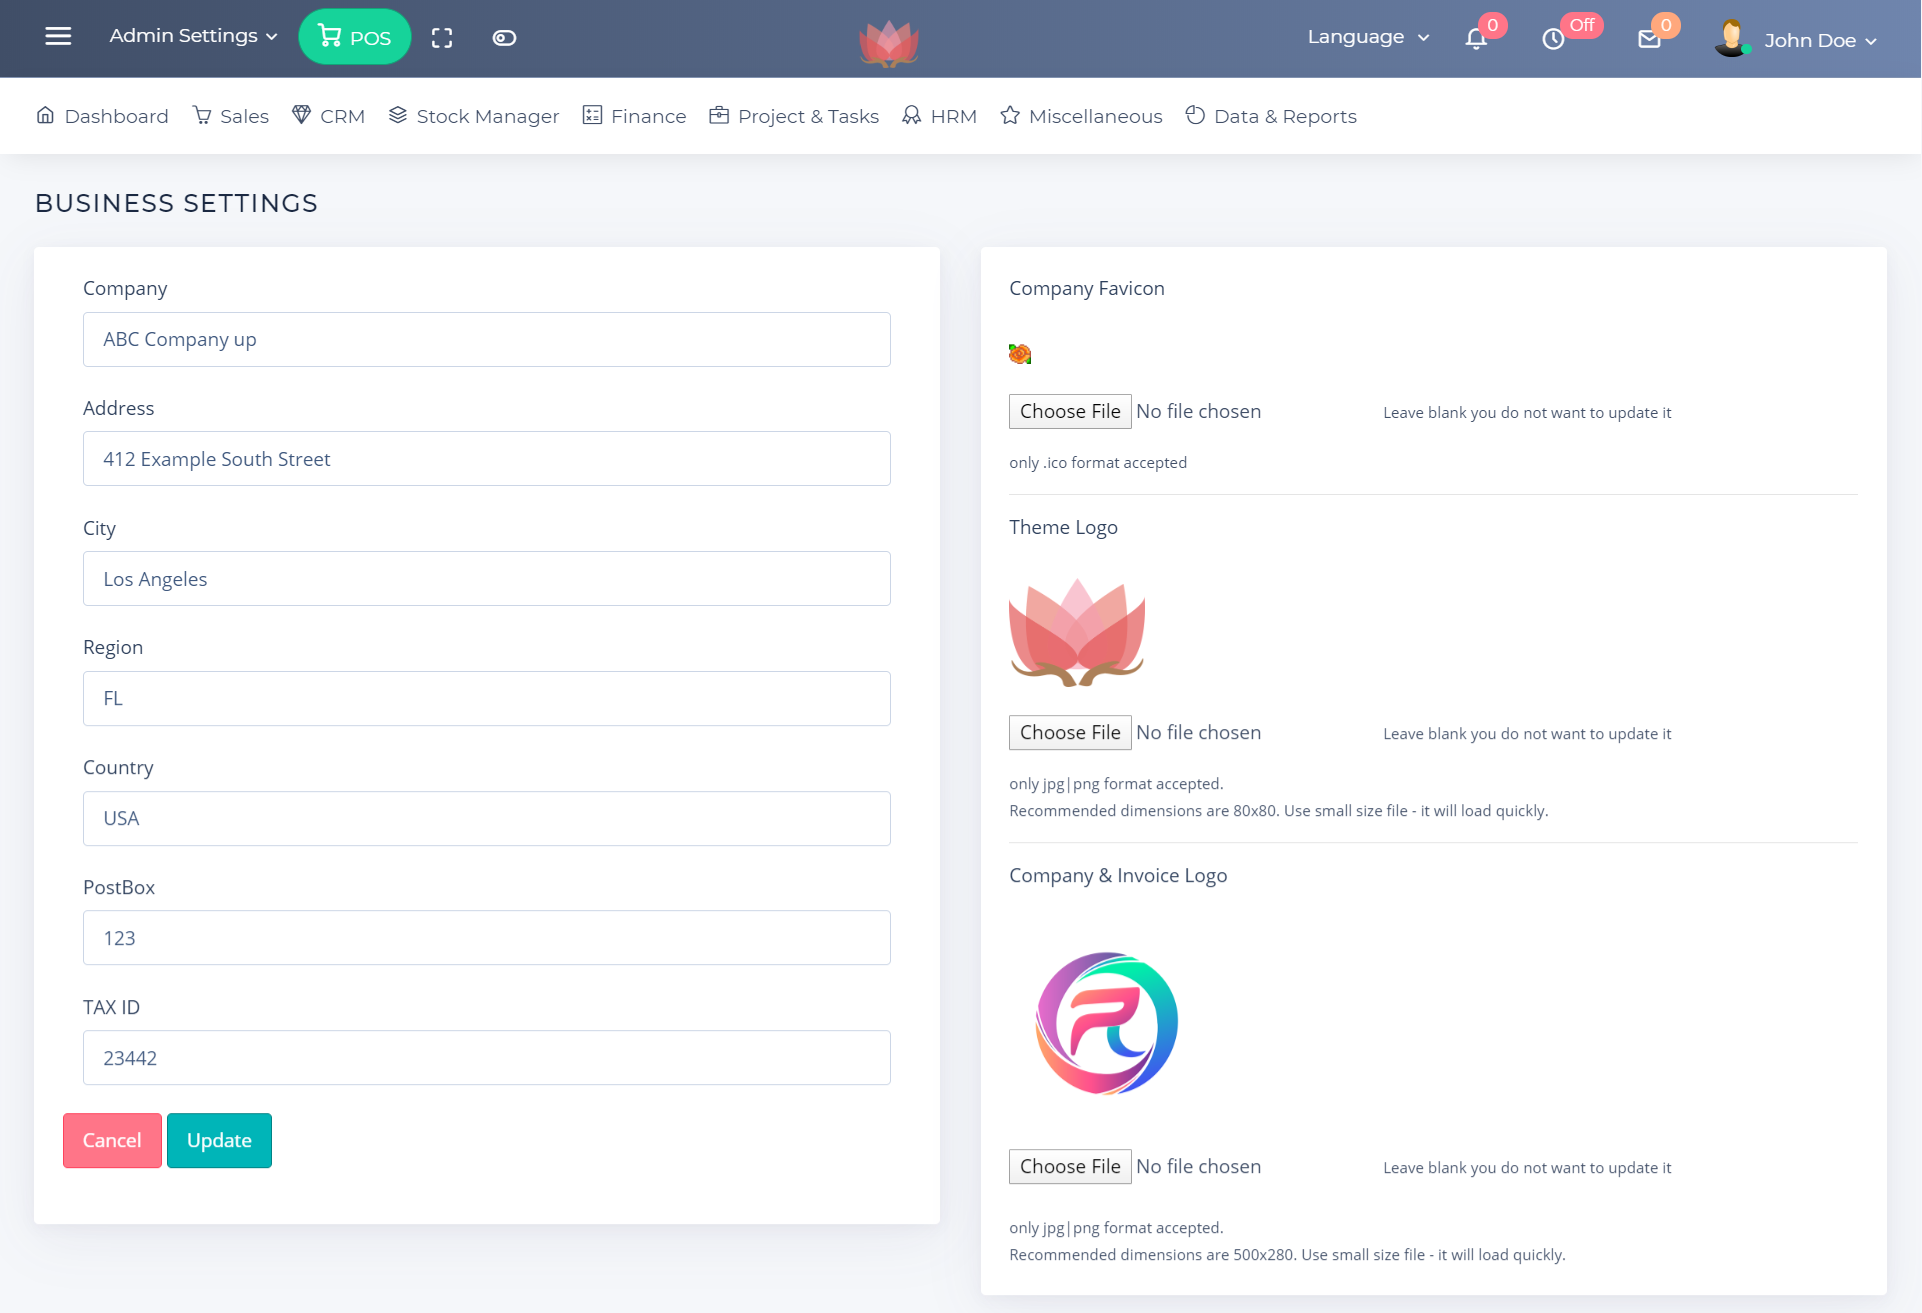
5. Business Details Setup
Admin Settings >BUSINESS SETTING
Here you can update Business Details
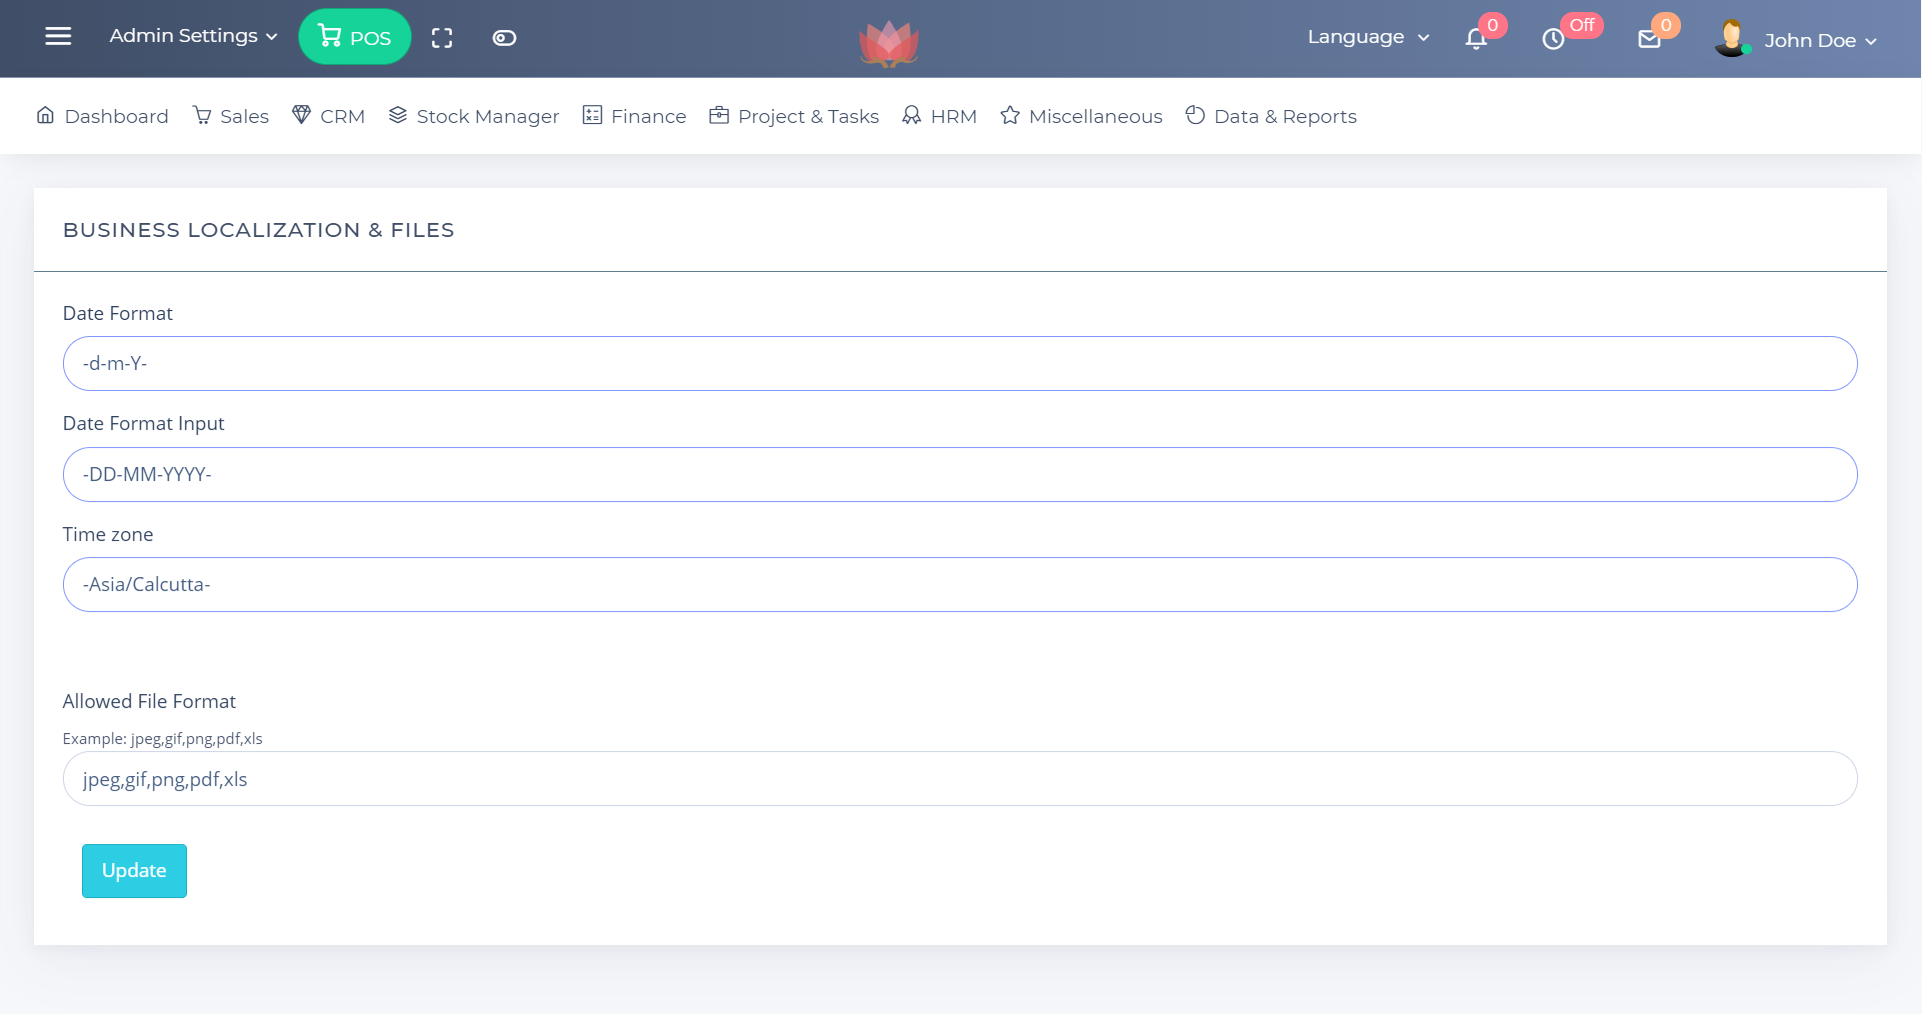
6. Localization Settings
In this section you can update your date format and timezone
7. TRANSACTION CATEGORIES
In this section you can add and update the TRANSACTION CATEGORIES. Do not delete default categorise as these are required to display some charts and calculations.
![]()
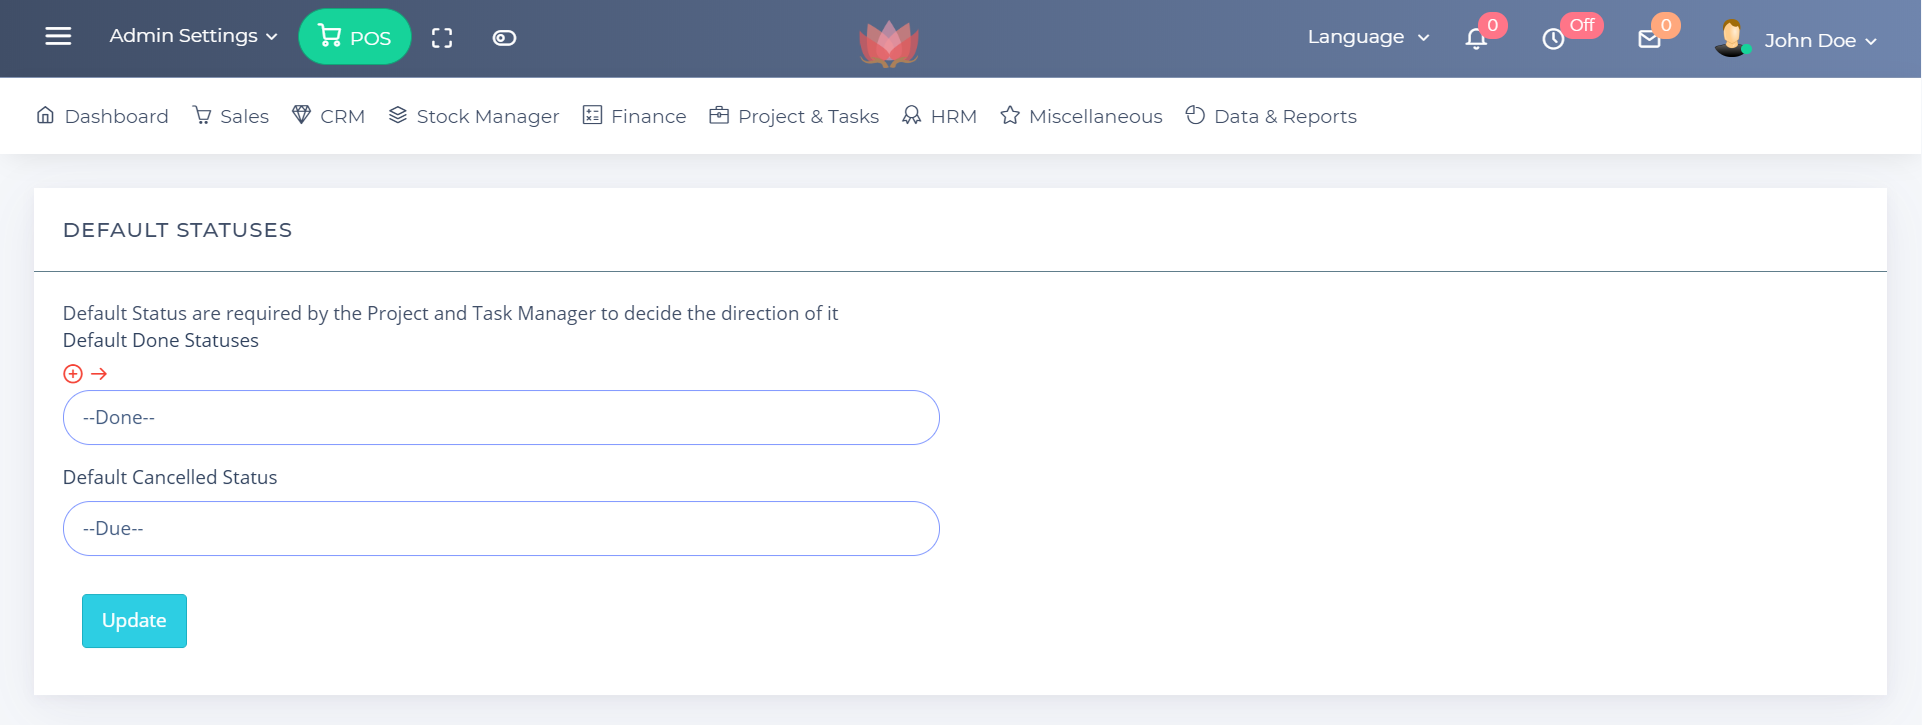
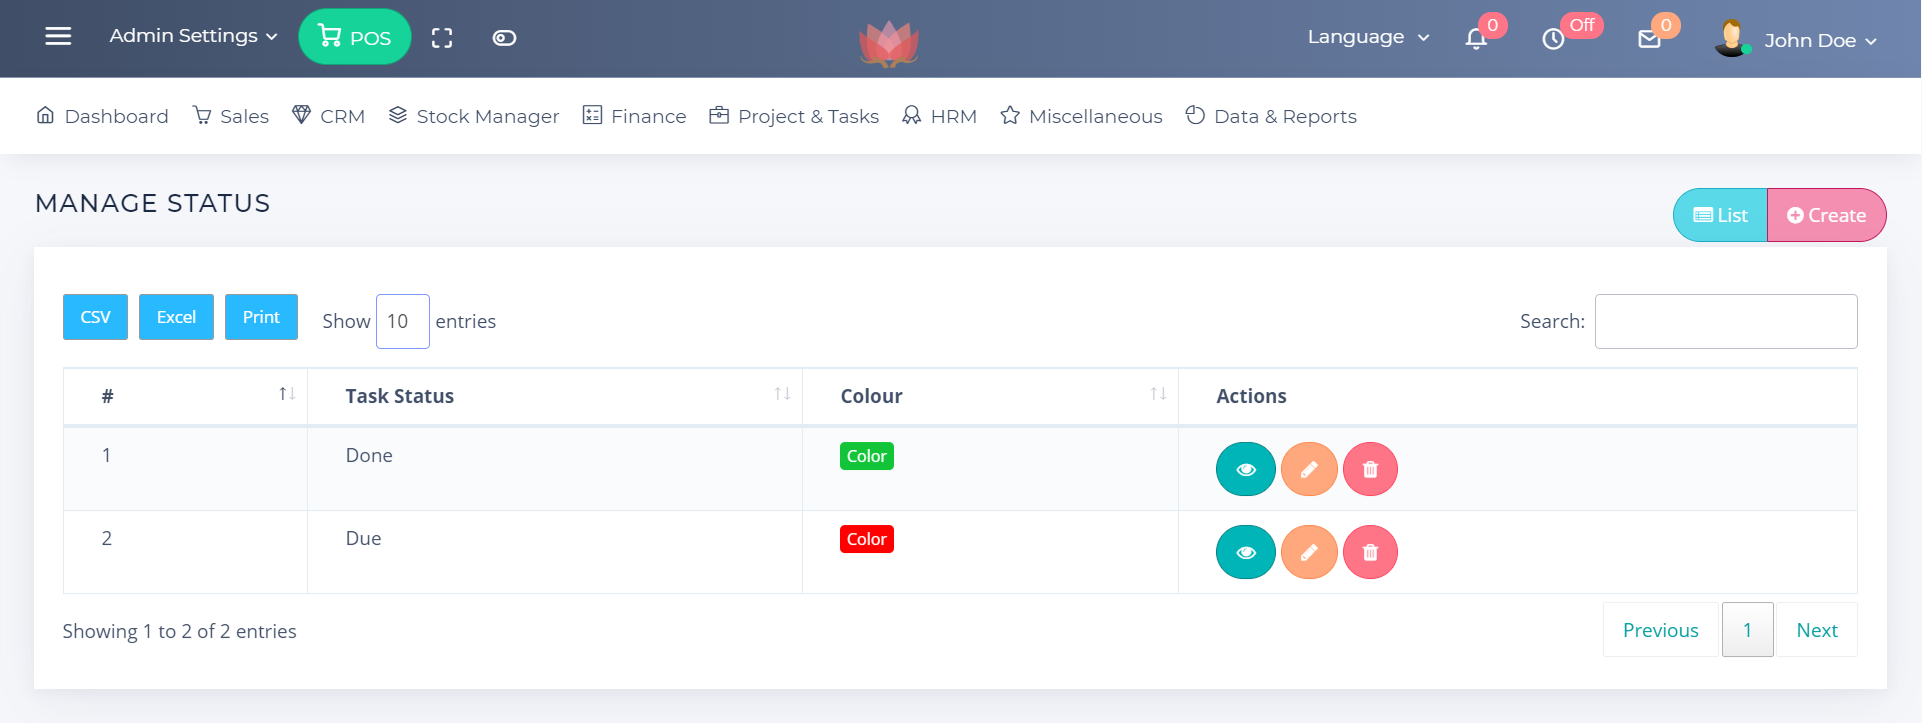
8. DEFAULT STATUSES
In this section you can add and update the Default Status.
Default Statuses are required by the Project and Task Manager to judge the direction of tasks and projects
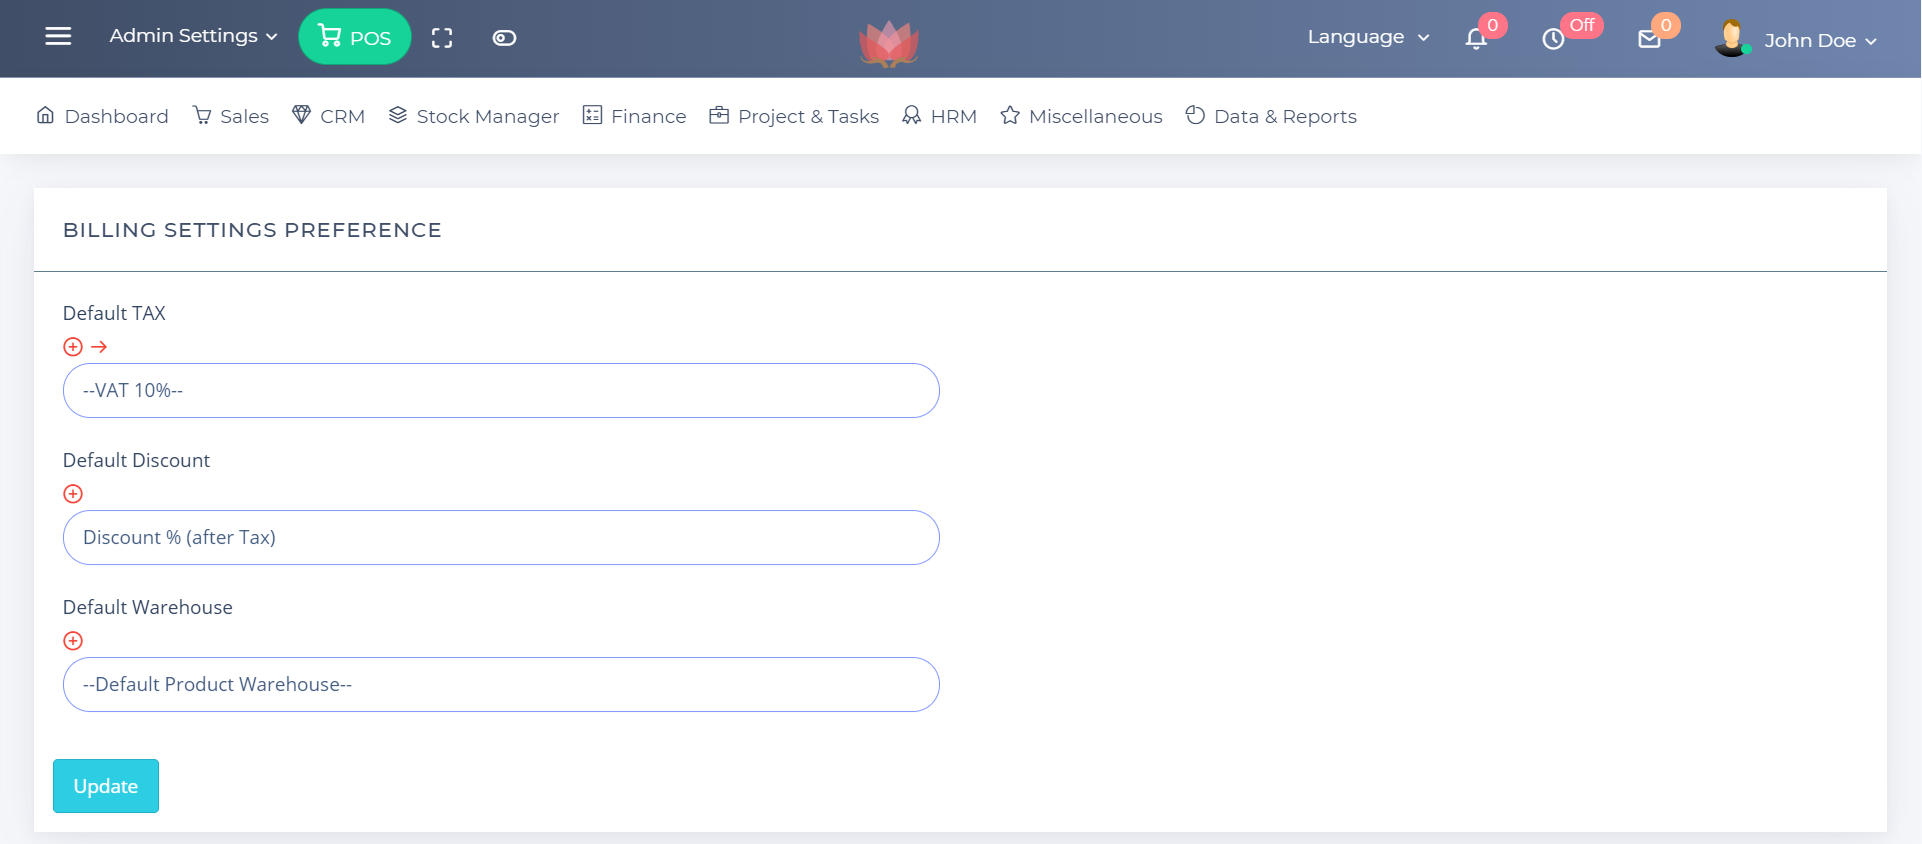
9. BILLING SETTINGS PREFERENCE
In this section you can update the Default Tax, Discount format and warehouse. To add items click on the red Plus icon.
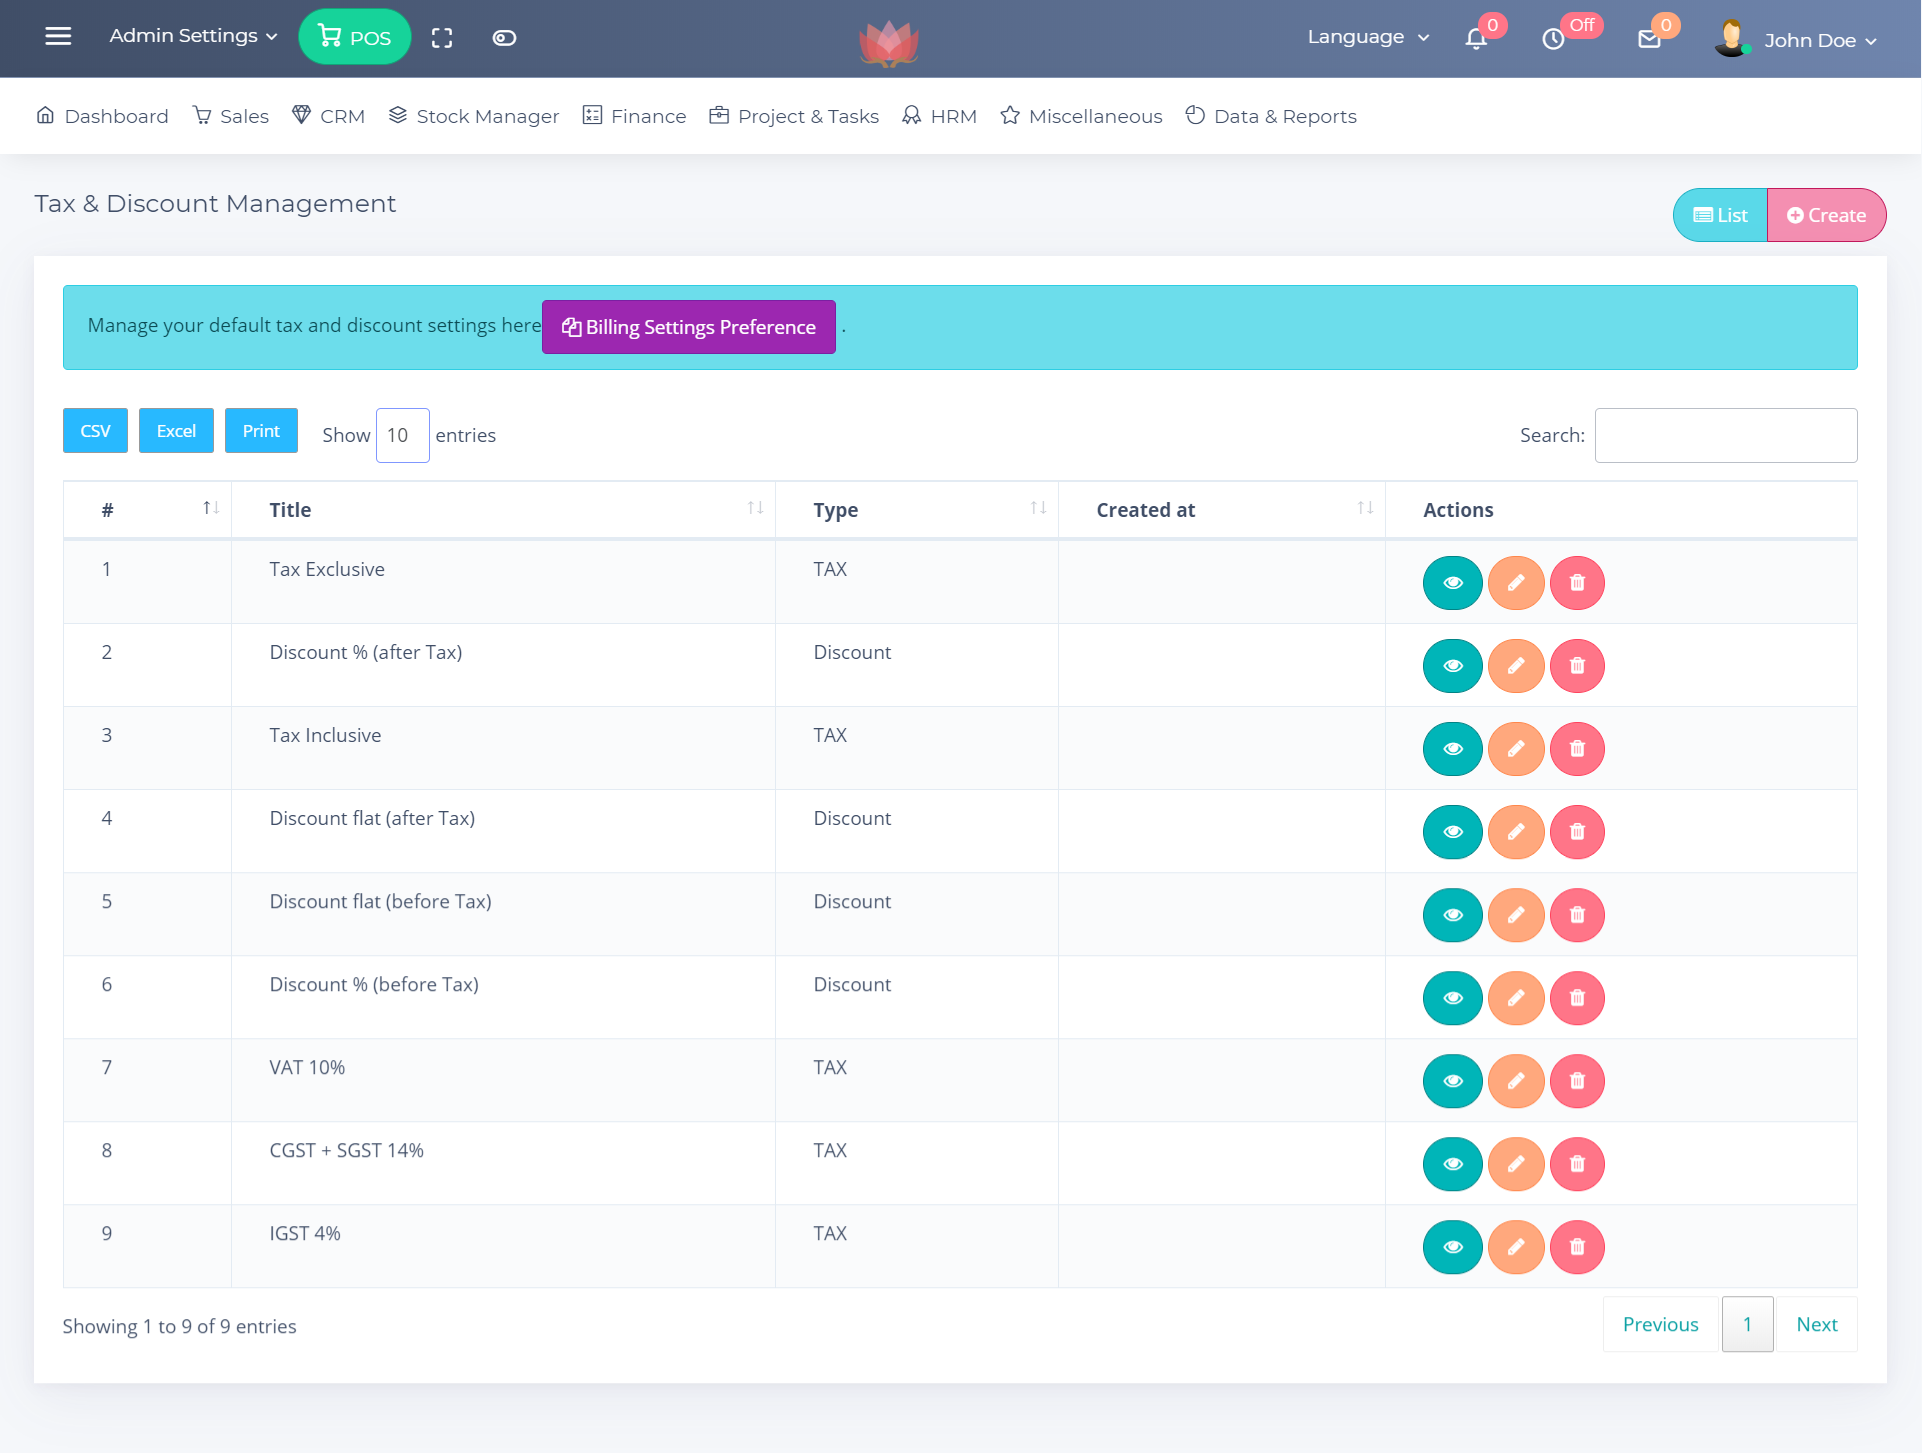
10. Tax & Discount Management
In this section you can add and update the Tax & Discount types. To set default check 8. BILLING SETTINGS PREFERENCE
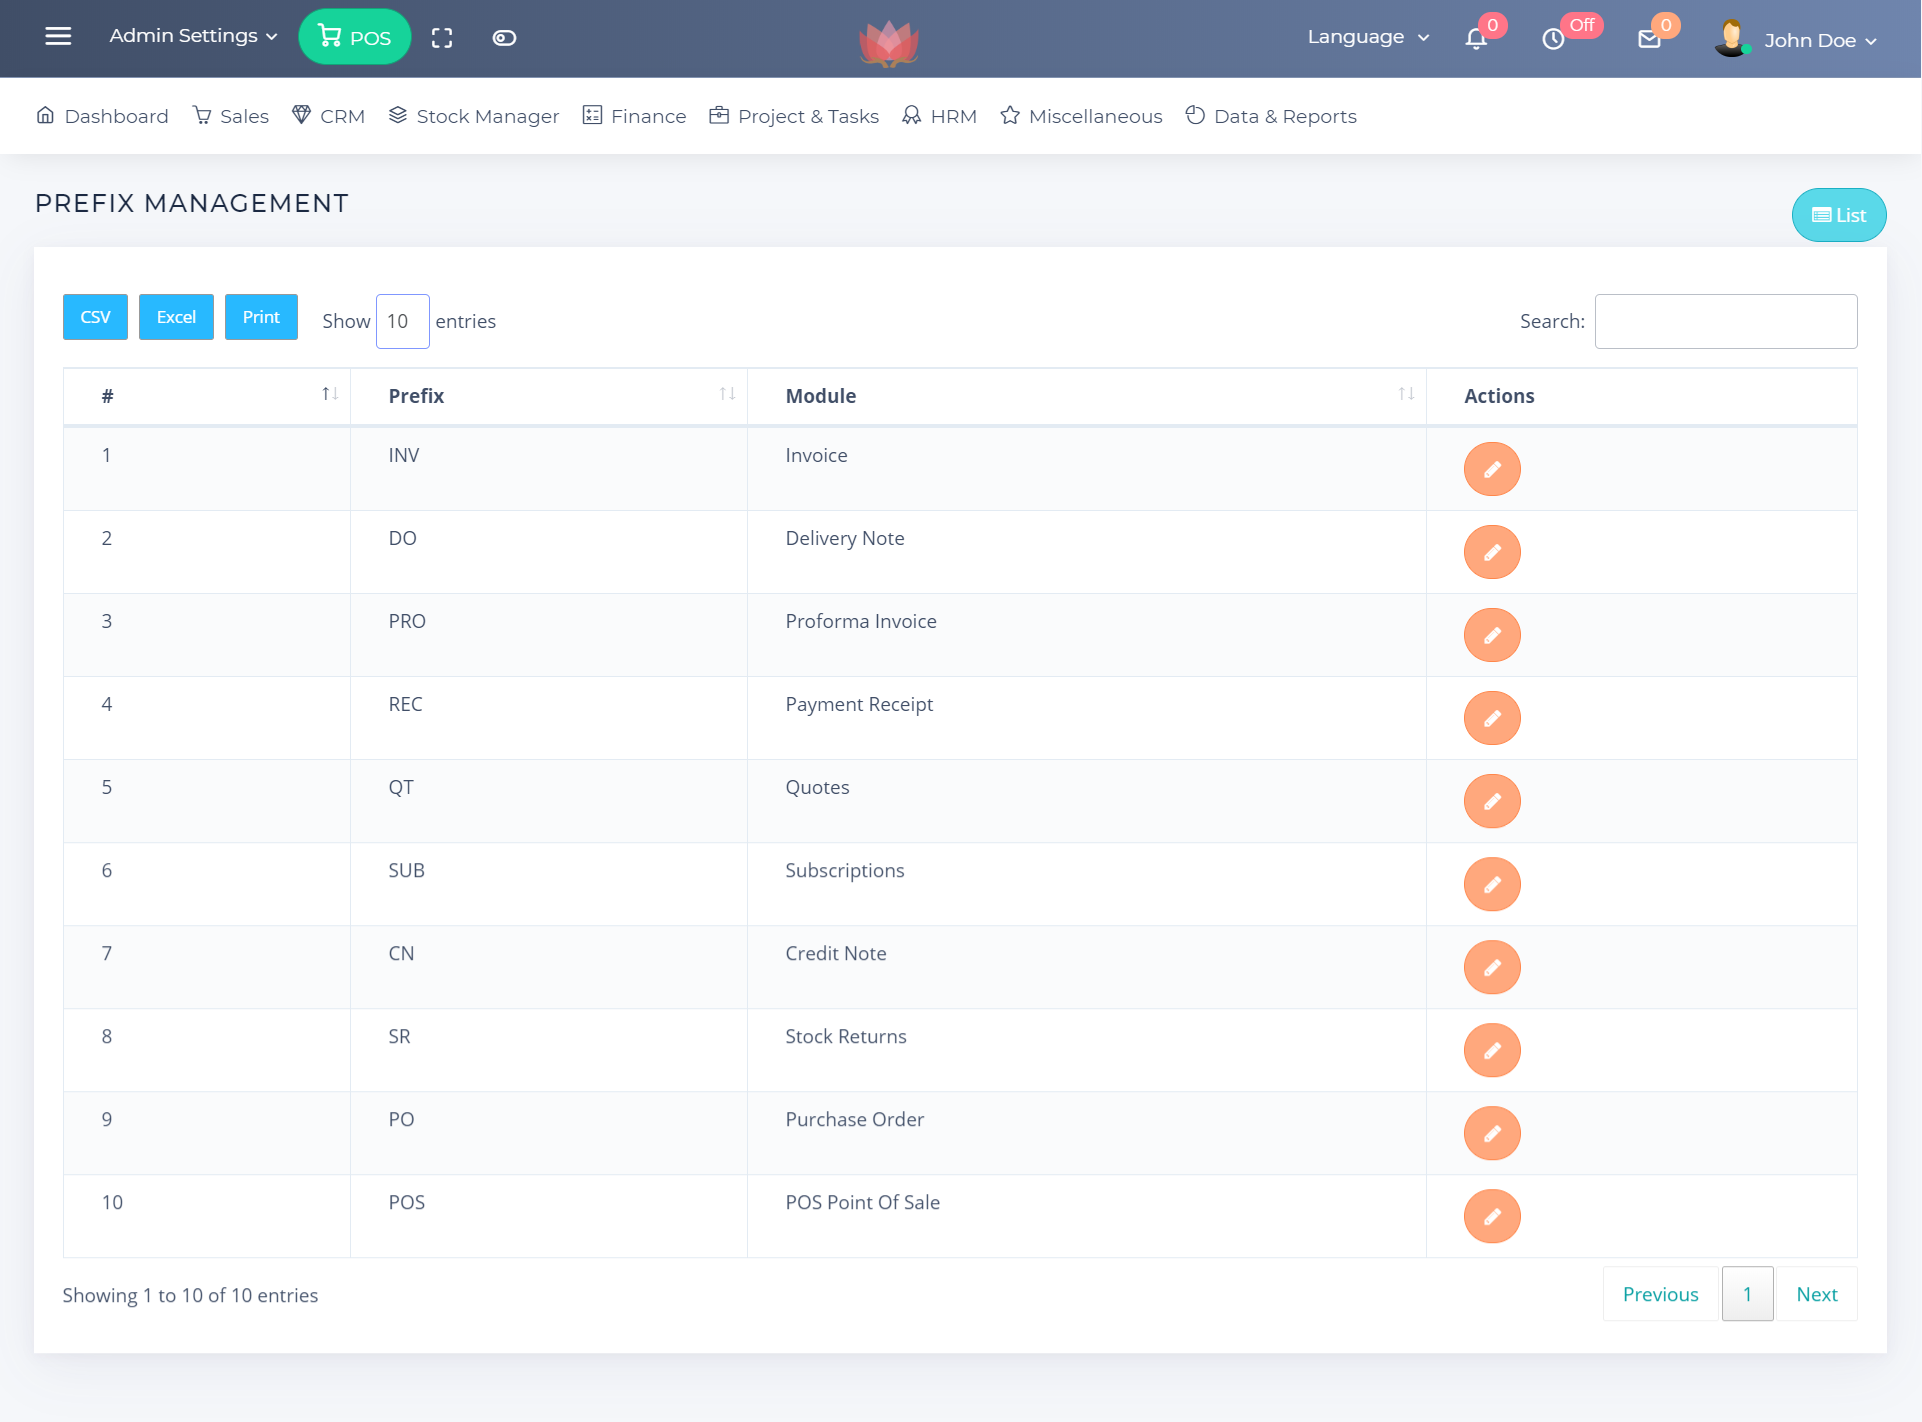
11. PREFIX MANAGEMENT
In this section you can update the Prefixes of respected modules.
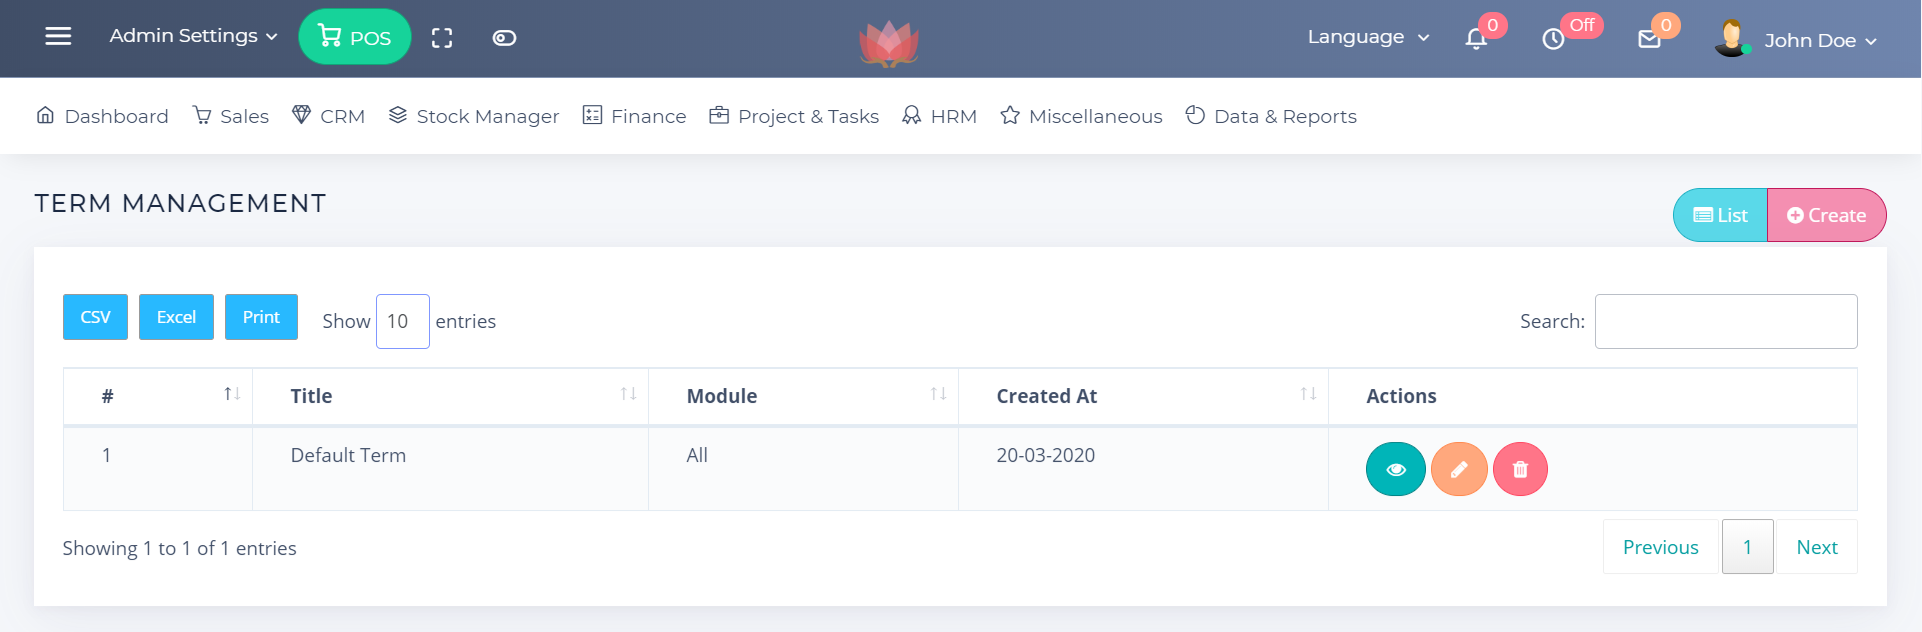
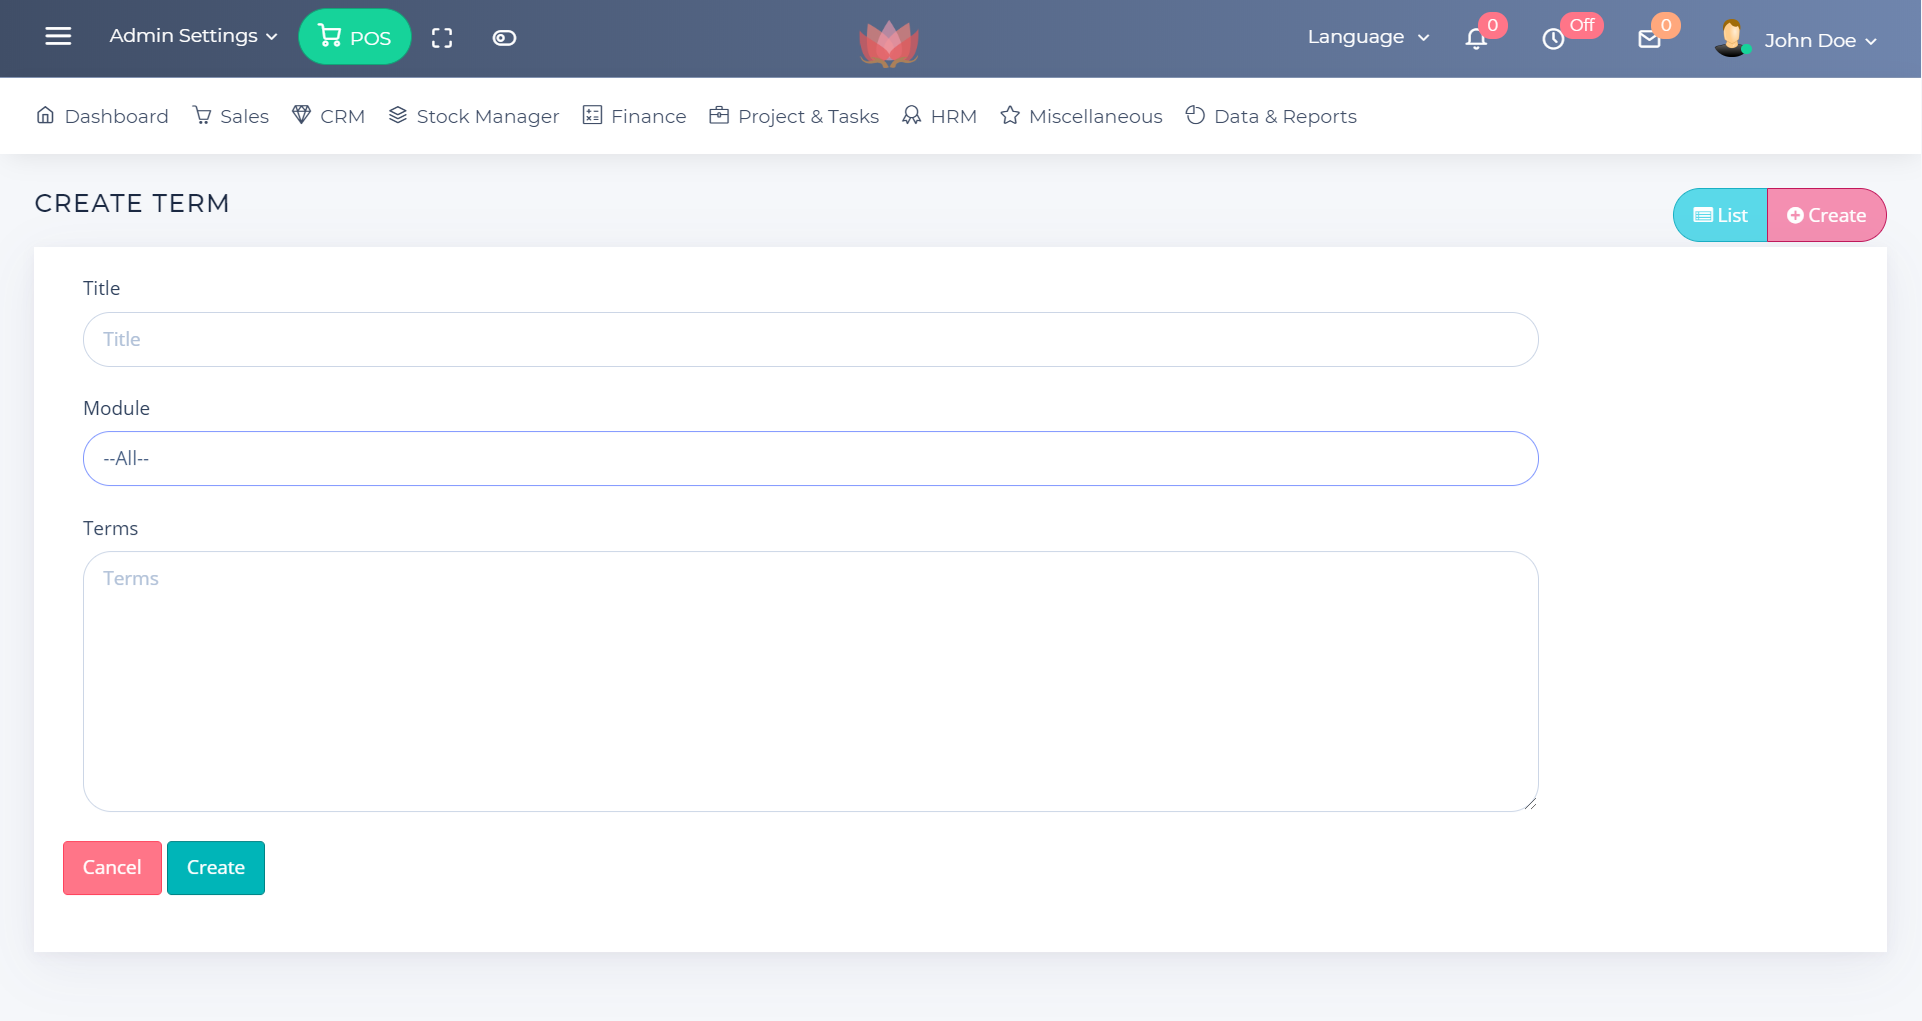
12. TERM MANAGEMENT
In this section you can manage billing terms, You can select module for the terms
13. POS PREFERENCE
Go to POS Here
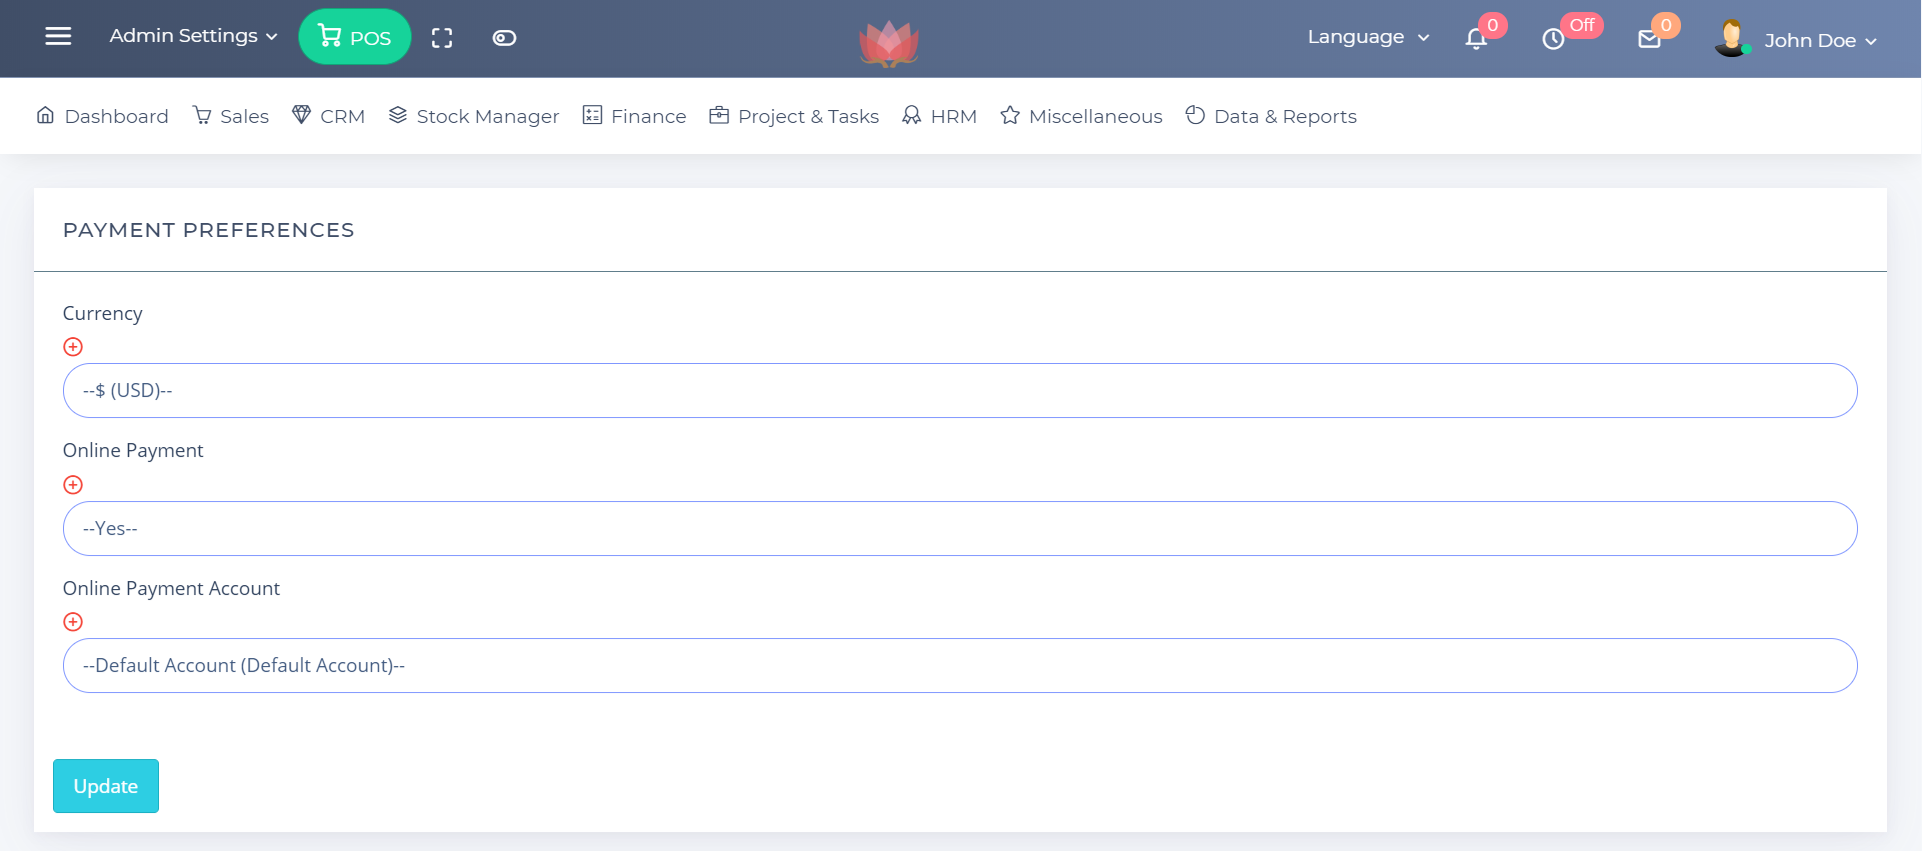
14. PAYMENT PREFERENCES
In this section you can set
- Currency - your default business currency for invoices and
other bills
- Online payment - It will add a card payment button on invoices public preview
- Online payment Account - The online paid amount will reflect in the selected account.
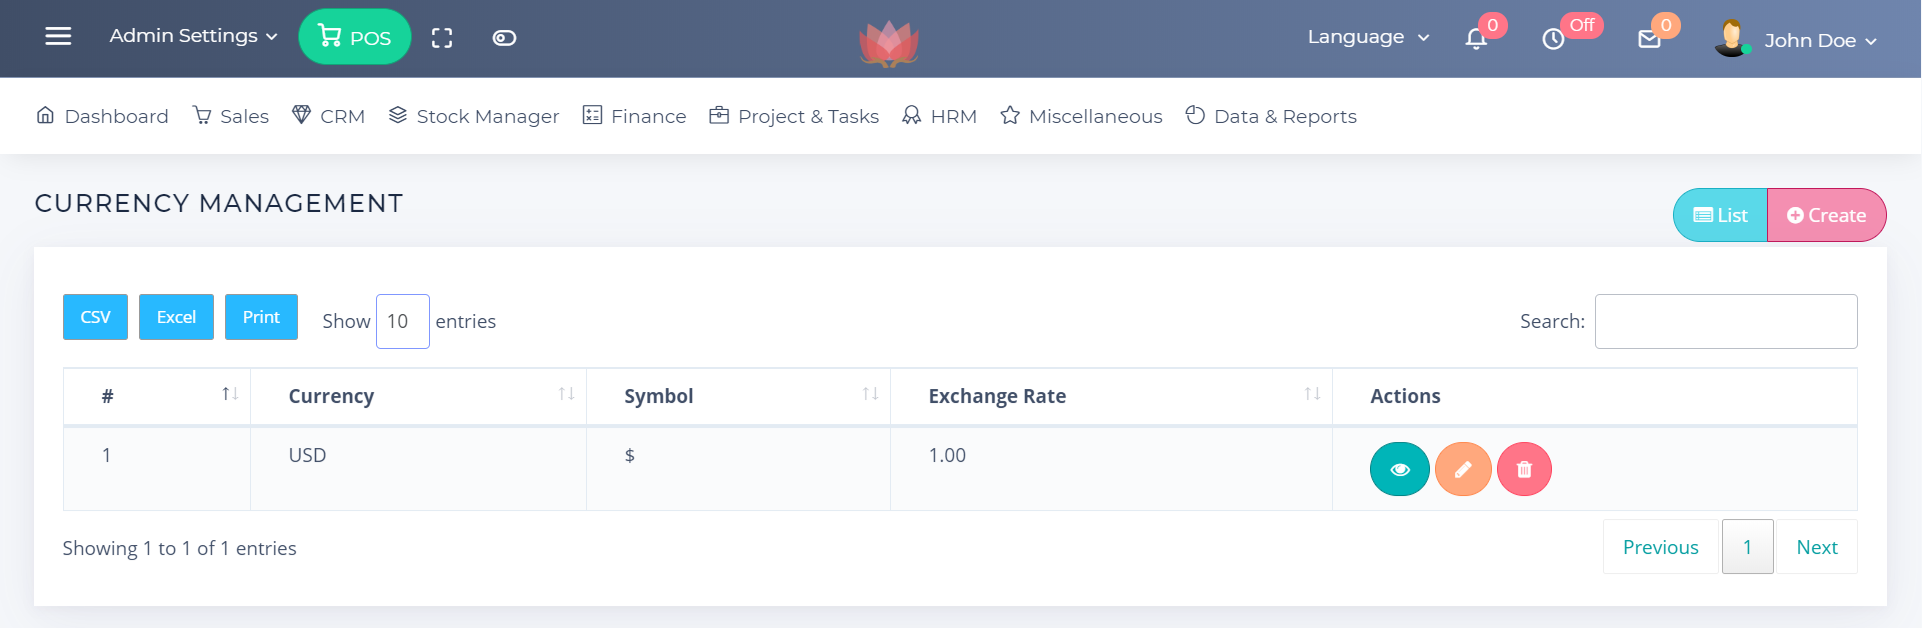
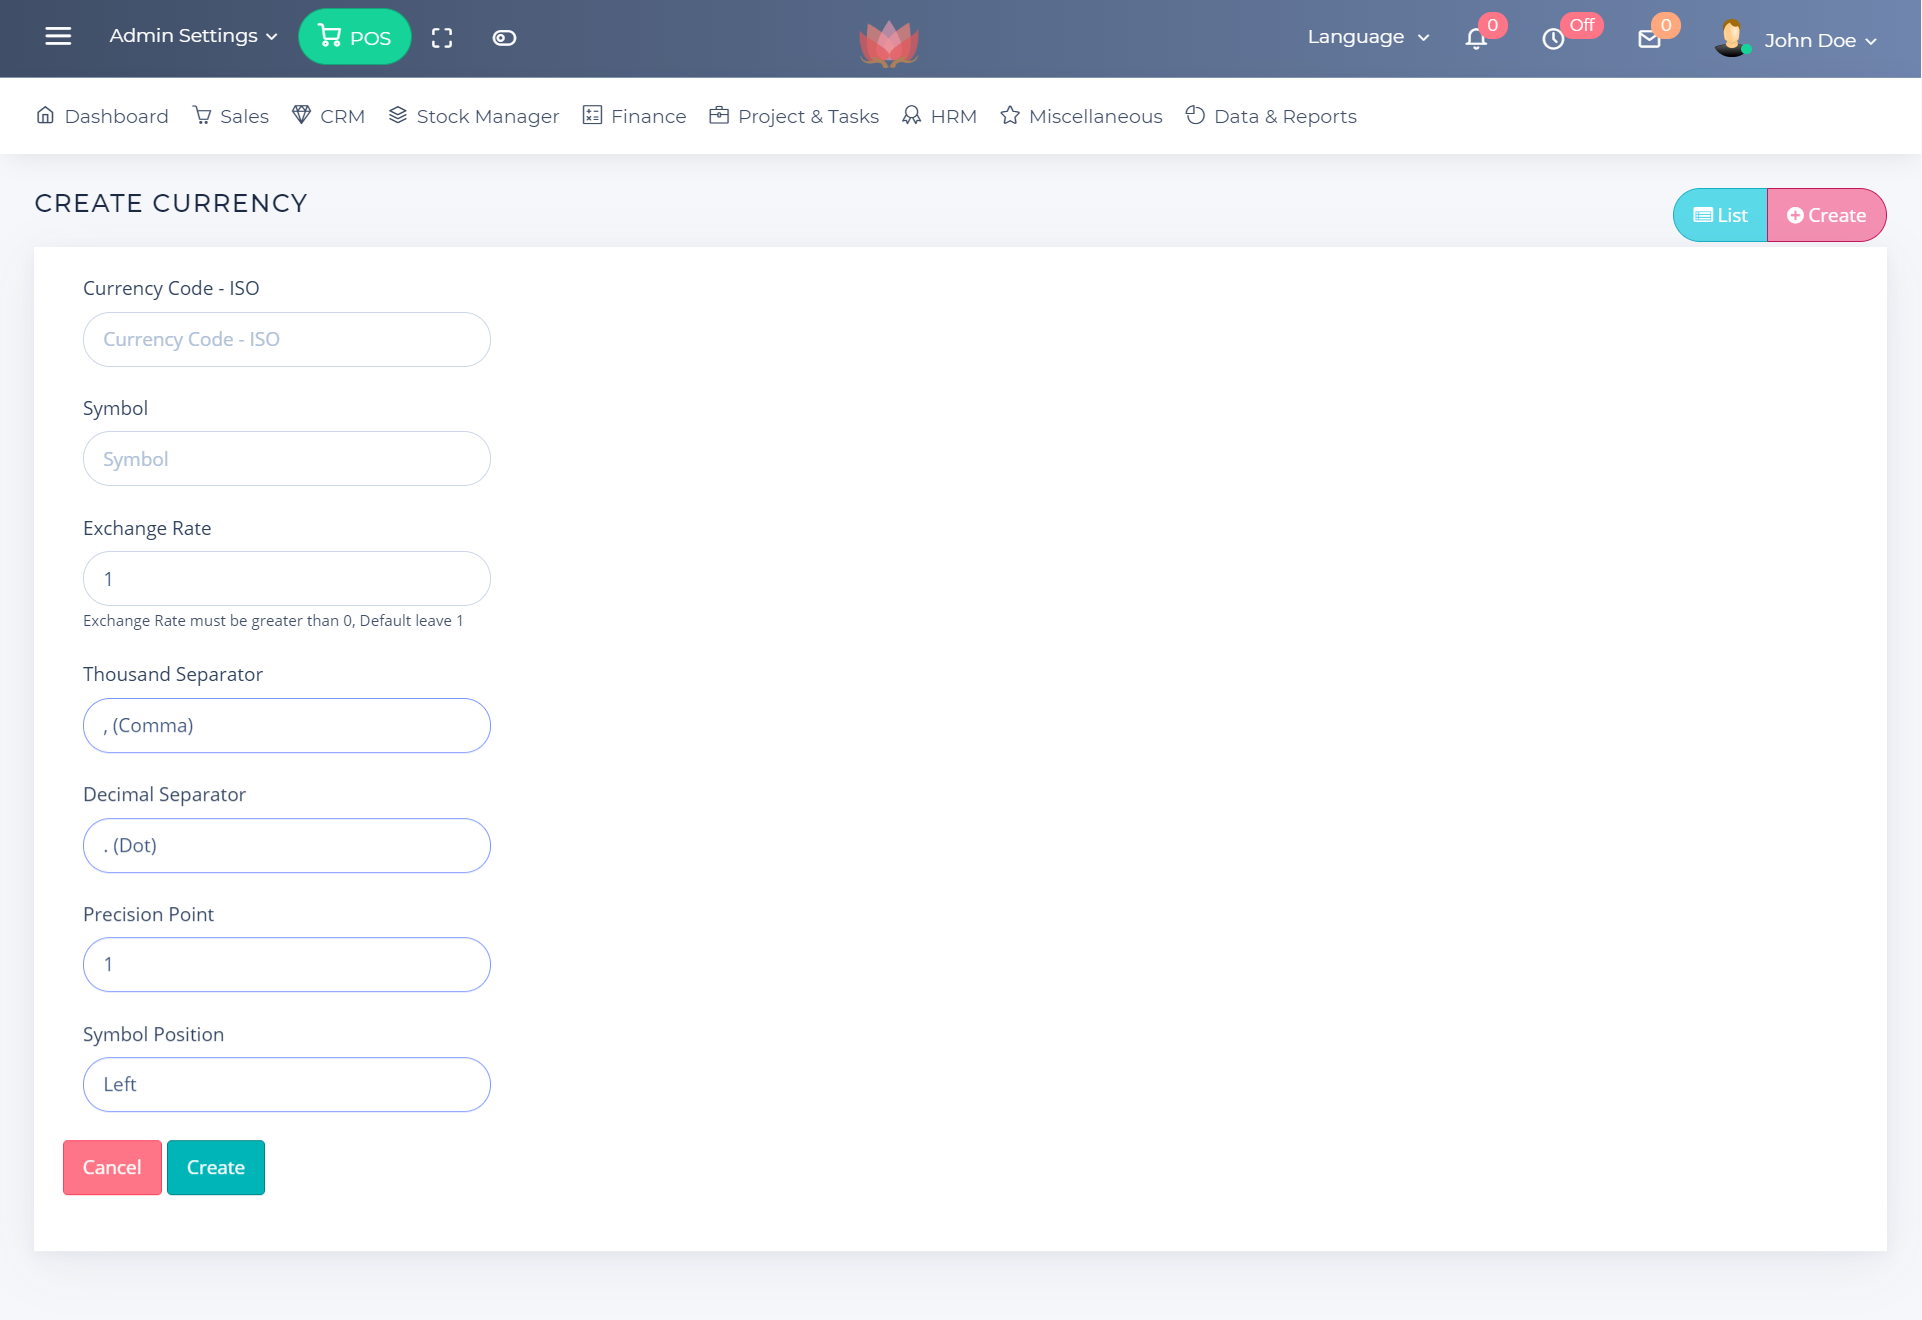
15. CURRENCY MANAGEMENT
In this section you can multiple currencies
- you can select these currencies during invoice
and bill creation.
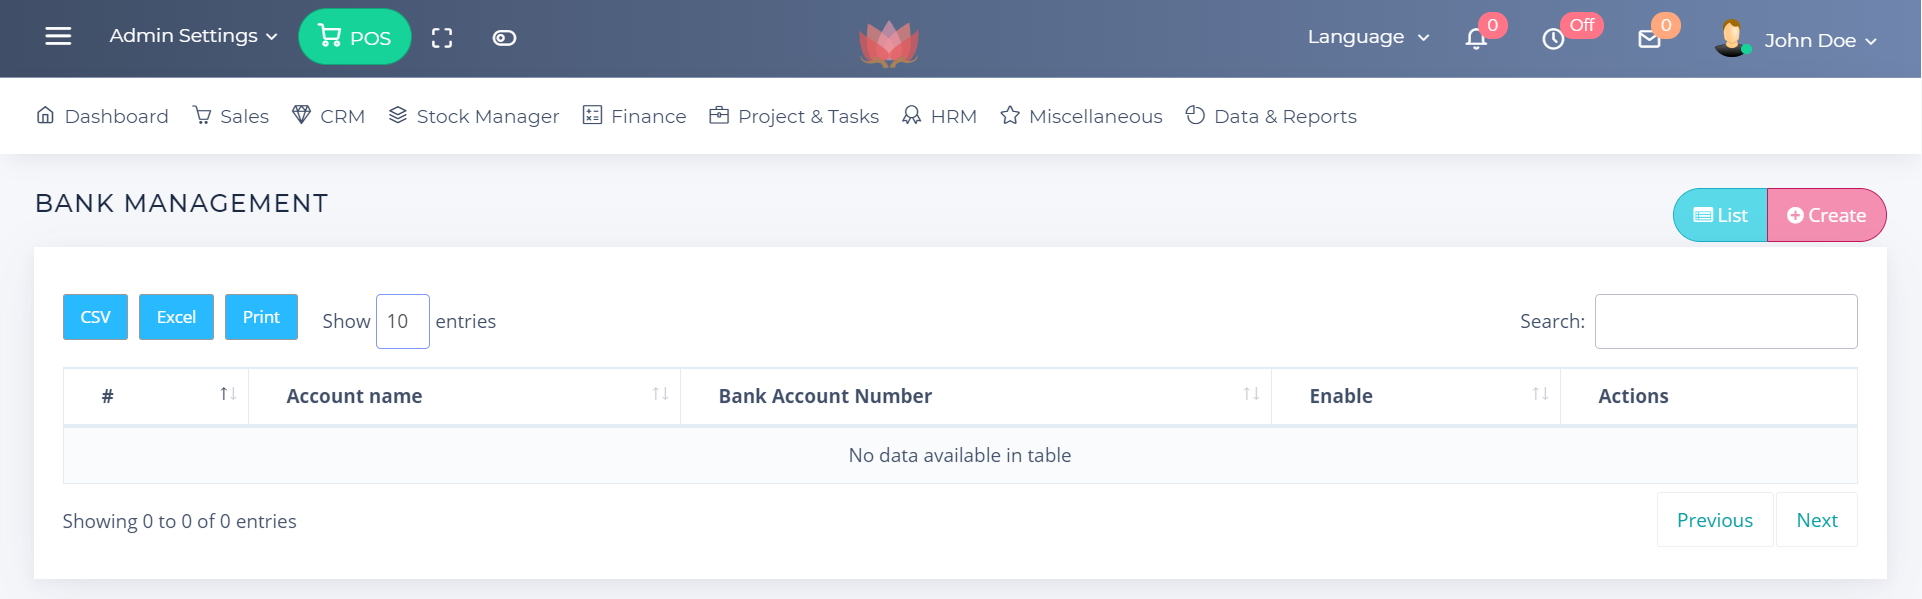
16. BANK MANAGEMENT
In this section you can add banks account
- You customer can view these bank account details
on the public preview of invoices.
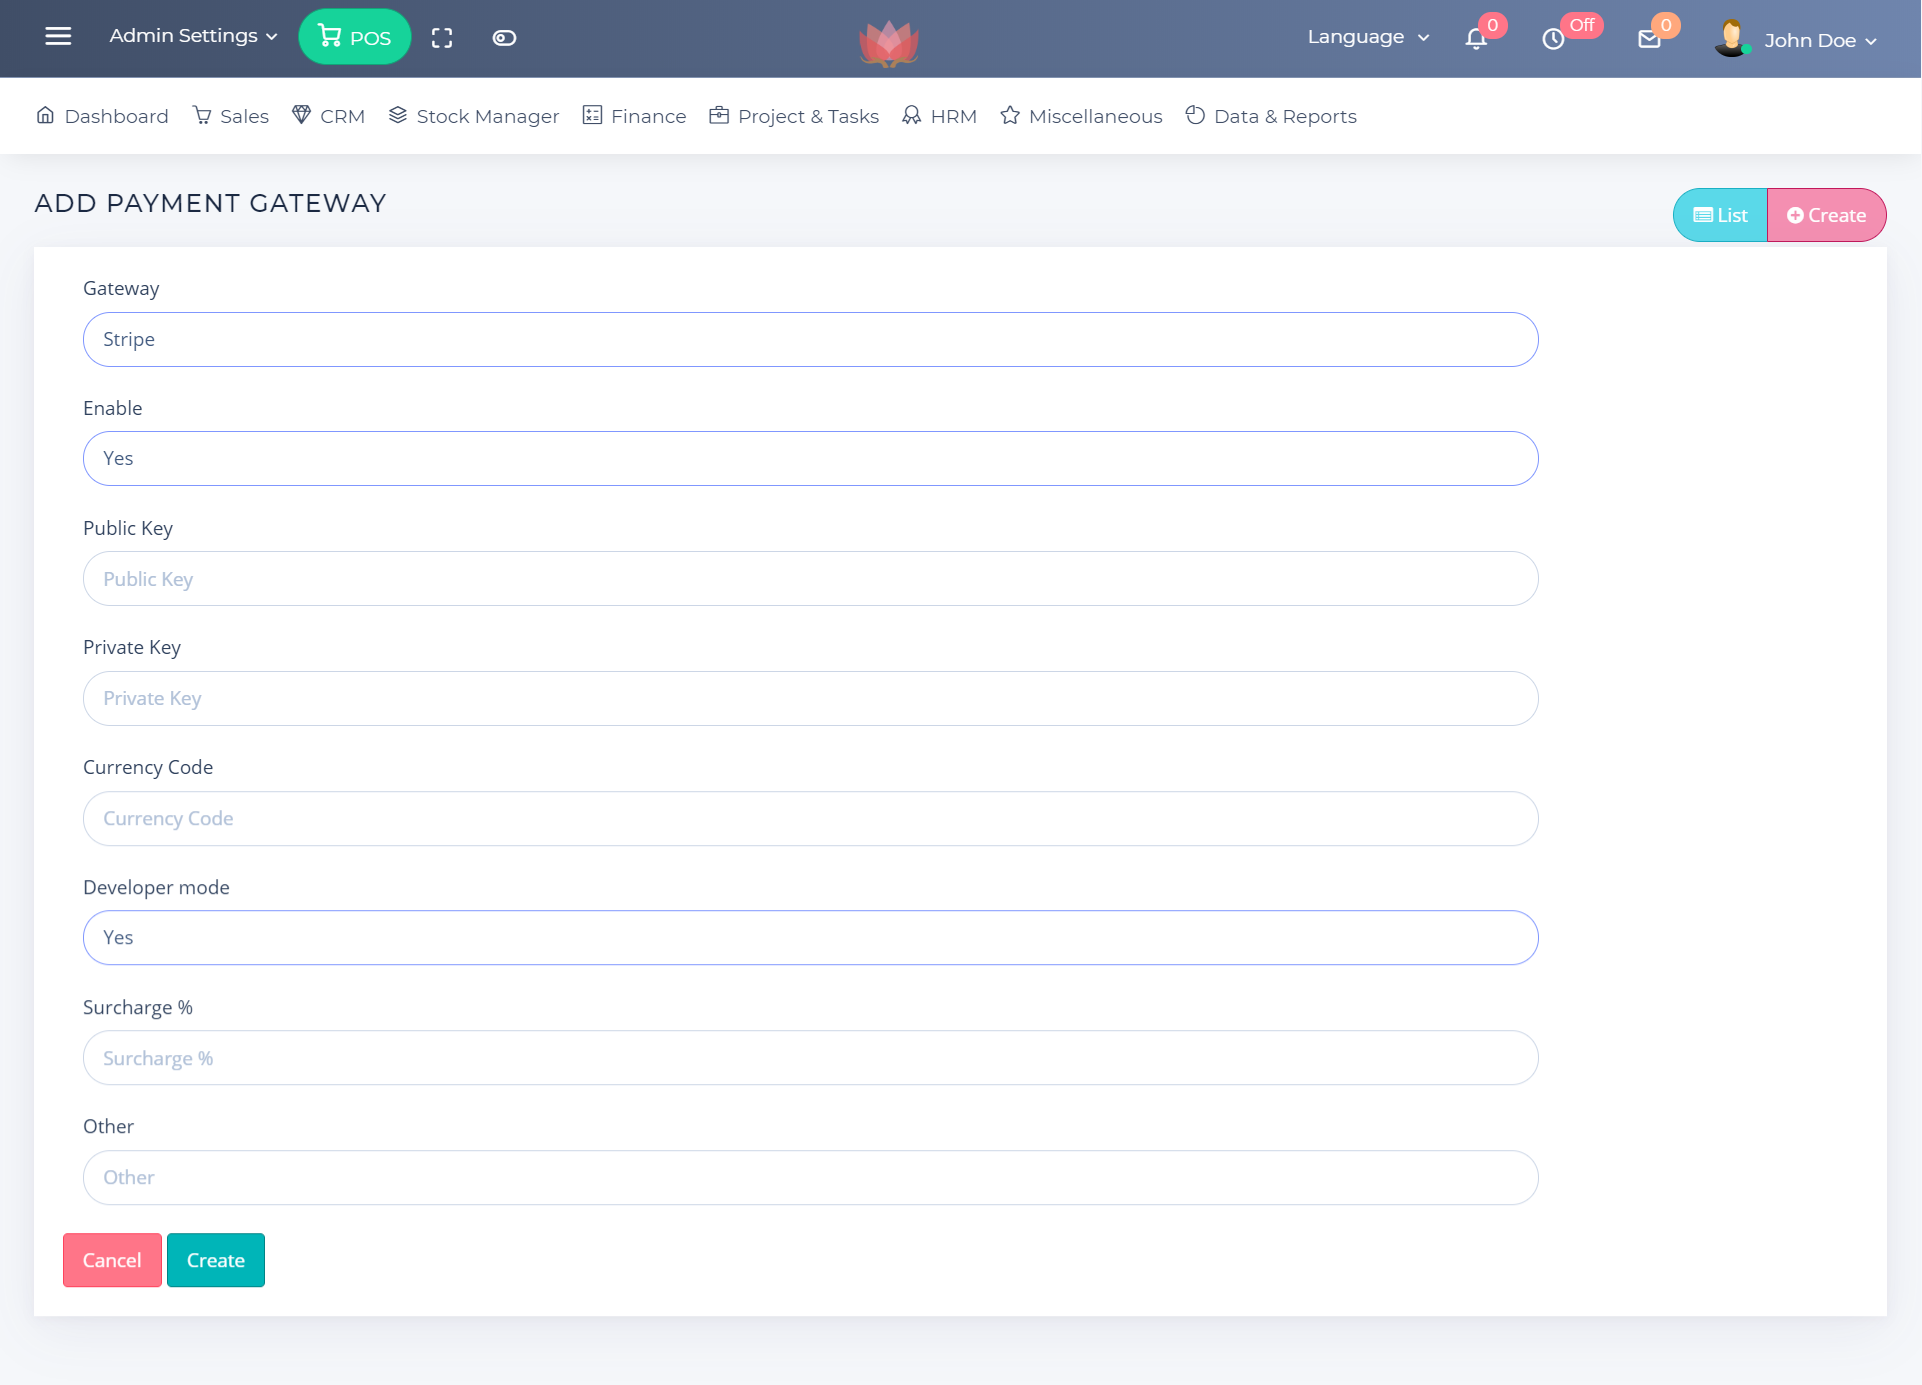
17. Payment Gateways
In this section you can add Payment Gateways
- You customer can pay with these gateways on
the public preview of invoices.
At time of the release of the app Paypal and Stripe are added but in future, you may see more gateways
A. Stripe Setup
- Create a stripe account and login
- Go to developers section and obtain public key and private key and enter them on respected fields
- Currency Code - as per your location and account
- Surcharge - you can add to manage your gateways charges
- Other - the field can be ignored
A. Paypal Setup
- Create a stripe account and login (Developer should create a sandbox account)
- Go to Paypal developers section and create an app
- After app creation you will receive Paypal client id and secret
- Surcharge - you can add to manage your gateways charges
- Other - the field can be ignored

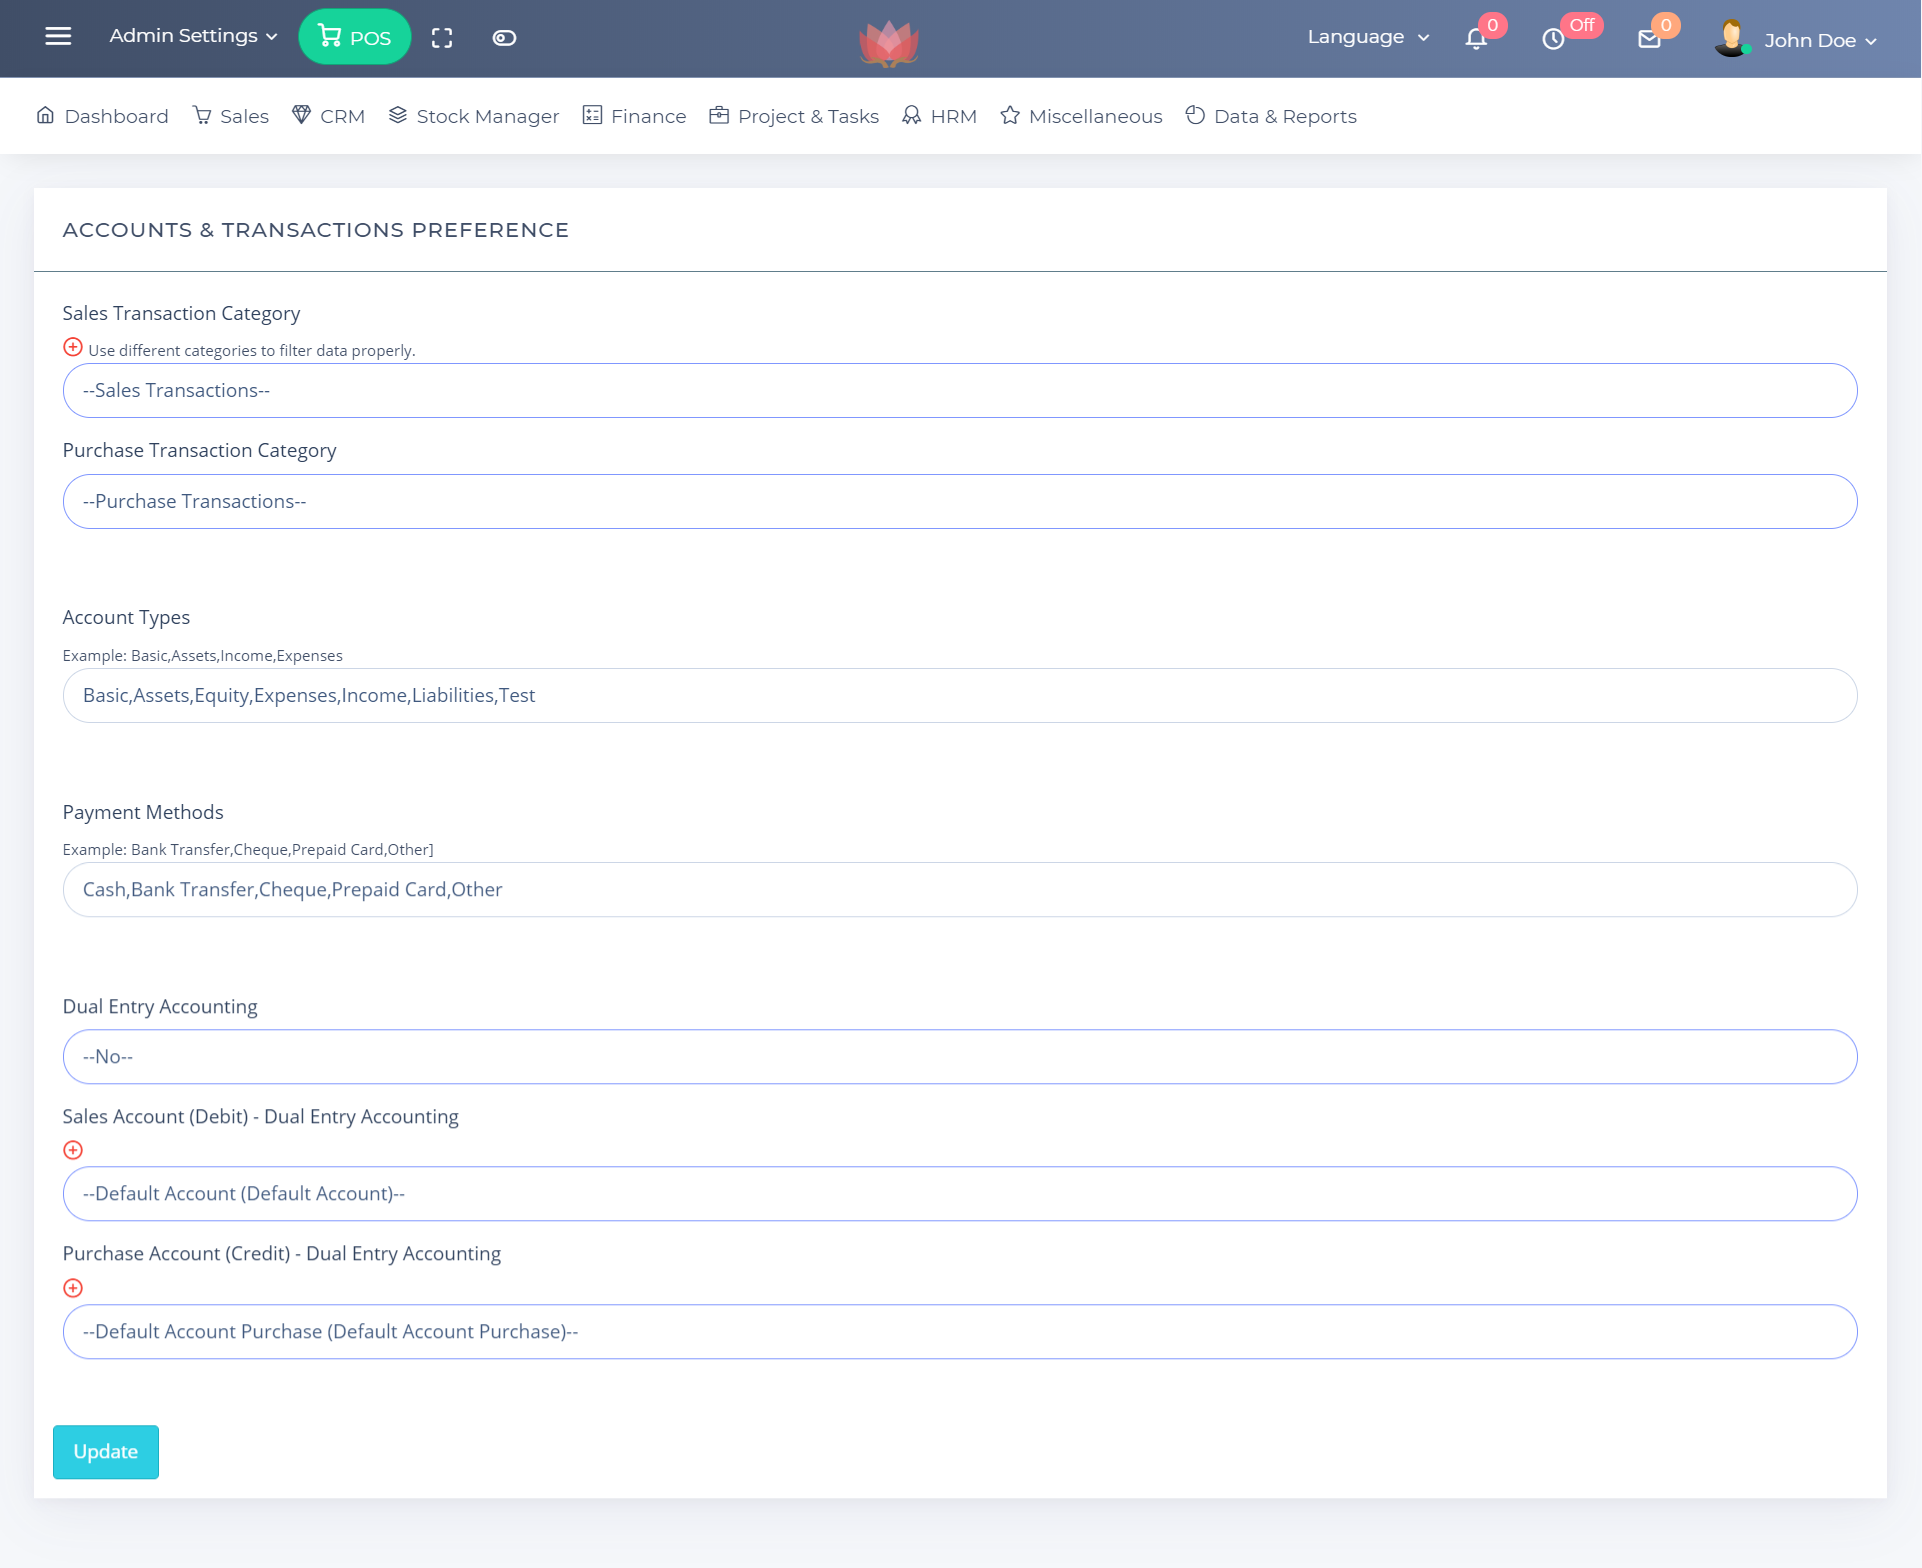
18. ACCOUNTS & TRANSACTIONS PREFERENCE
In this section you can set
- Sales Transaction Category - your default business Sales
Transaction Category for invoices
- Purchase Transaction Category - your default business
Purchase Transaction Category for Purchase orders
- Account Types - Example:
Basic,Assets,Income,Expenses, these can be used during accout creation
- Payment Methods - Example: Cash,Bank Transfer,Cheque,Prepaid Card,Other
- Dual Entry Accounting - It will create a secondary transaction in selected account
19. EMAIL SETTINGS & Sms Gateway
Rose application utilize SMTP protocol to send its all emails including (invoice notifications, user password reset). You must configure SMTP correctly to send emails.
EMAIL SETTINGS
A. Email System :Use Default System Settings
If you are using this option than you must set
the details in your_project> .env file
- Open you project directory
- Here you will get
.env(if you are not able to view file , please enable to show the hidden dot files in your file manager)
MAIL_DRIVER = smtp
MAIL_HOST = smtp.yourserver.com
MAIL_PORT = 587
MAIL_FROM = use@yourserver.com
MAIL_FROM_NAME = User
MAIL_USERNAME = your_smtp_user_name
MAIL_PASSWORD = your_smtp_user_password
MAIL_ENCRYPTION = null
B. Use Custom SMTP Settings
Email Sending & Communication Errors
Please do not send support requests regarding your SMTP configuration. the
application has a perfectly tested SMTP integration so check your server credentials and configuration.
If send email is not working you can create a test SMTP account here https://mailtrap.io/
as well can try
some SMTP diagnostic tools, user of G Suite may face error in sending if their hosting company
is not allowing the communication, in this case you can contact you hosting provider
Try to
switch you port from 465 SSL to 587 TLS
Special Case: For a user, SMTP settings are working for general client-side desktop and mobile applications but not for the Rose Billing
- The Rose billing needs a server to server communication and that can be restricted by your hosting provider or email service provider, it is different from server to client app communication.
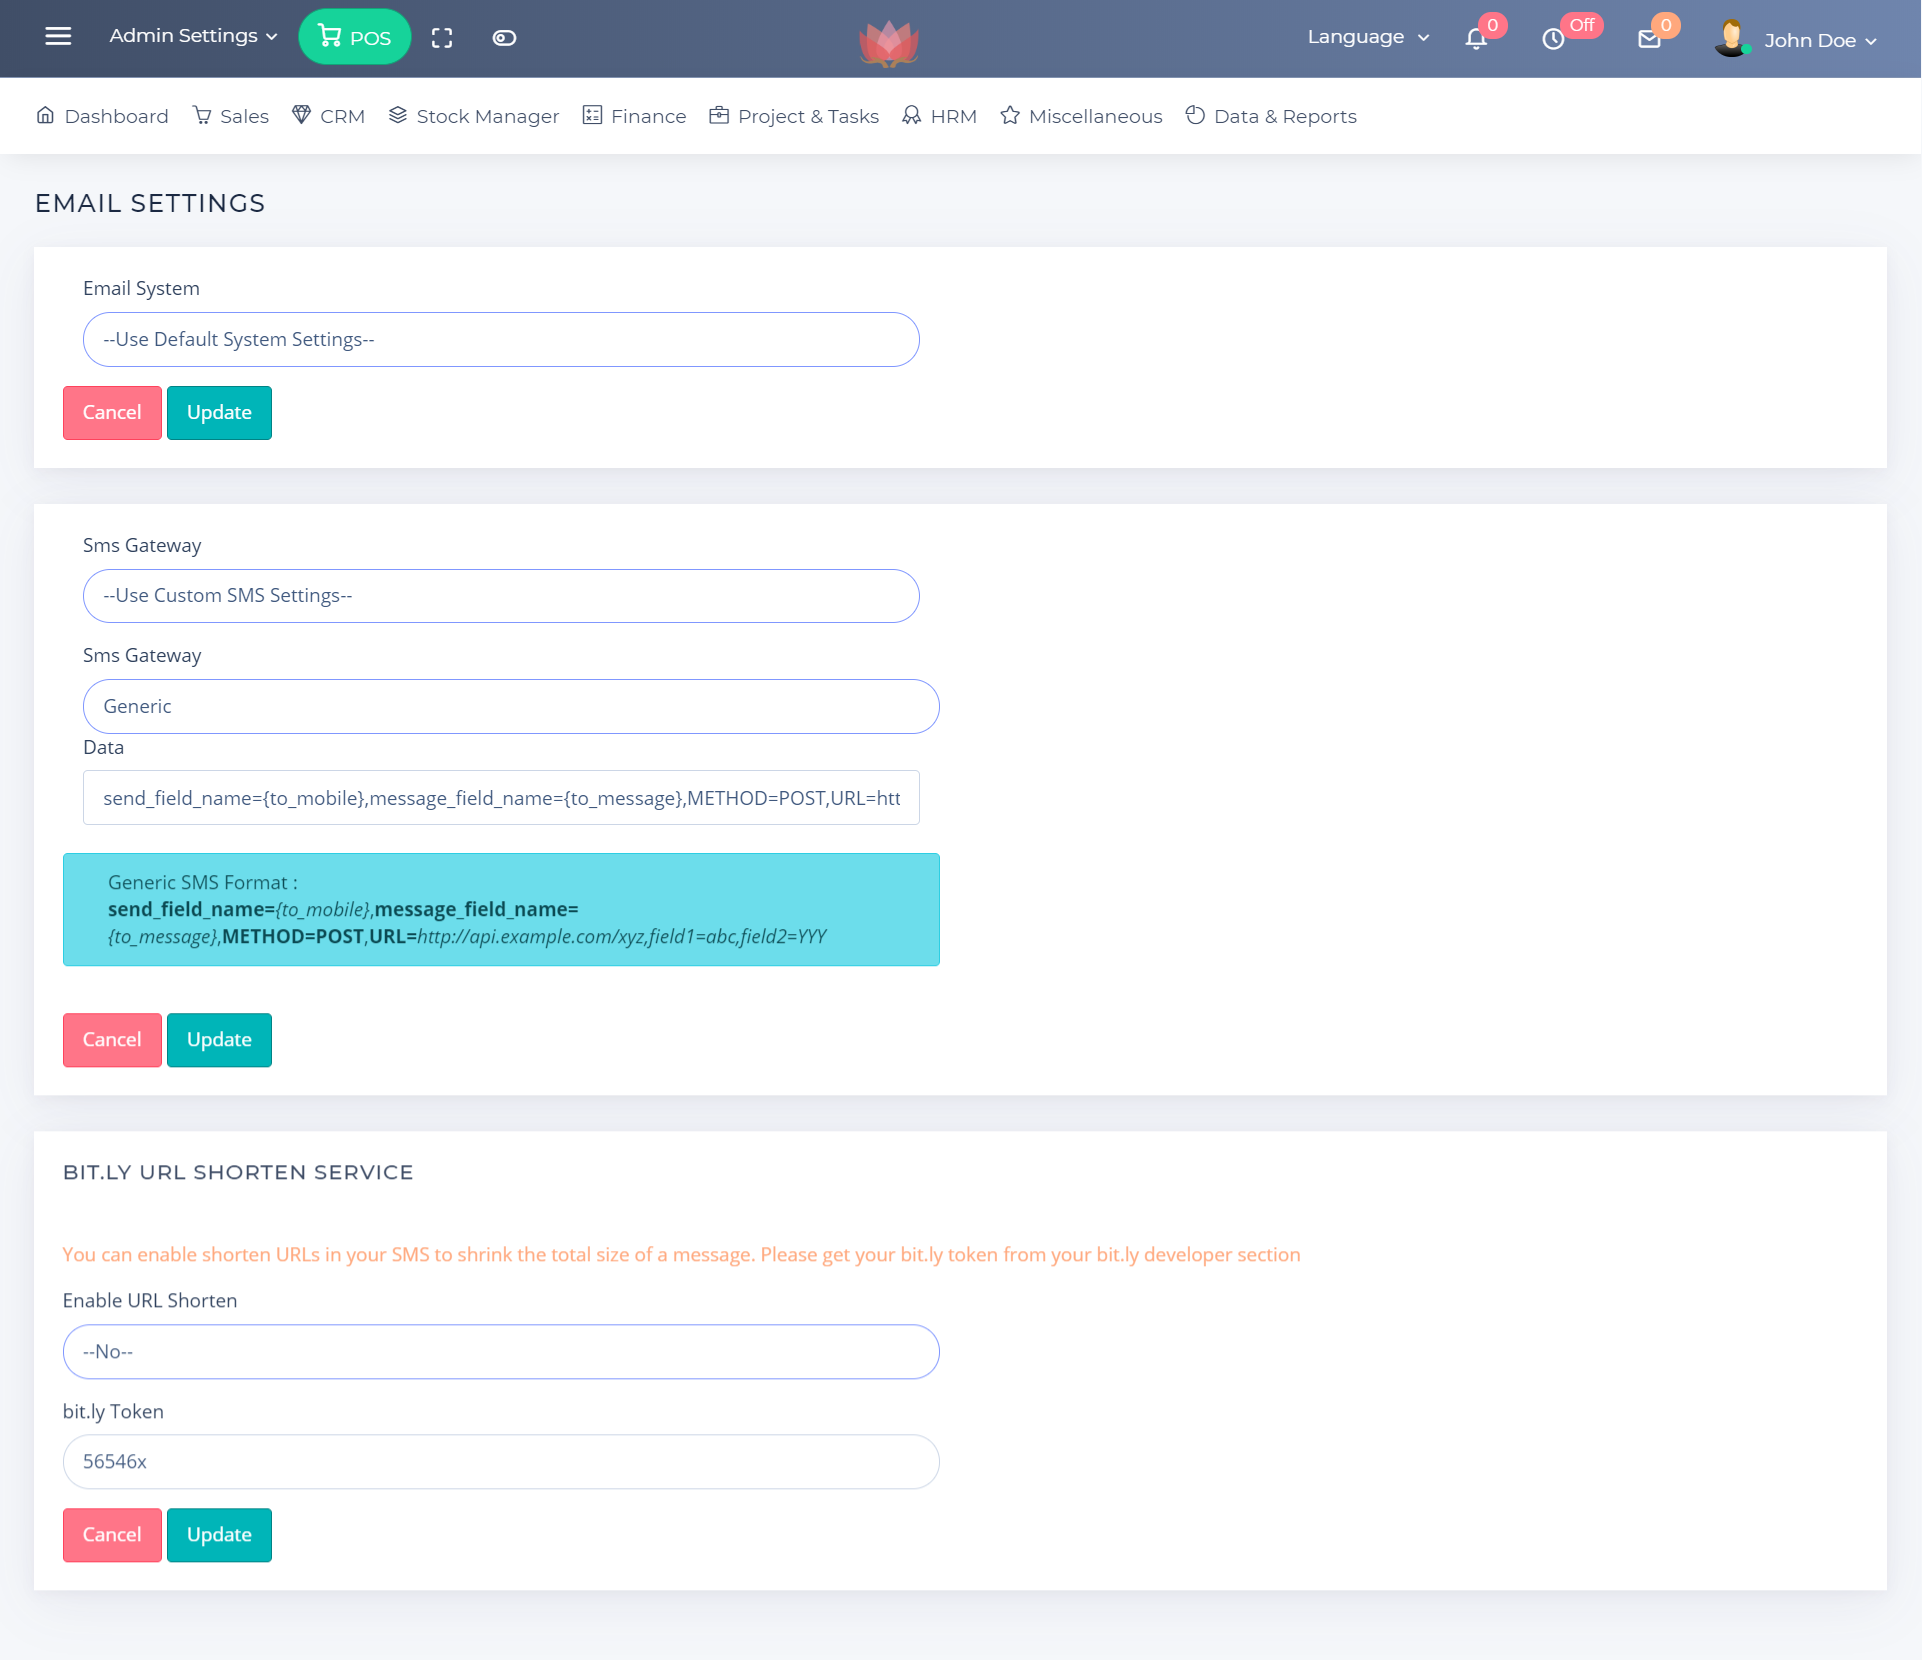
SMS Gateway Settings
A. SMS Gateway :Use Default System Settings
If you are using this option than
you must set the details in your_project> .env file
- Open you project directory
- Here you will get
.env(if you are not able to view file , please enable to show the hidden dot files in your file manager)
TWILLIO_SID = TWILLIO_SENDER_ID
TWILLIO_PASSWORD = TWILLIO_PASSWORD
TWILLIO_TOKEN = TWILLIO_TOKEN
With "Default System Settings" option application will use TWILLIO Sms gateway, you can get TWILLIO_SENDER_ID ,TWILLIO_PASSWORD and TWILLIO_TOKEN from https://www.twilio.com/
B. SMS Gateway :Use Custom SMS Settings
B.1 Twilio - Enter Your Twilio gateway Credentials
B.2 TextLocal - Enter Your TextLocal gateway Credentials - Api Key & Sender ID
B.3 Clockwork - Enter Your Clockwork gateway Credentials - Api Key & Sender ID
B.4 msg91 - Enter Your msg91 gateway Credentials - Api Key & Sender ID
B.5 BulkSMS Gateway (bulksms.in) - Enter Your BulkSMS Gateway (bulksms.in) gateway Credentials - Username, Password & Sender ID
B.6 Generic - Enter Your Generic gateway Credentials
send_field_name={to_mobile},message_field_name={to_message},METHOD=POST,URL=http://api.example.com/xyz,field1=abc,field2=YYY
i. Replace {to_mobile} as per your api "to" field - it can be like "to","mobile" or
"numbers" etc
ii. Replace {to_message} as per your api "message" field - it can be like "message","text"
or "content" etc
iii. METHOD=POST OR METHOD=GET - as per your api
iv. Replace http://api.example.com/xyz as per your api url
v. field1=abc,field2=YYY are other fixed custom fields as per your api. Example
country_code=XX etc
Url Shorten for SMS links
You can enable shorten URLs in your SMS to shrink the total size of a message. Please get your bit.ly token from your bit.ly developer section
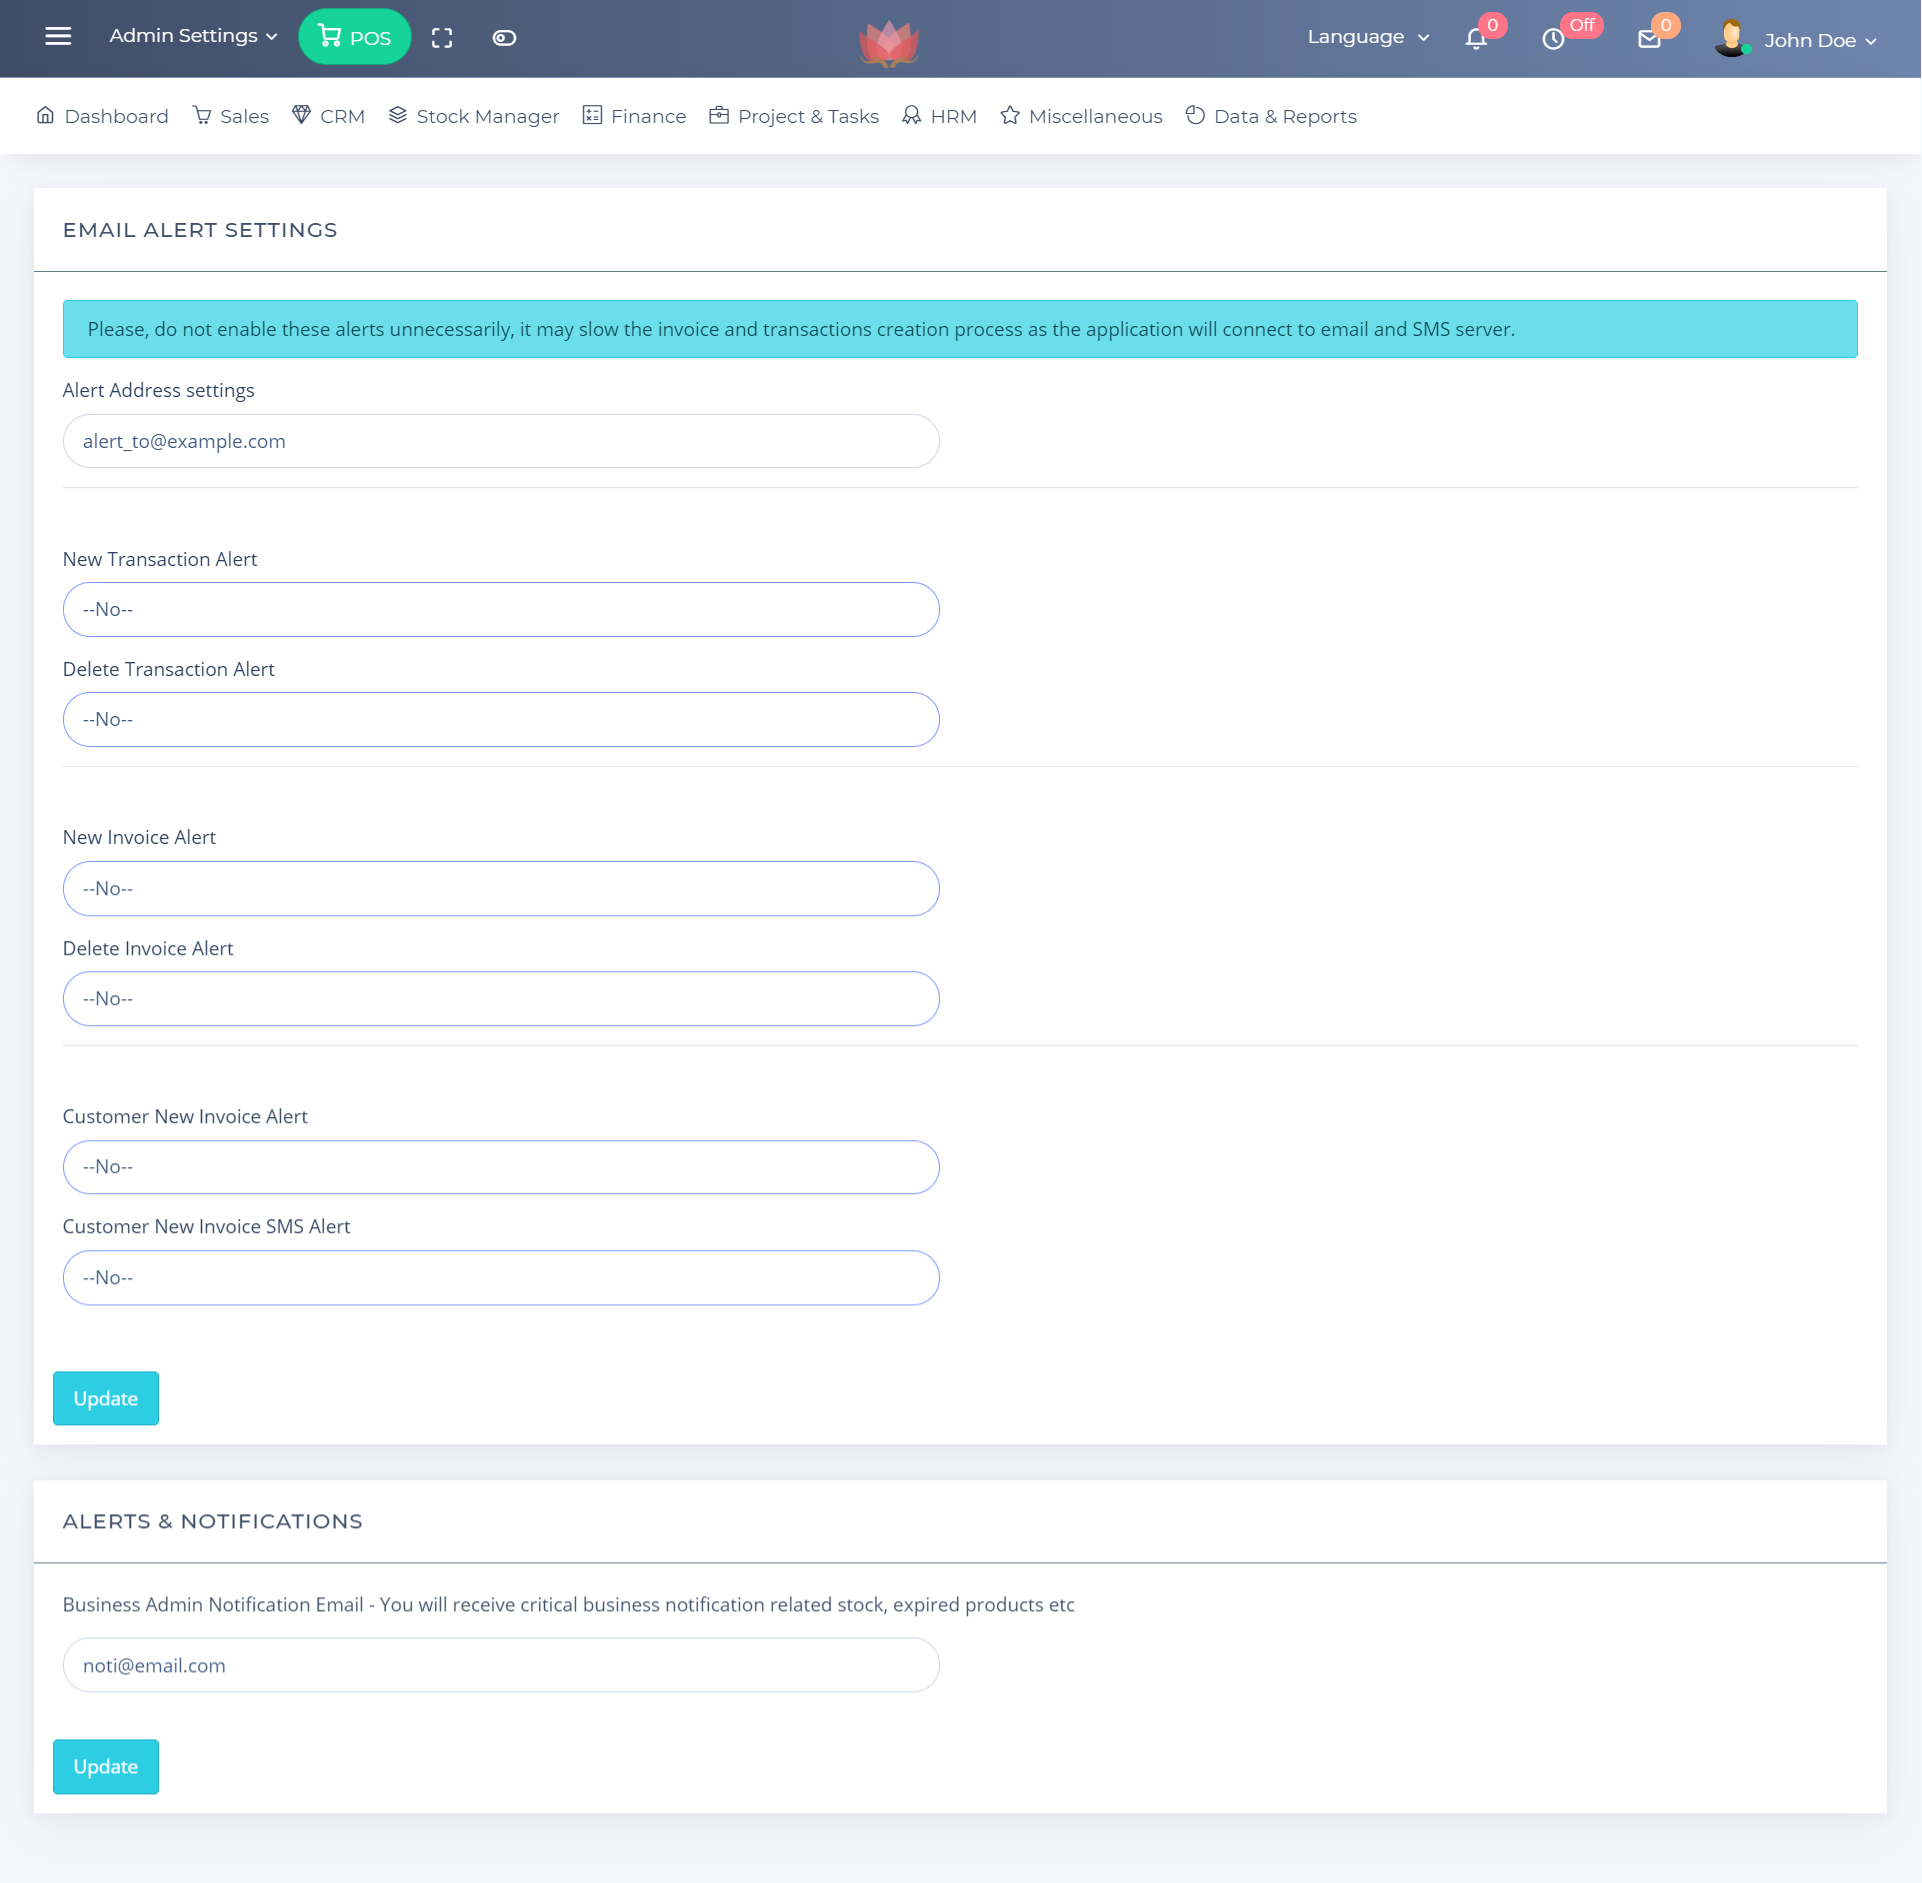
20. EMAIL ALERTS & NOTIFICATIONS SETTINGS
Please, do not enable these alerts unnecessarily, it may slow the invoice and transactions creation process as the application will connect to email and SMS server.
In this section you can set - EMAIL ALERTS & NOTIFICATIONS SETTINGS
- New Transaction Alert
- Delete Transaction Alert
- New Invoice Alert
- Delete Invoice Alert
- Customer New Invoice Alert
- Customer New Invoice SMS Alert
- Customer New Invoice Alert
- Business Admin Notification Email - You will receive critical business notification
related stock, expired products etc
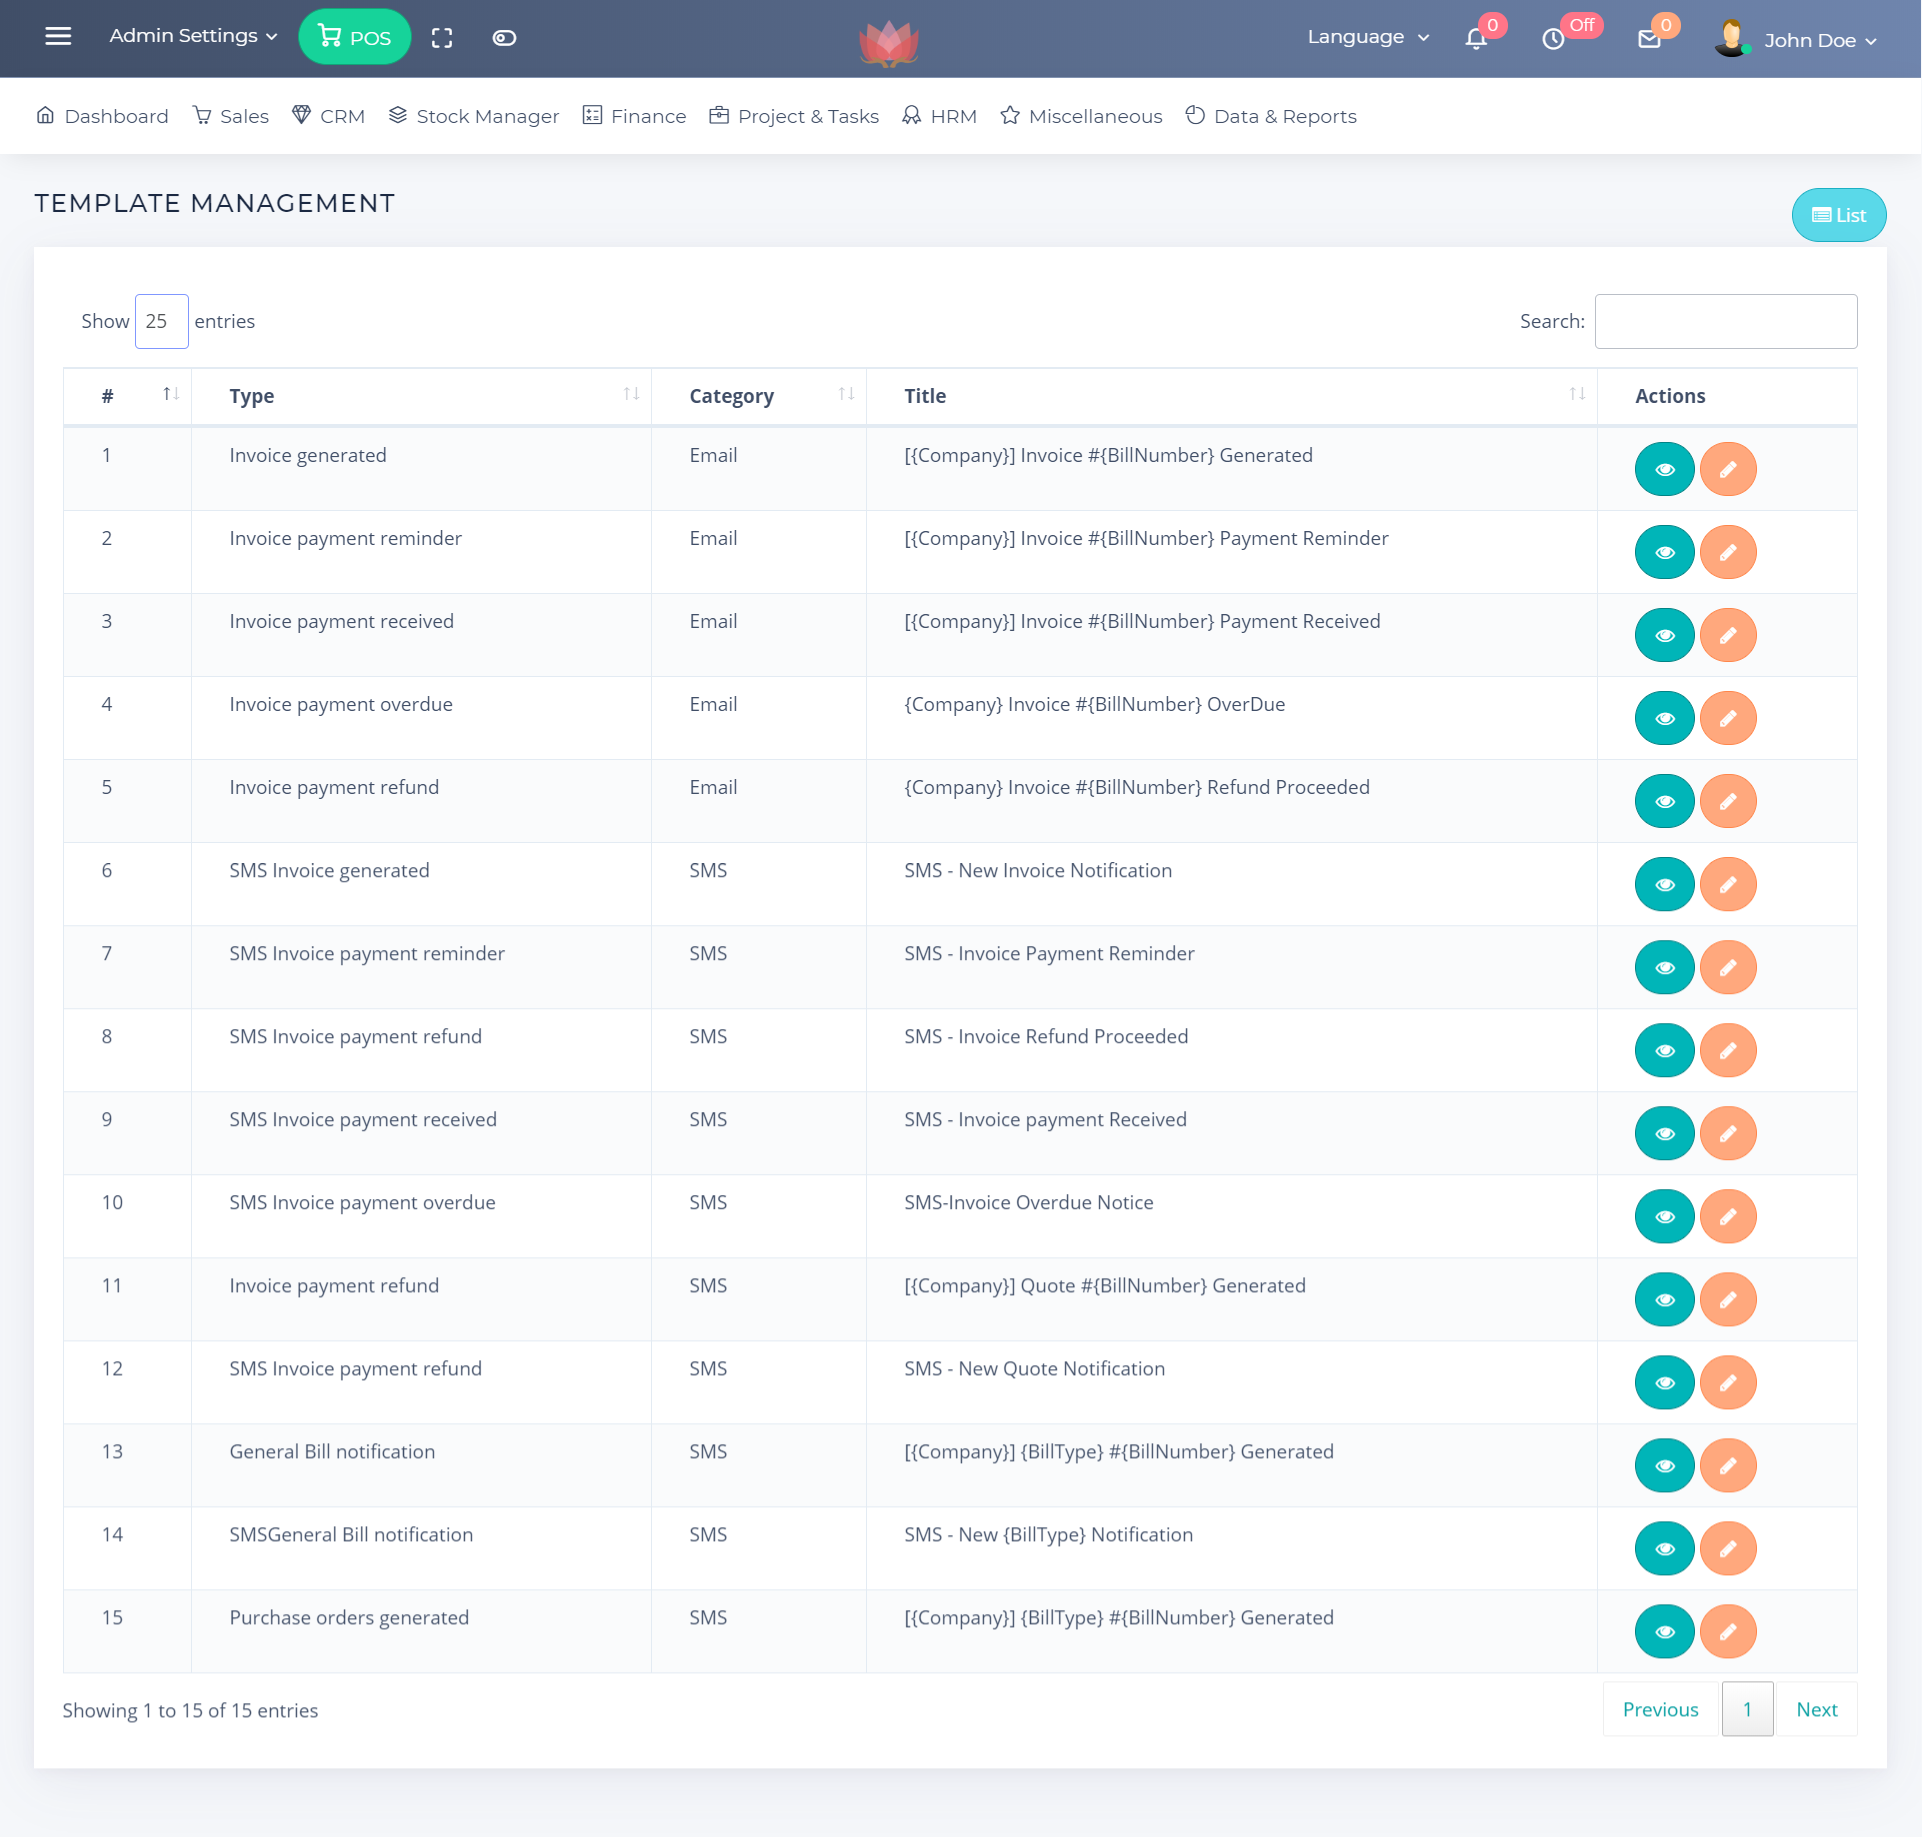
21. Manage Email & SMS Templates
In this section you can edit your sms and email templates, keep {Variables}
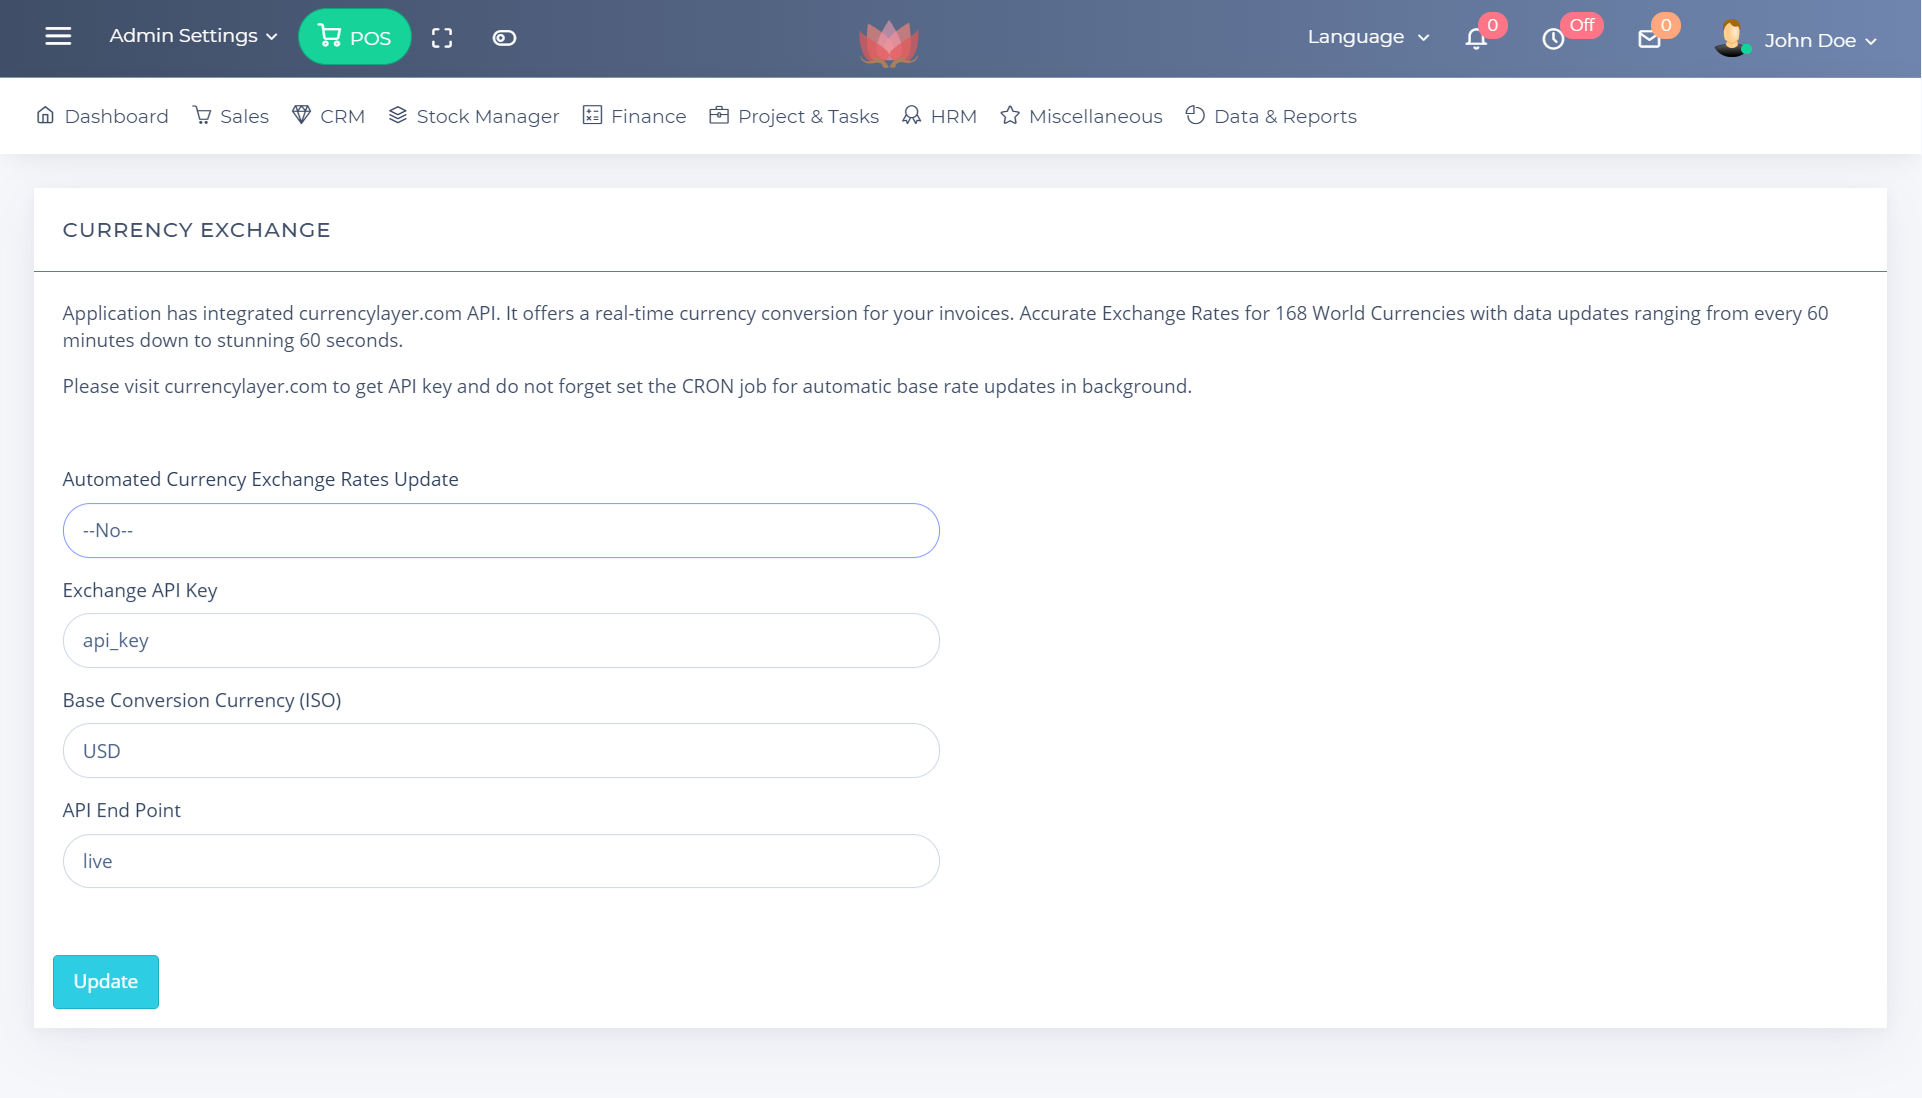
22. CURRENCY EXCHANGE
Application has integrated currencylayer.com API. It offers a real-time currency conversion for your invoices. Accurate Exchange Rates for 168 World Currencies with data updates ranging from every 60 minutes down to stunning 60 seconds. Please visit currencylayer.com to get API key and do not forget set the CRON job for automatic base rate updates in background.
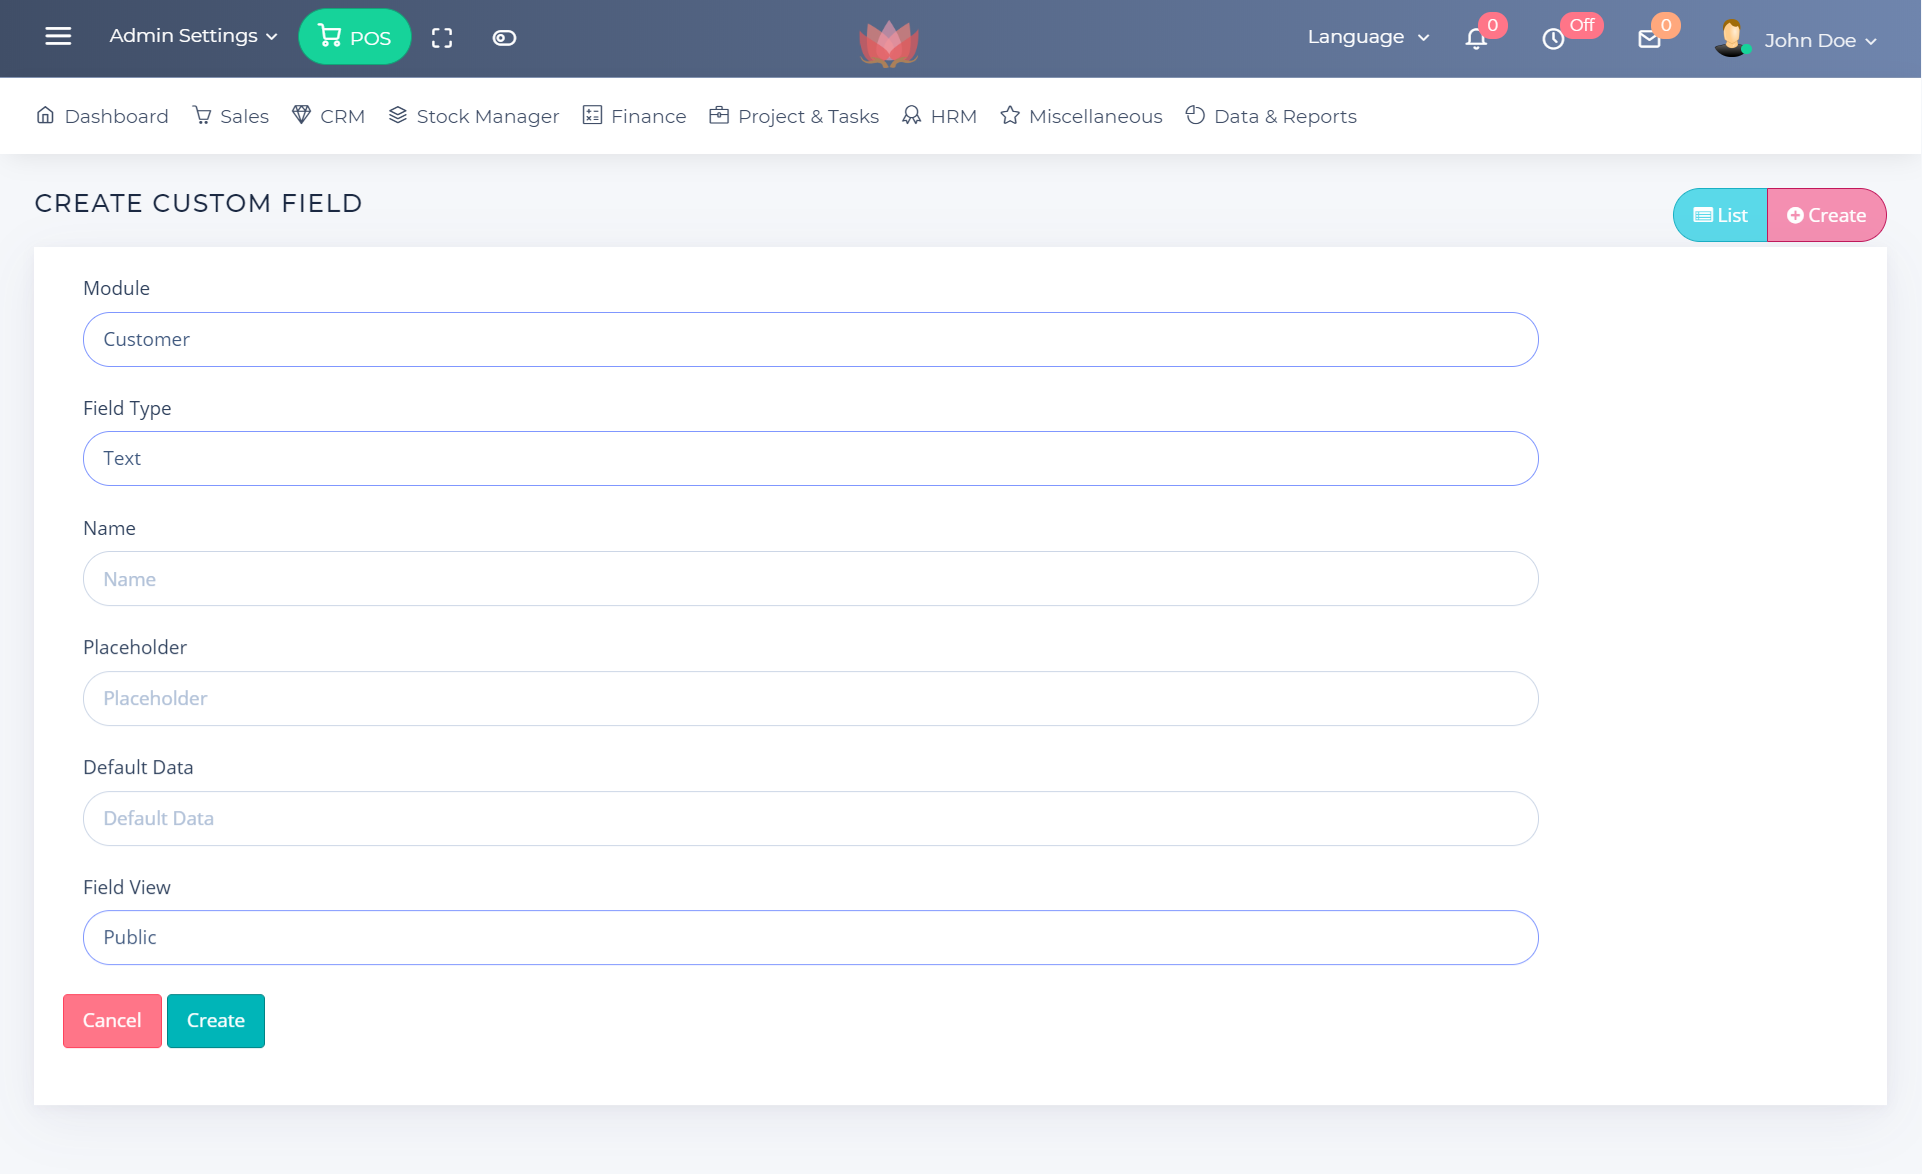
23. CUSTOM FIELD MANAGEMENT
In this section you can set CUSTOM FIELDS
- Customers
- Invoices
- Quotes
-
Credit Notes
Field View can be private (employees only) and public (on public previews and
print)
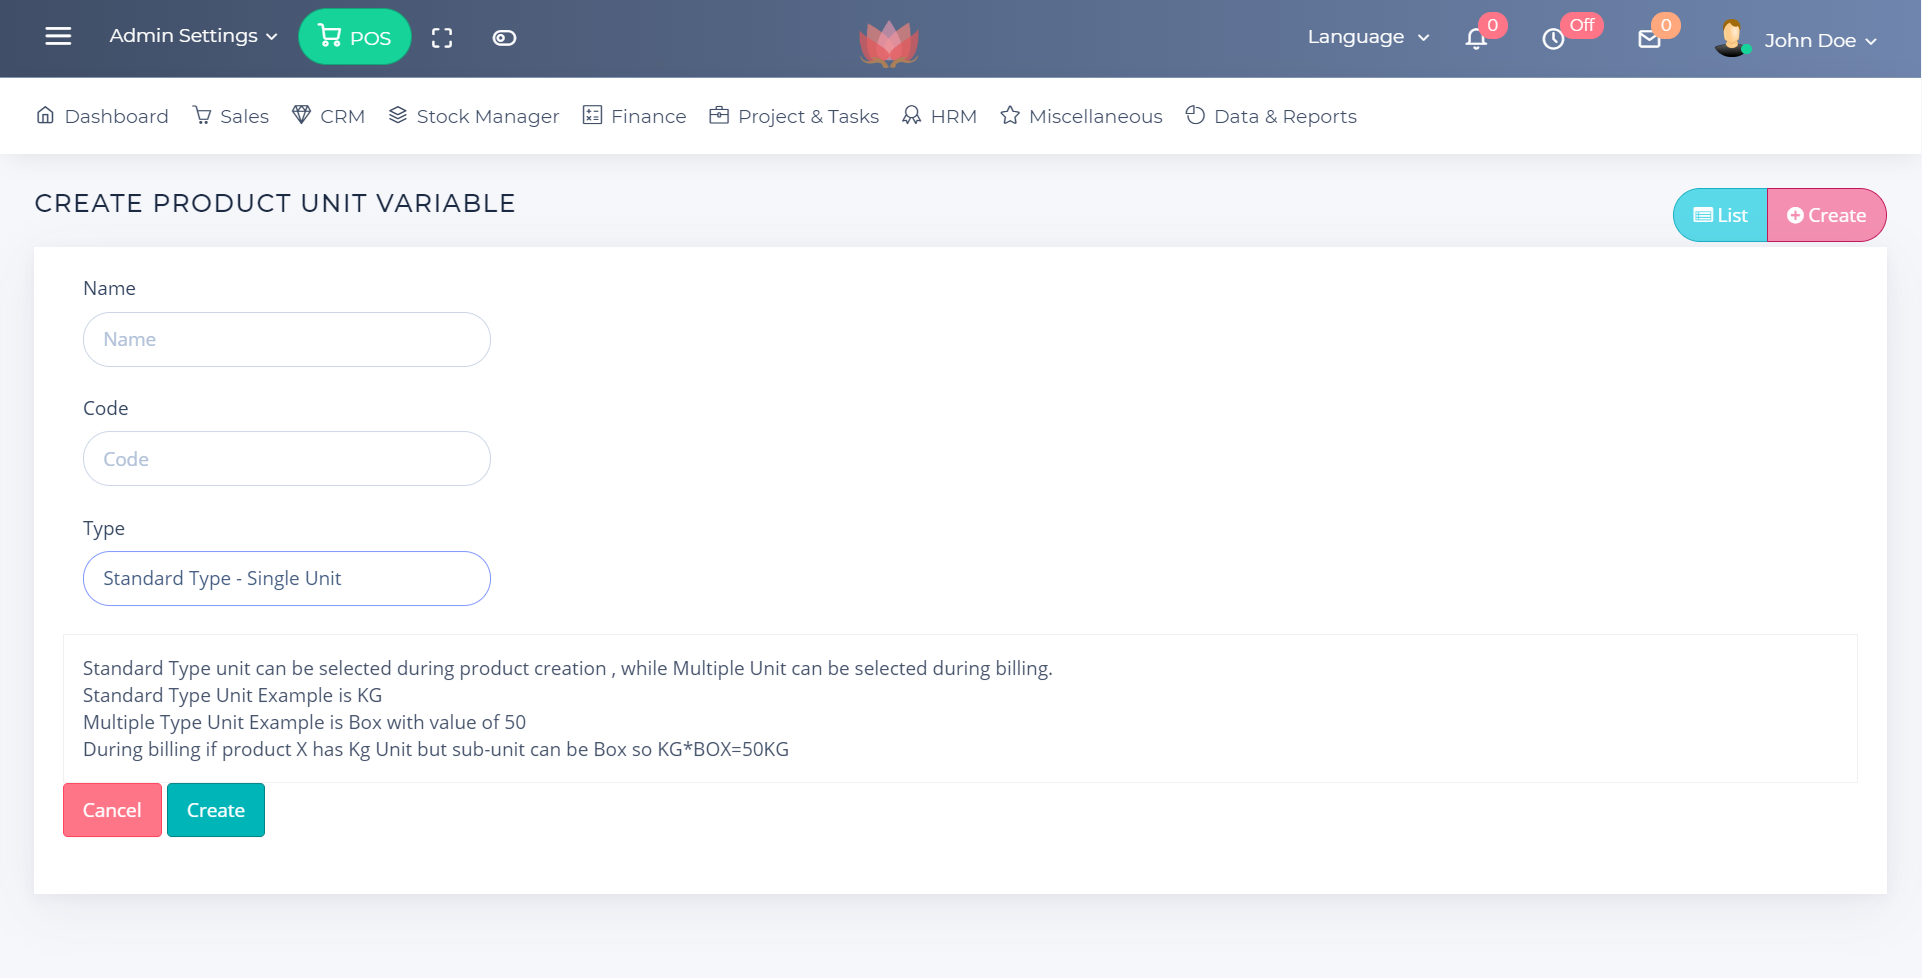
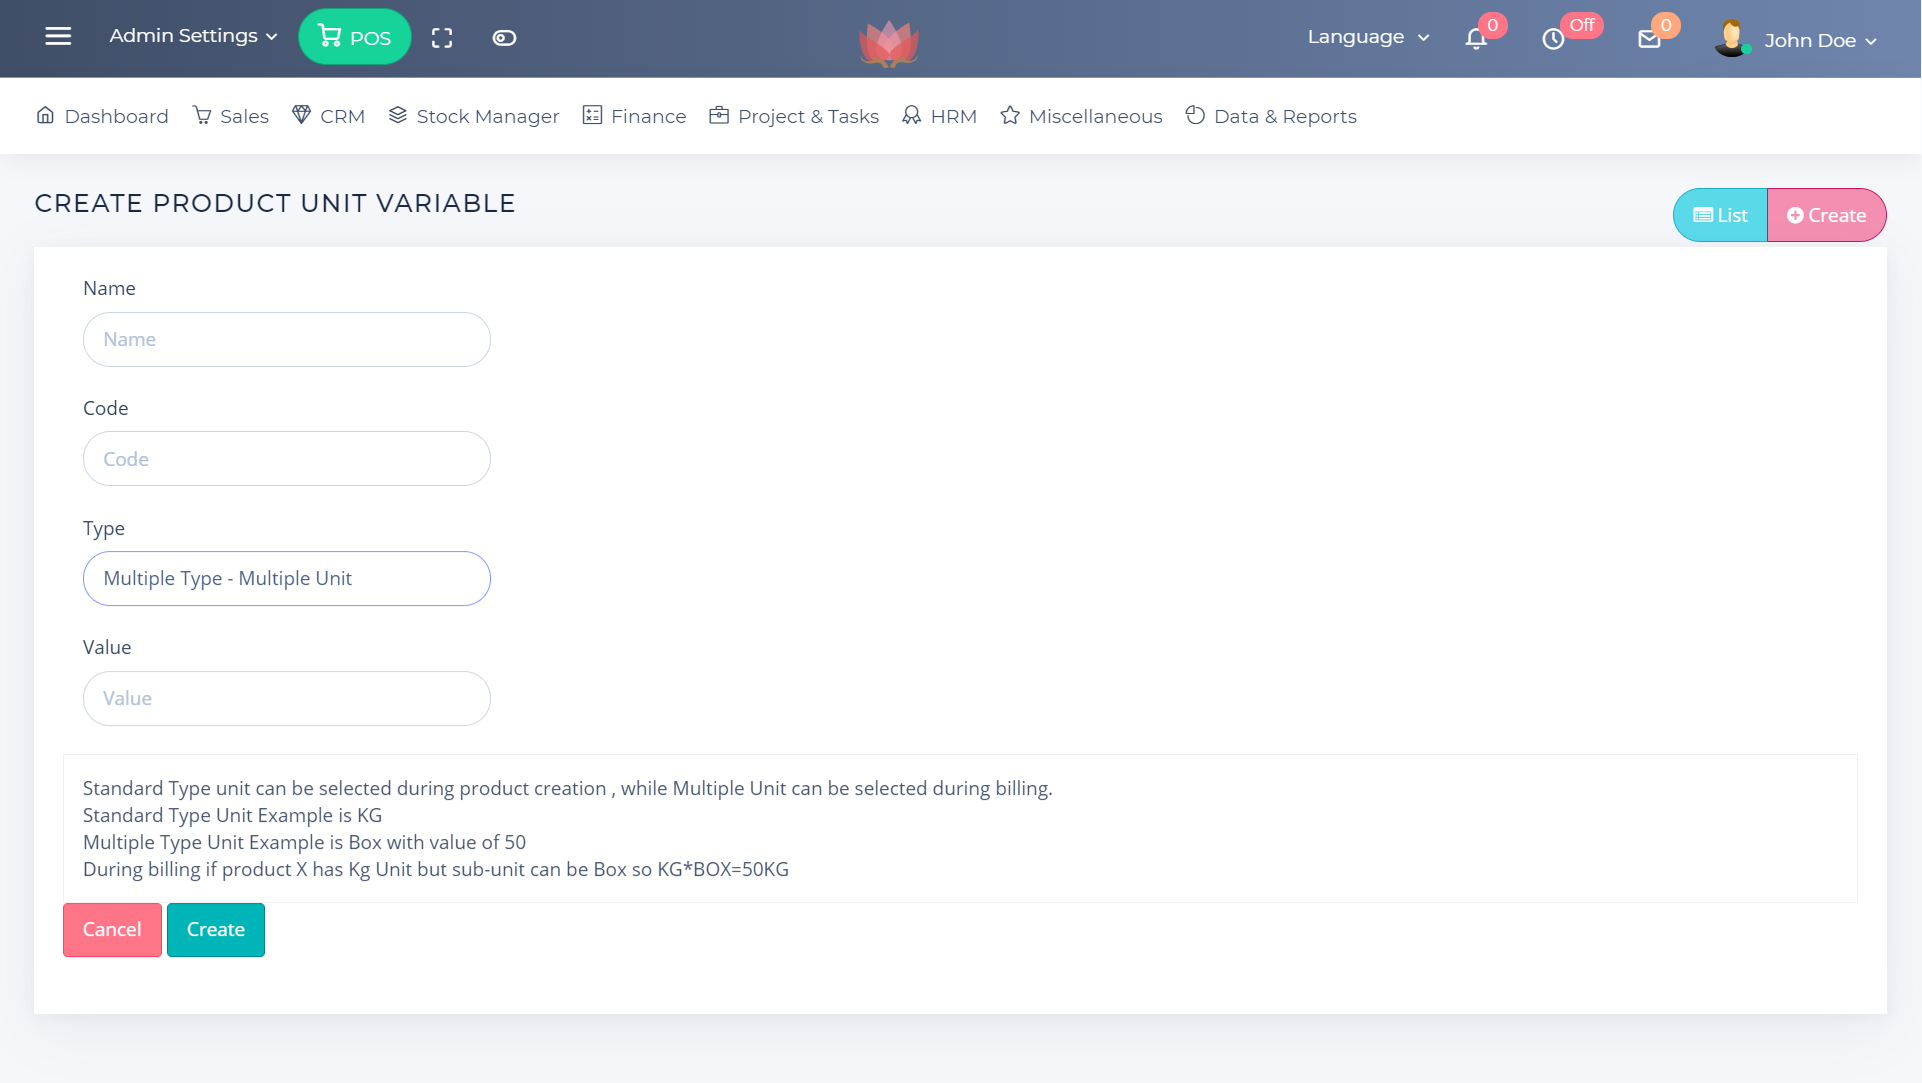
24. PRODUCT UNIT VARIABLE MANAGEMENT
In this section you can create standard and mulit units
Standard unit value is 1
Multi
The unit can be with value X - Here X is a number
Standard Type unit can be selected during product creation, while Multiple Unit can be selected during billing. Standard Type Unit Example is KG Multiple Type Unit Example is Box with a value of 50 During billing, if product X has Kg Unit but multi-unit can be Box so KG*BOX=50KG
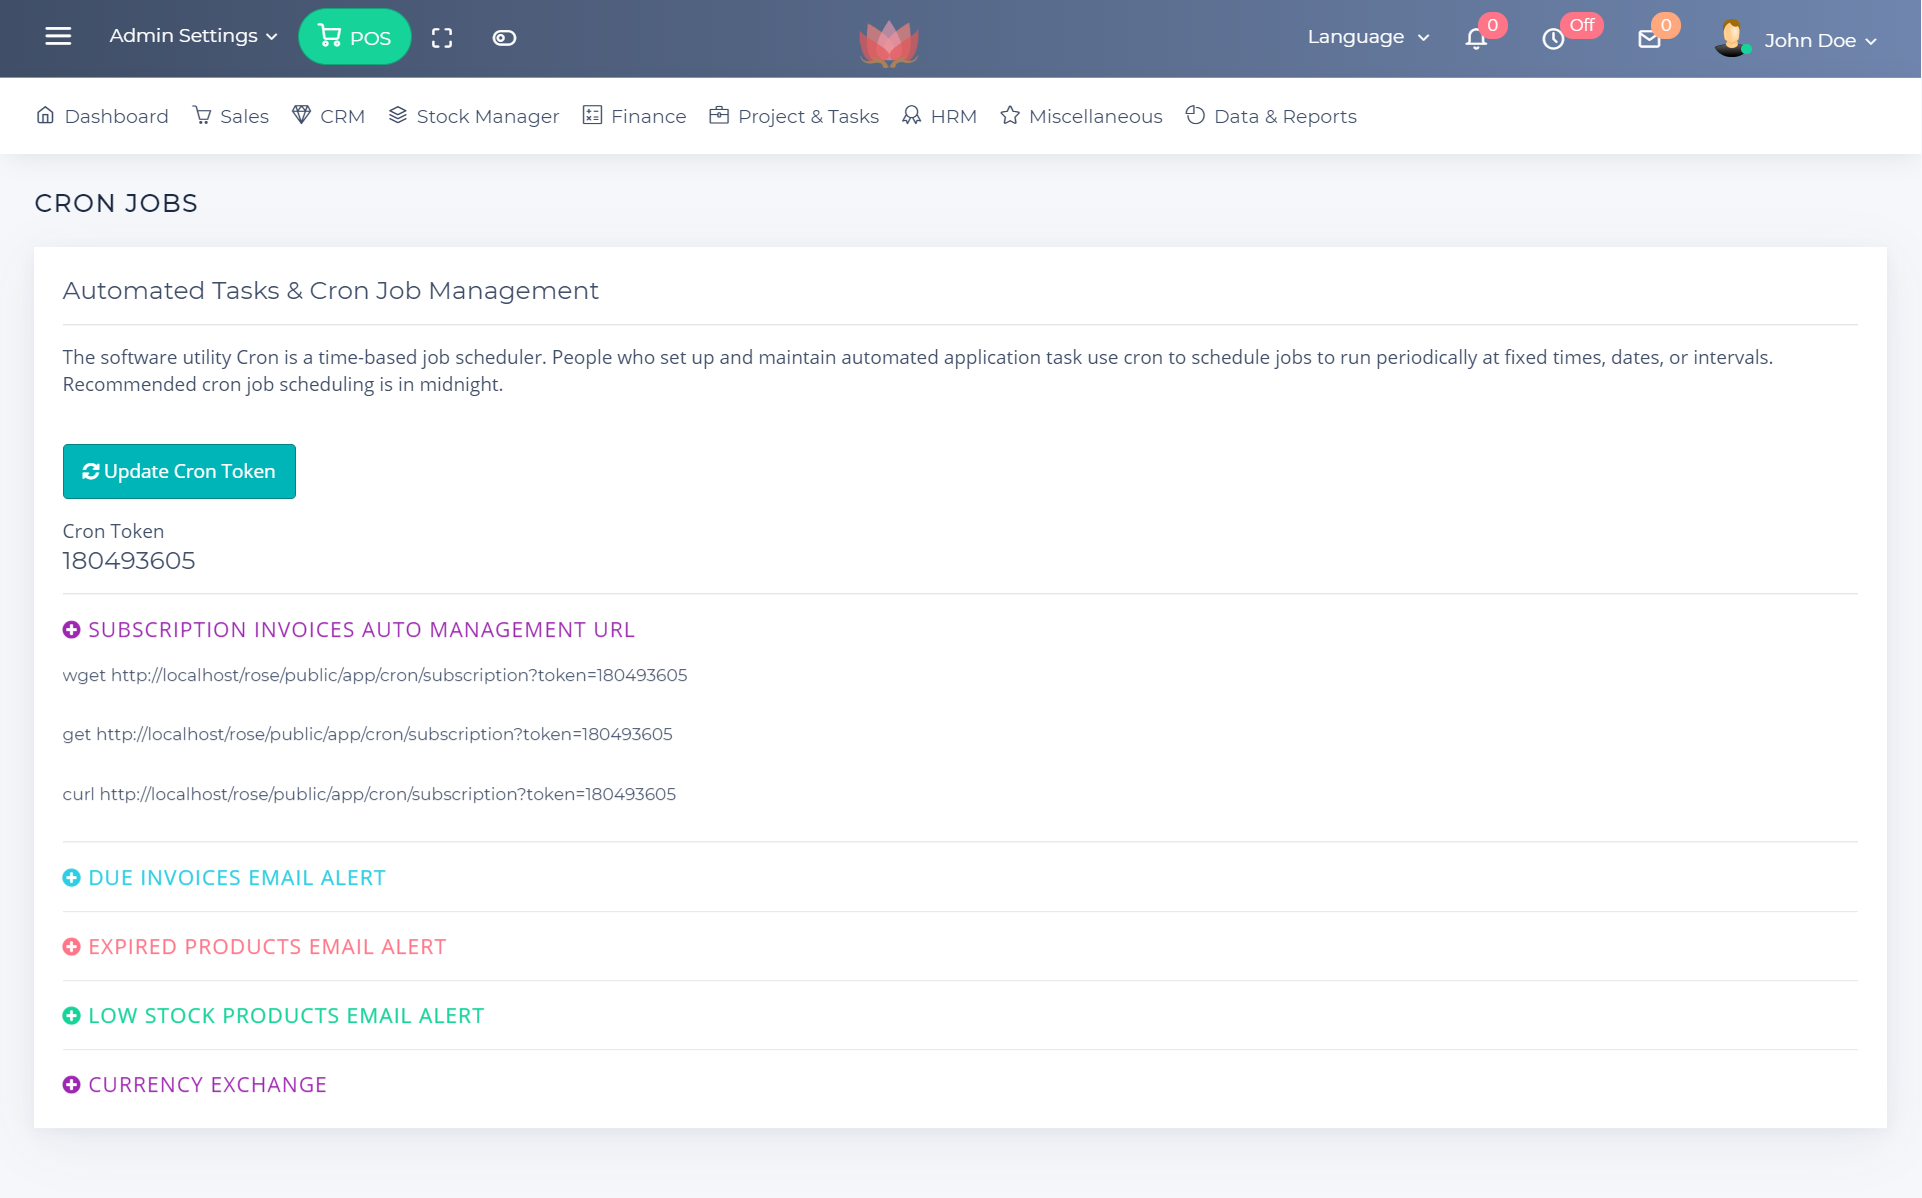
25. CRON JOBS
In this section you will get cron urls
The software utility Cron is a time-based job scheduler. People who set up and maintain automated application task uses Cron to schedule jobs to run periodically at fixed times, dates, or intervals. Recommended Cron job scheduling is in midnight.
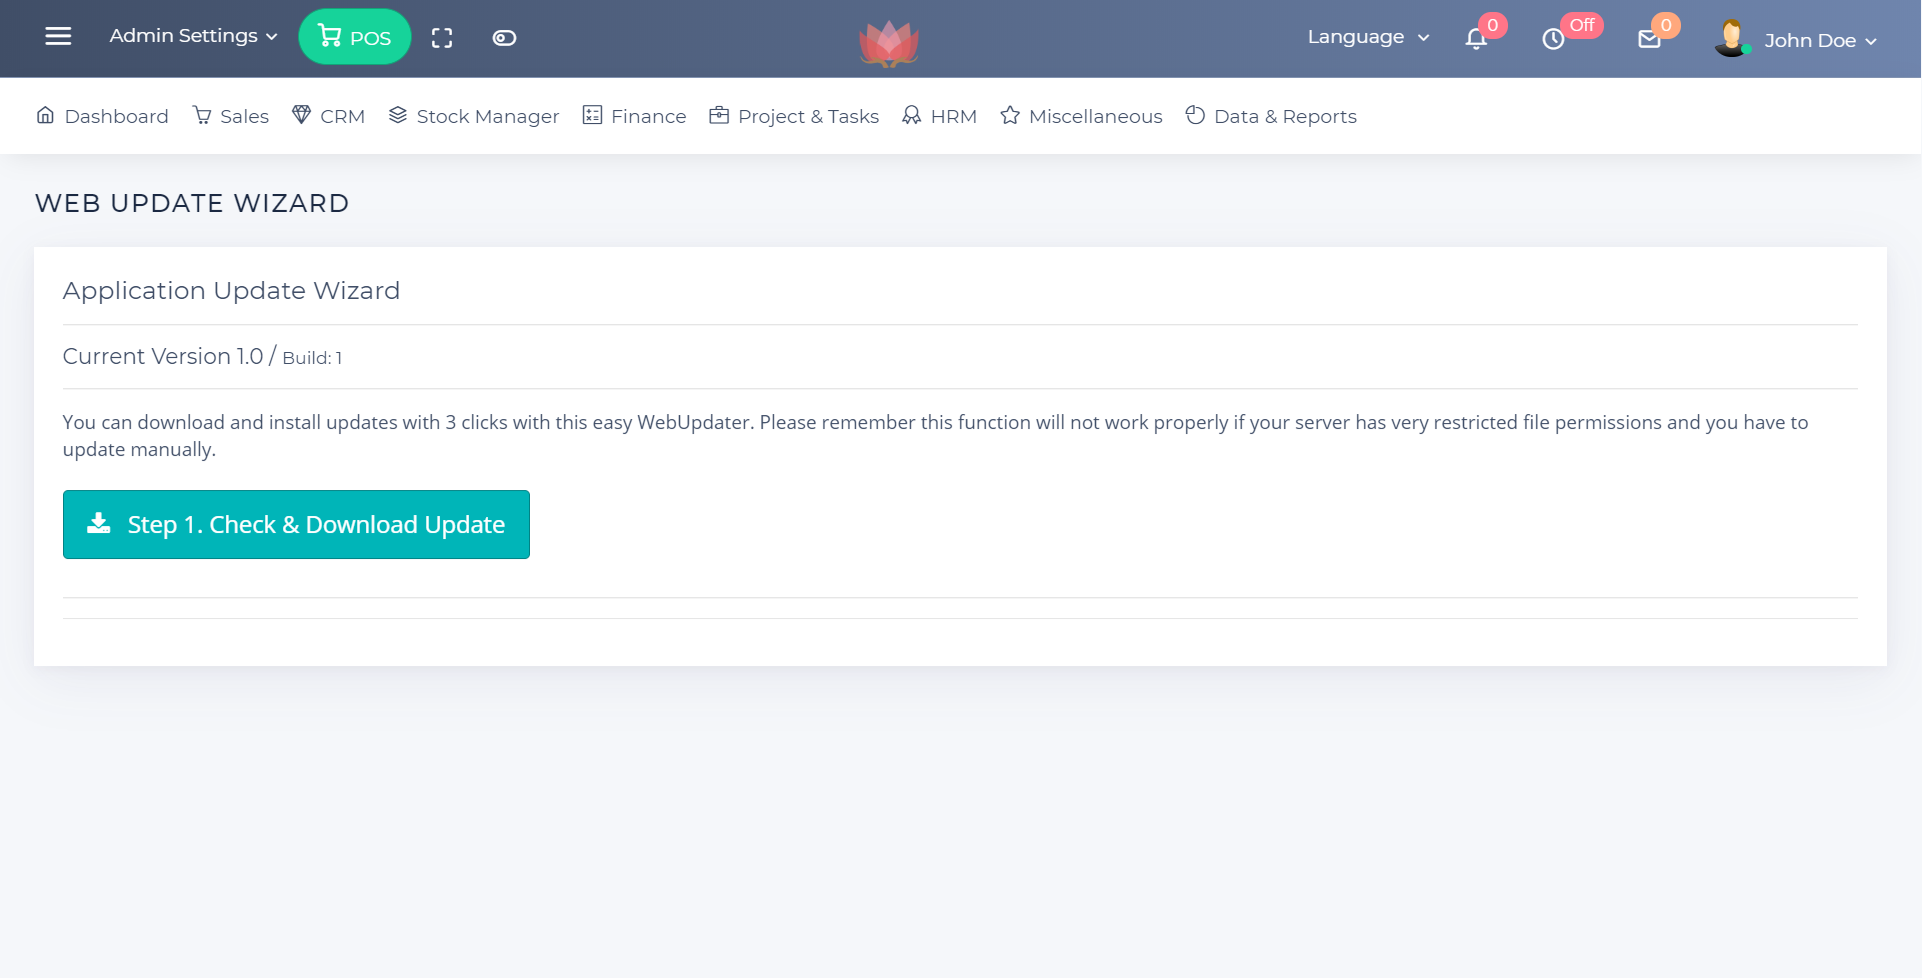
26. WEB UPDATE WIZARD
In this section you can download and install updates with 3 clicks with this easy WebUpdater.
Please remember this function will not work properly if your server has very restricted file permissions and you have to update manually.
Once after starting the process you must follow
all 3 steps.
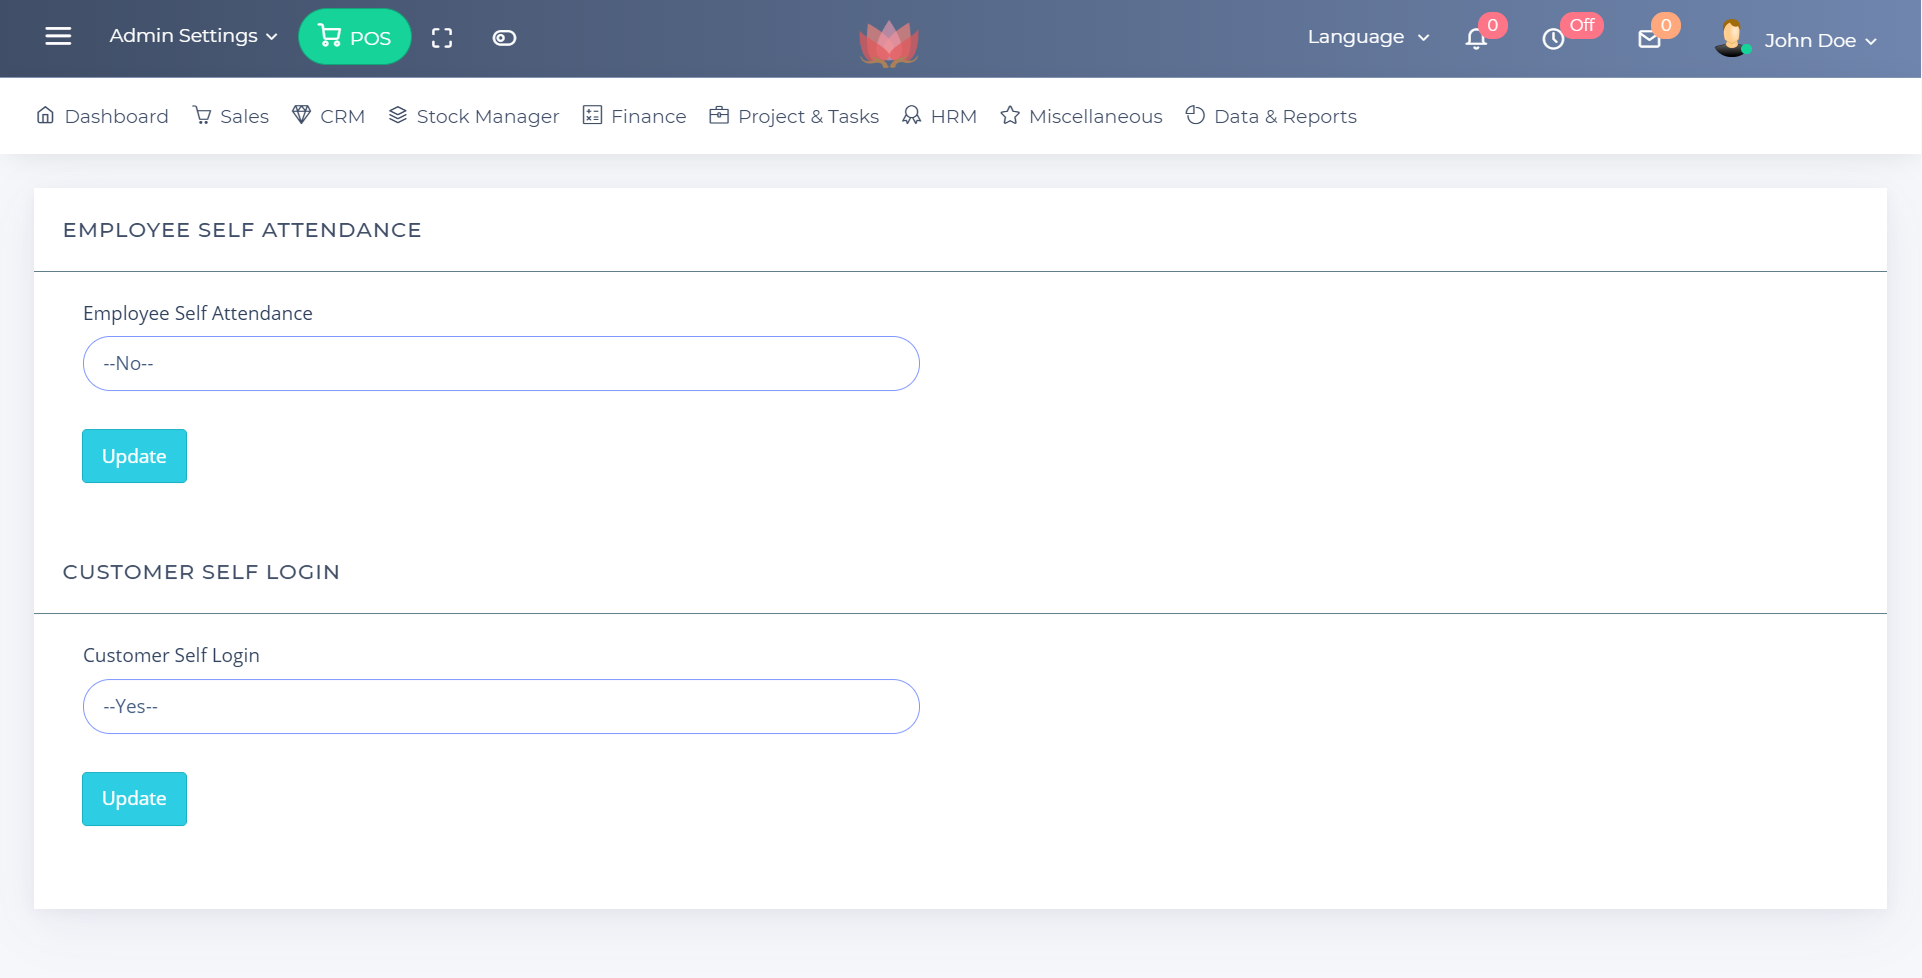
27. EMPLOYEE SELF ATTENDANCE and CUSTOMER SELF LOGIN
In this section you can EMPLOYEE SELF ATTENDANCE and CUSTOMER SELF LOGIN in the CRM section.
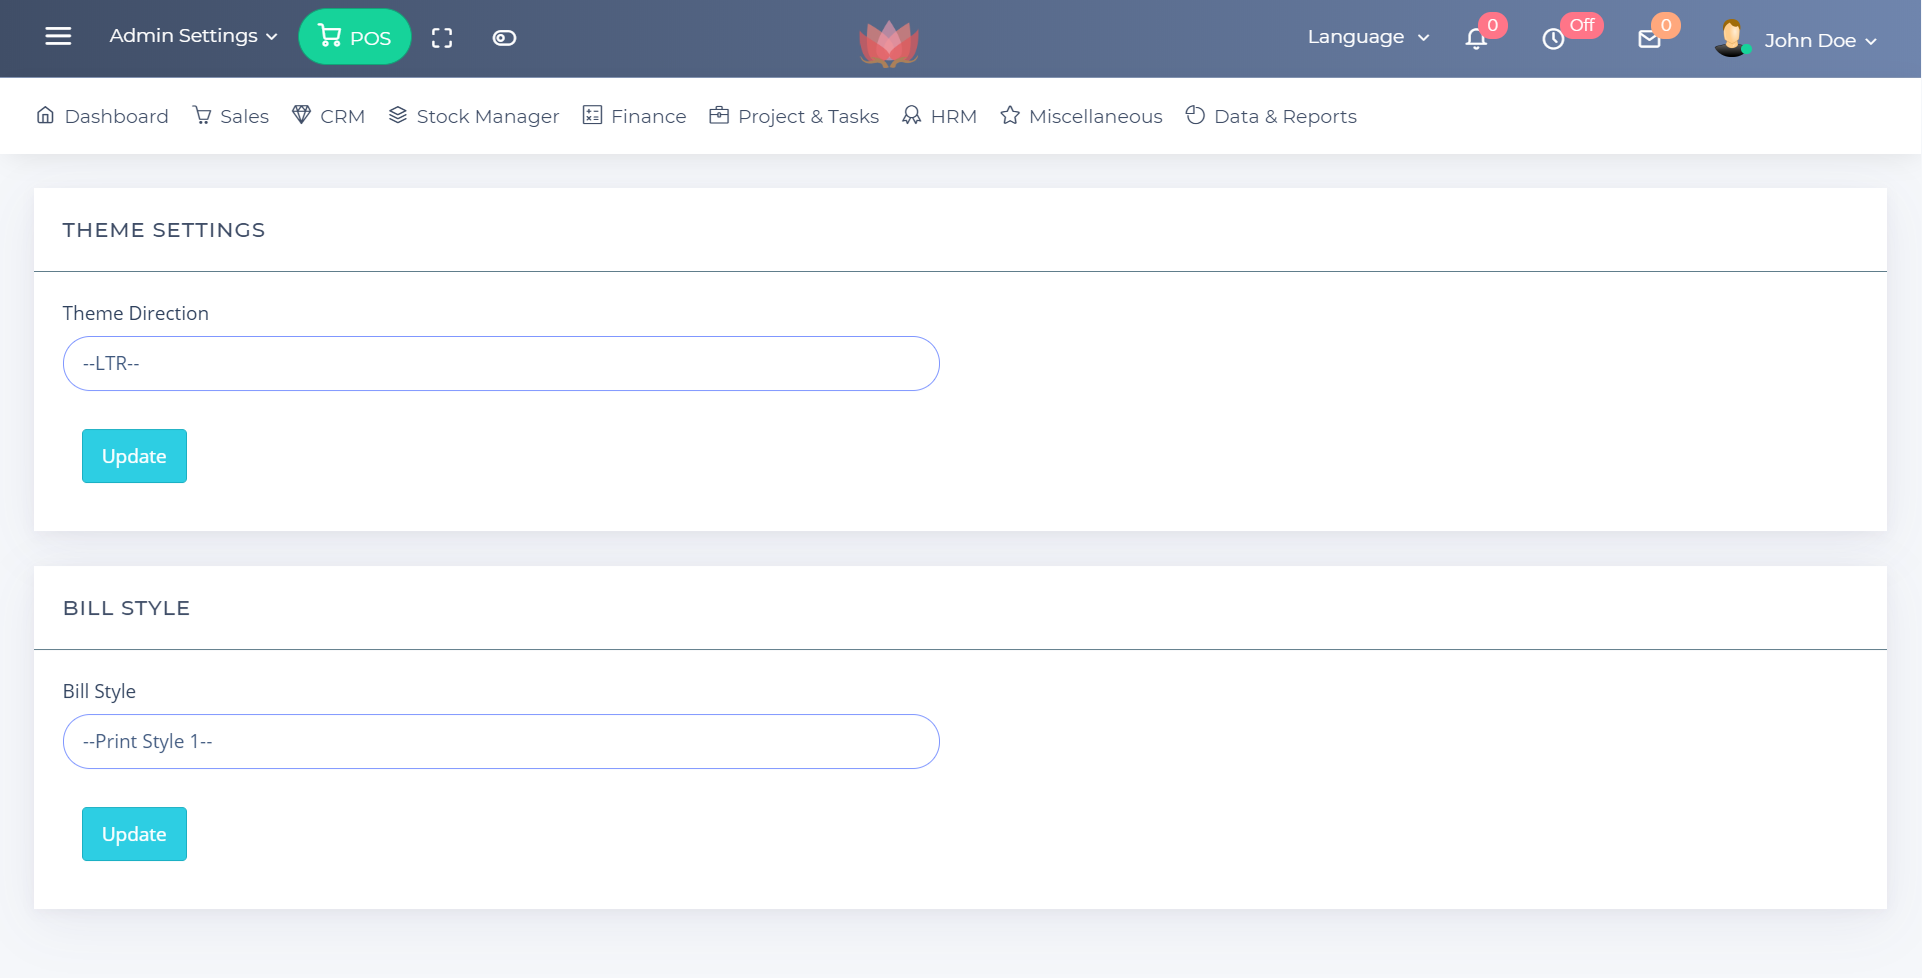
28. THEME SETTINGS & BILL Print STYLE
In this section you can adjust the visual setting, at launch time t has only one print style but in future more styles will be added .
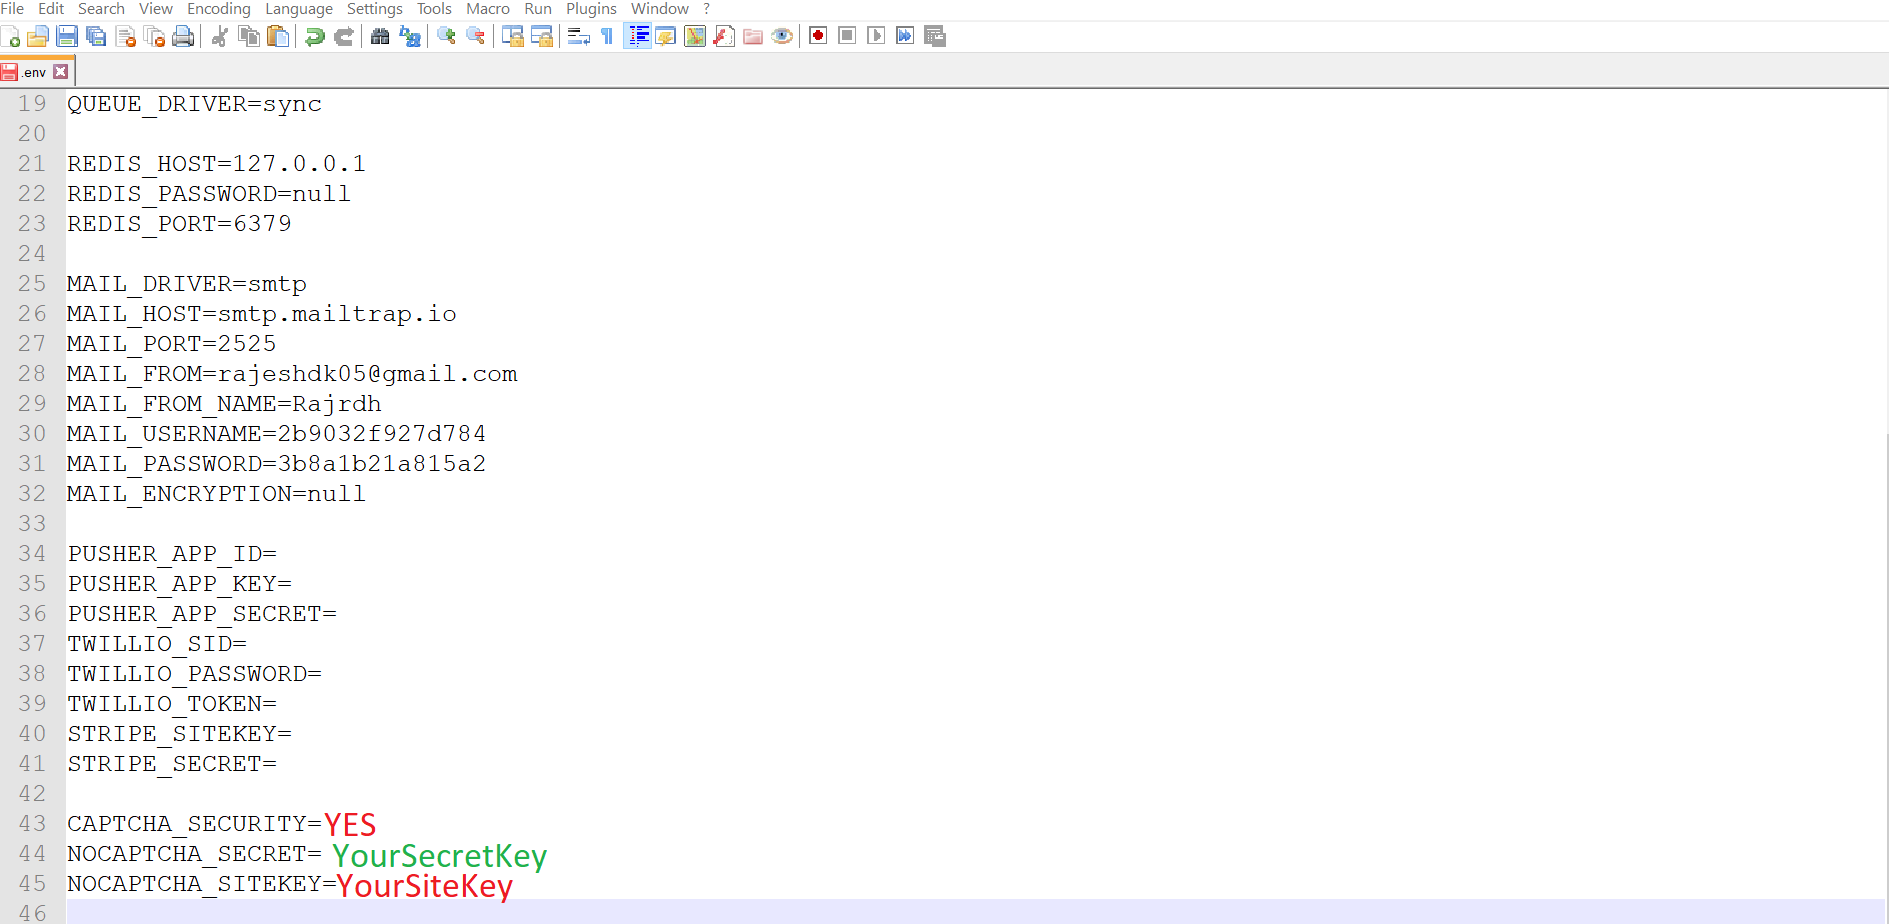
29. Enable Google Captcha
In this section you can configure and enable Google Captcha.
- Open you project directory
- Here you will get
.env(if you are not able to view file , please enable to show the hidden dot files in your file manager) - Visit https://www.google.com/recaptcha to get keys
- Change values as per screenshot and save it
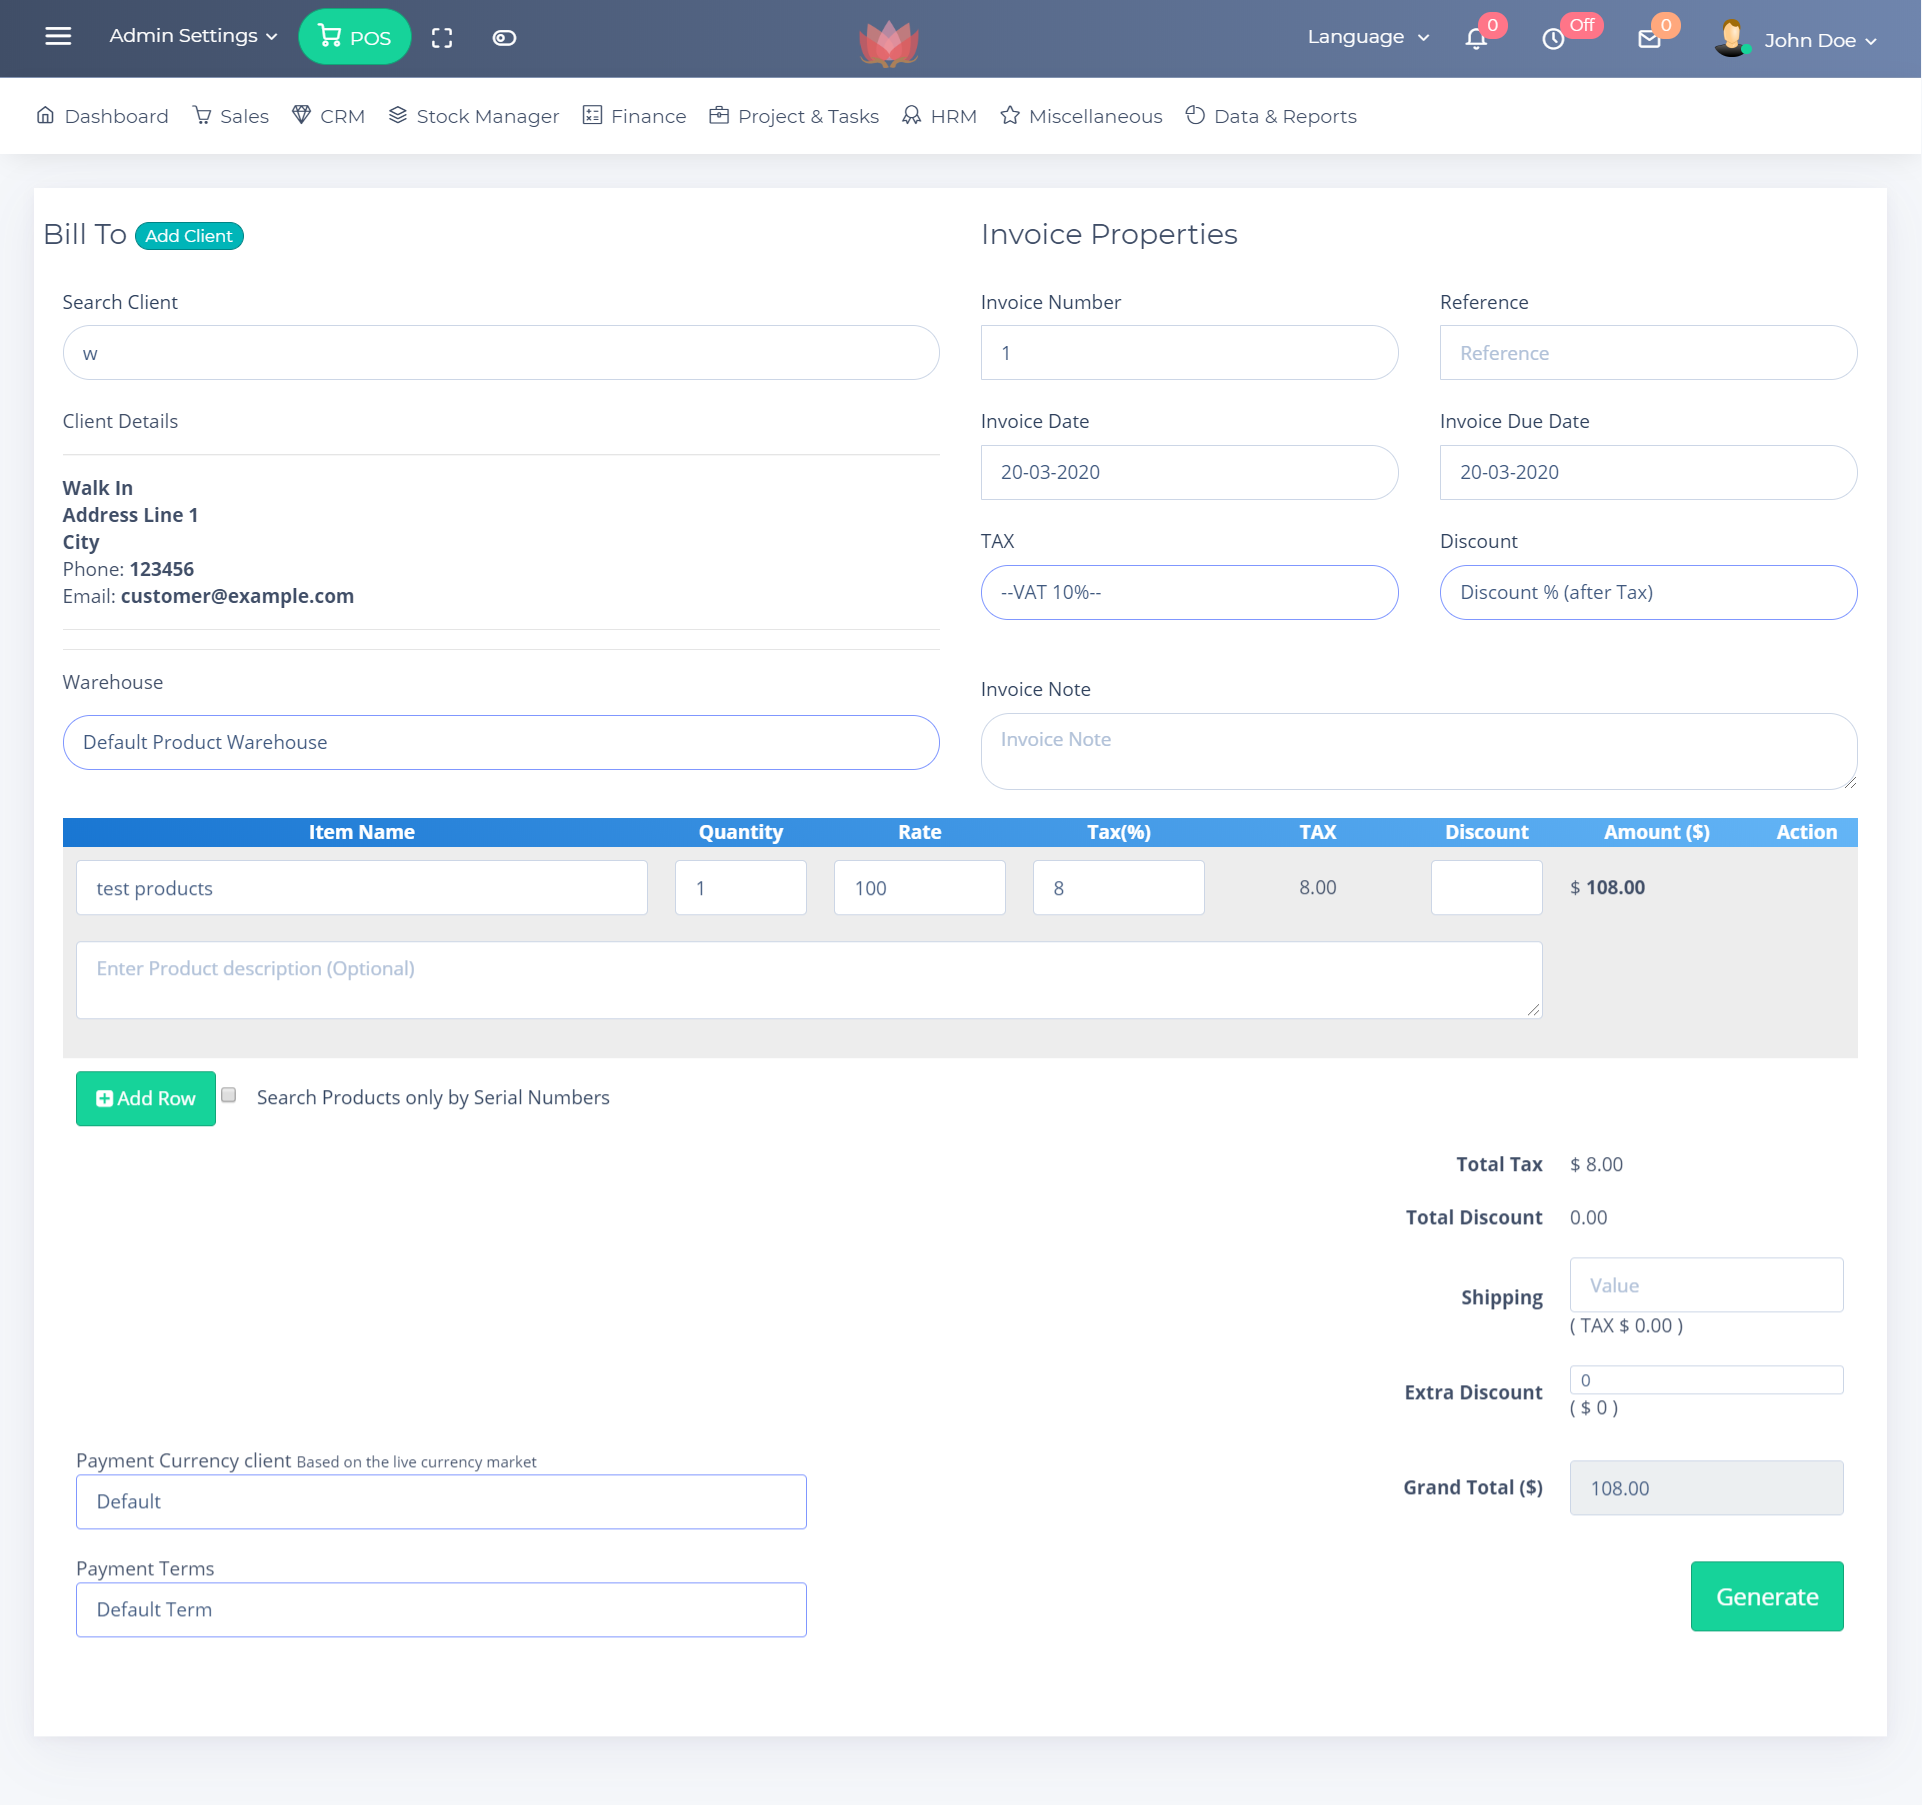
30. Create First Invoice
Invoice creation process is very simple with Rose Billing
- 1. Search an existing client or add new client
- 2. Search an existing product or add new product in stock manager
- 3. To add more product click on green button with + icon near products row
- 4. Change values if required and Generate the invoice
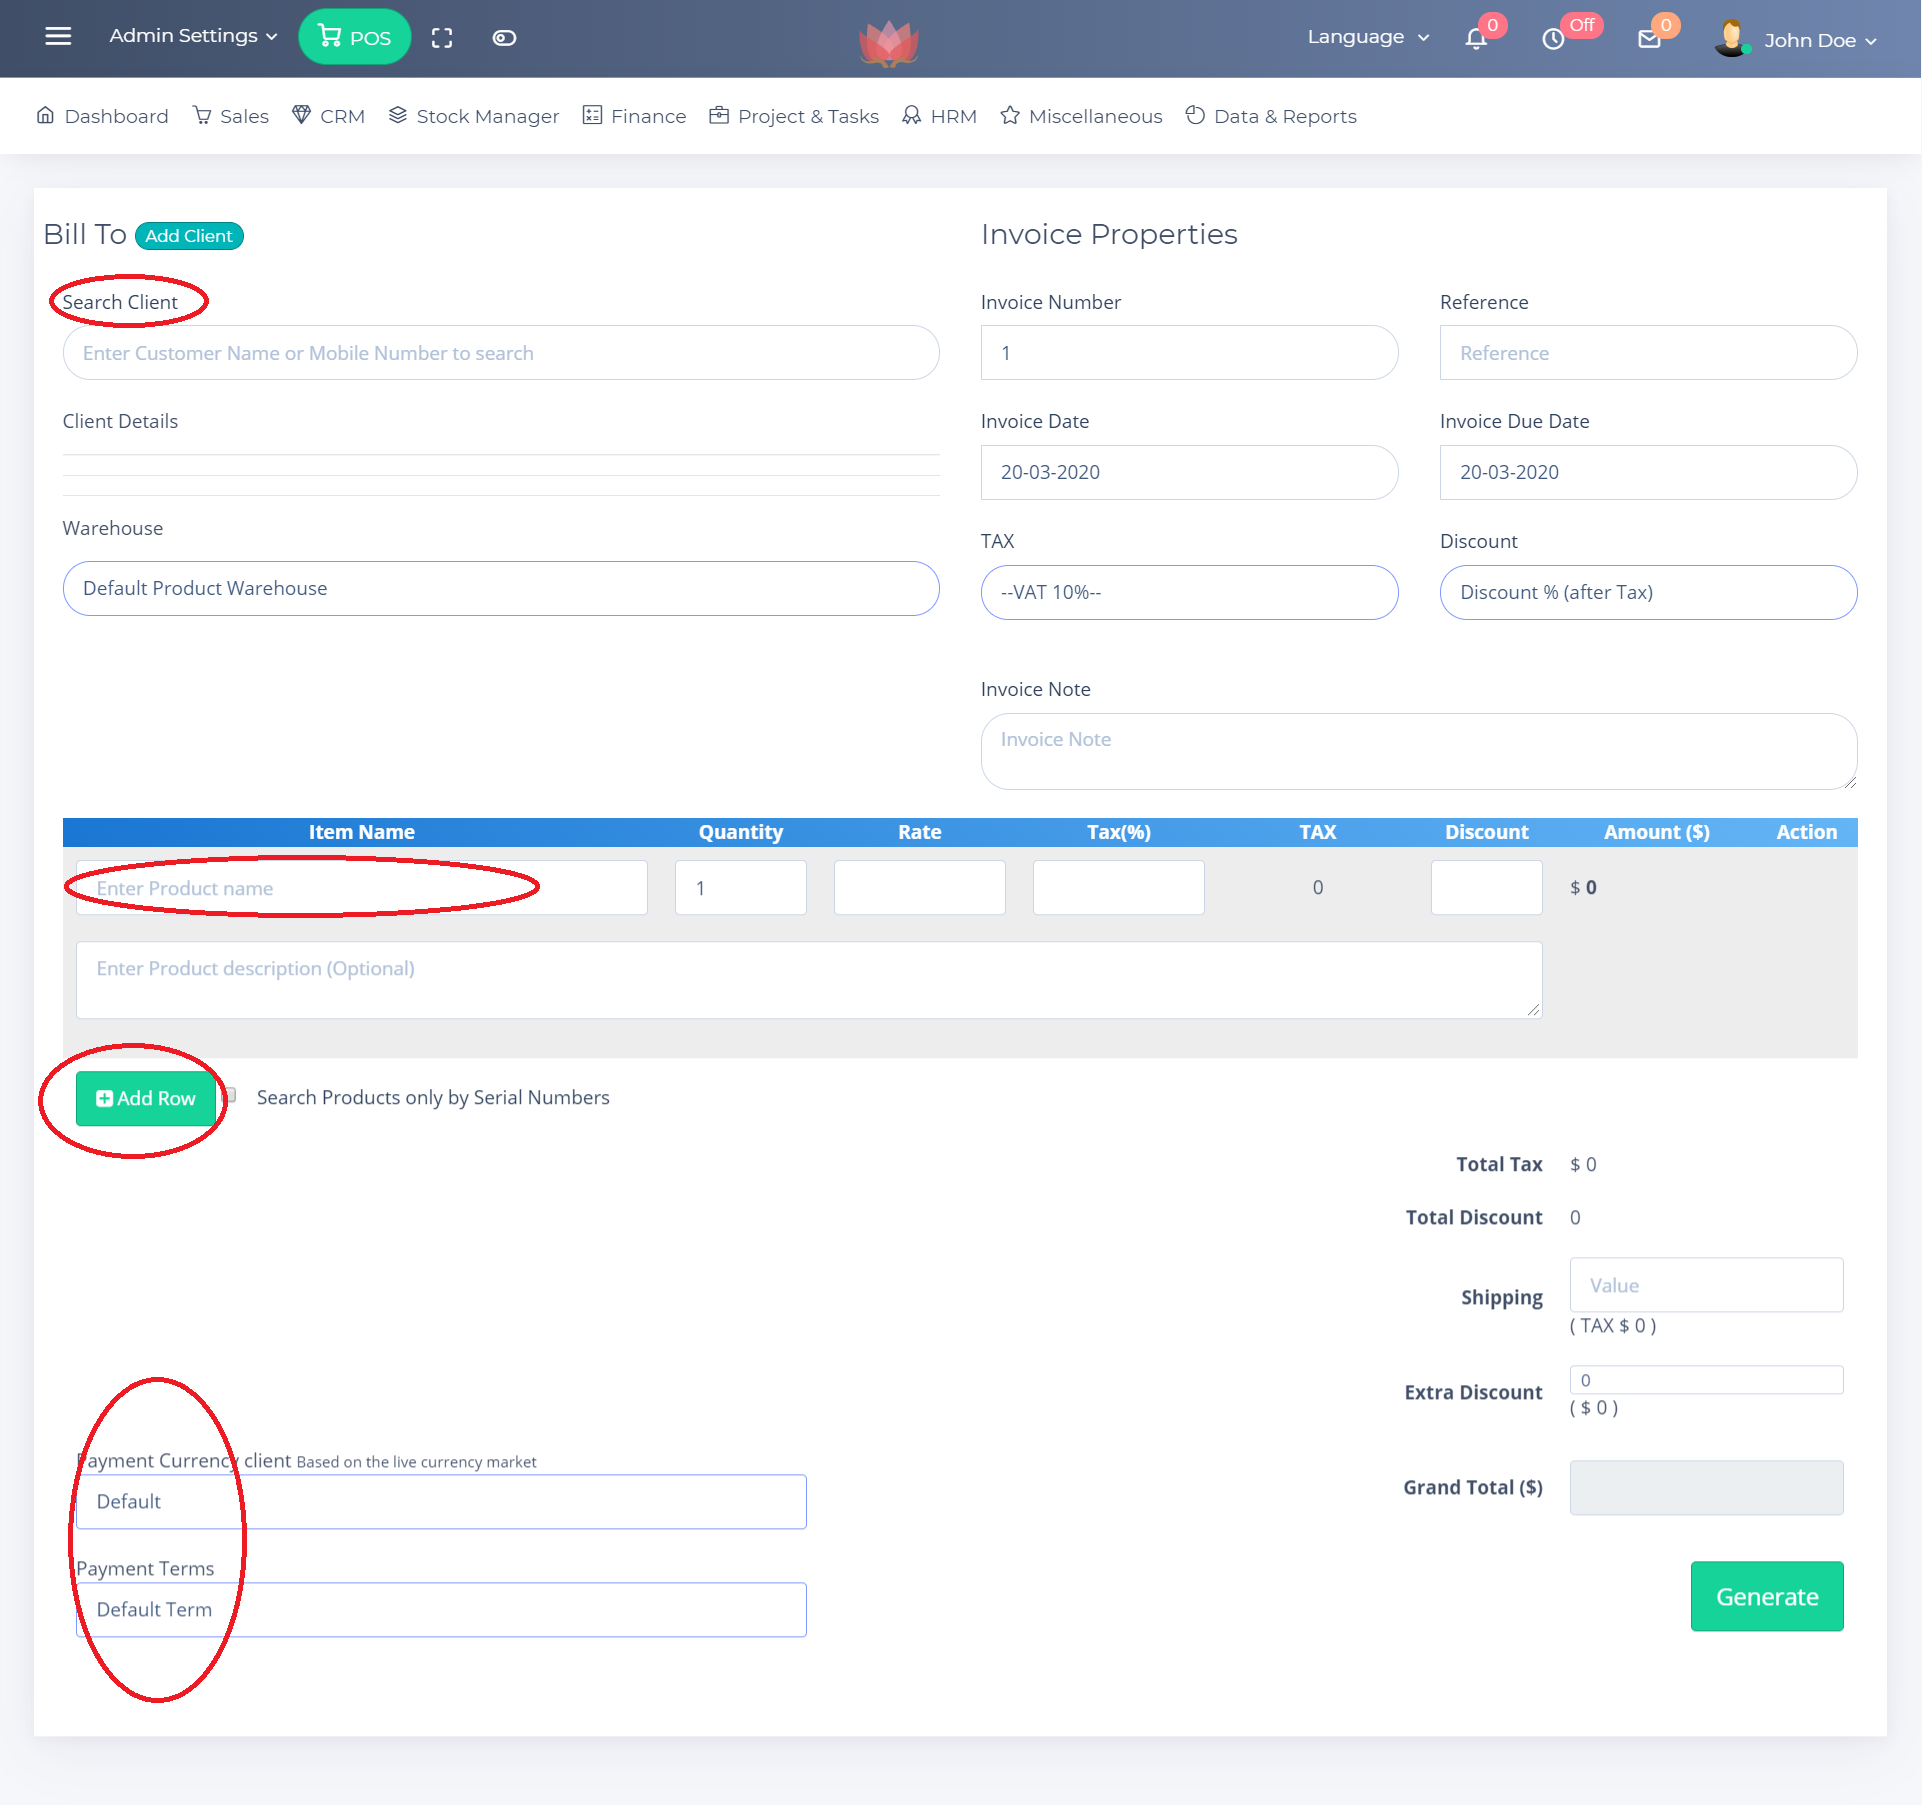
After Successful Generation you will see following buttons
- View (To Internal
View) - Print - Preview (Public Invoic link that can be accessed without login )

- Internal Invoice View 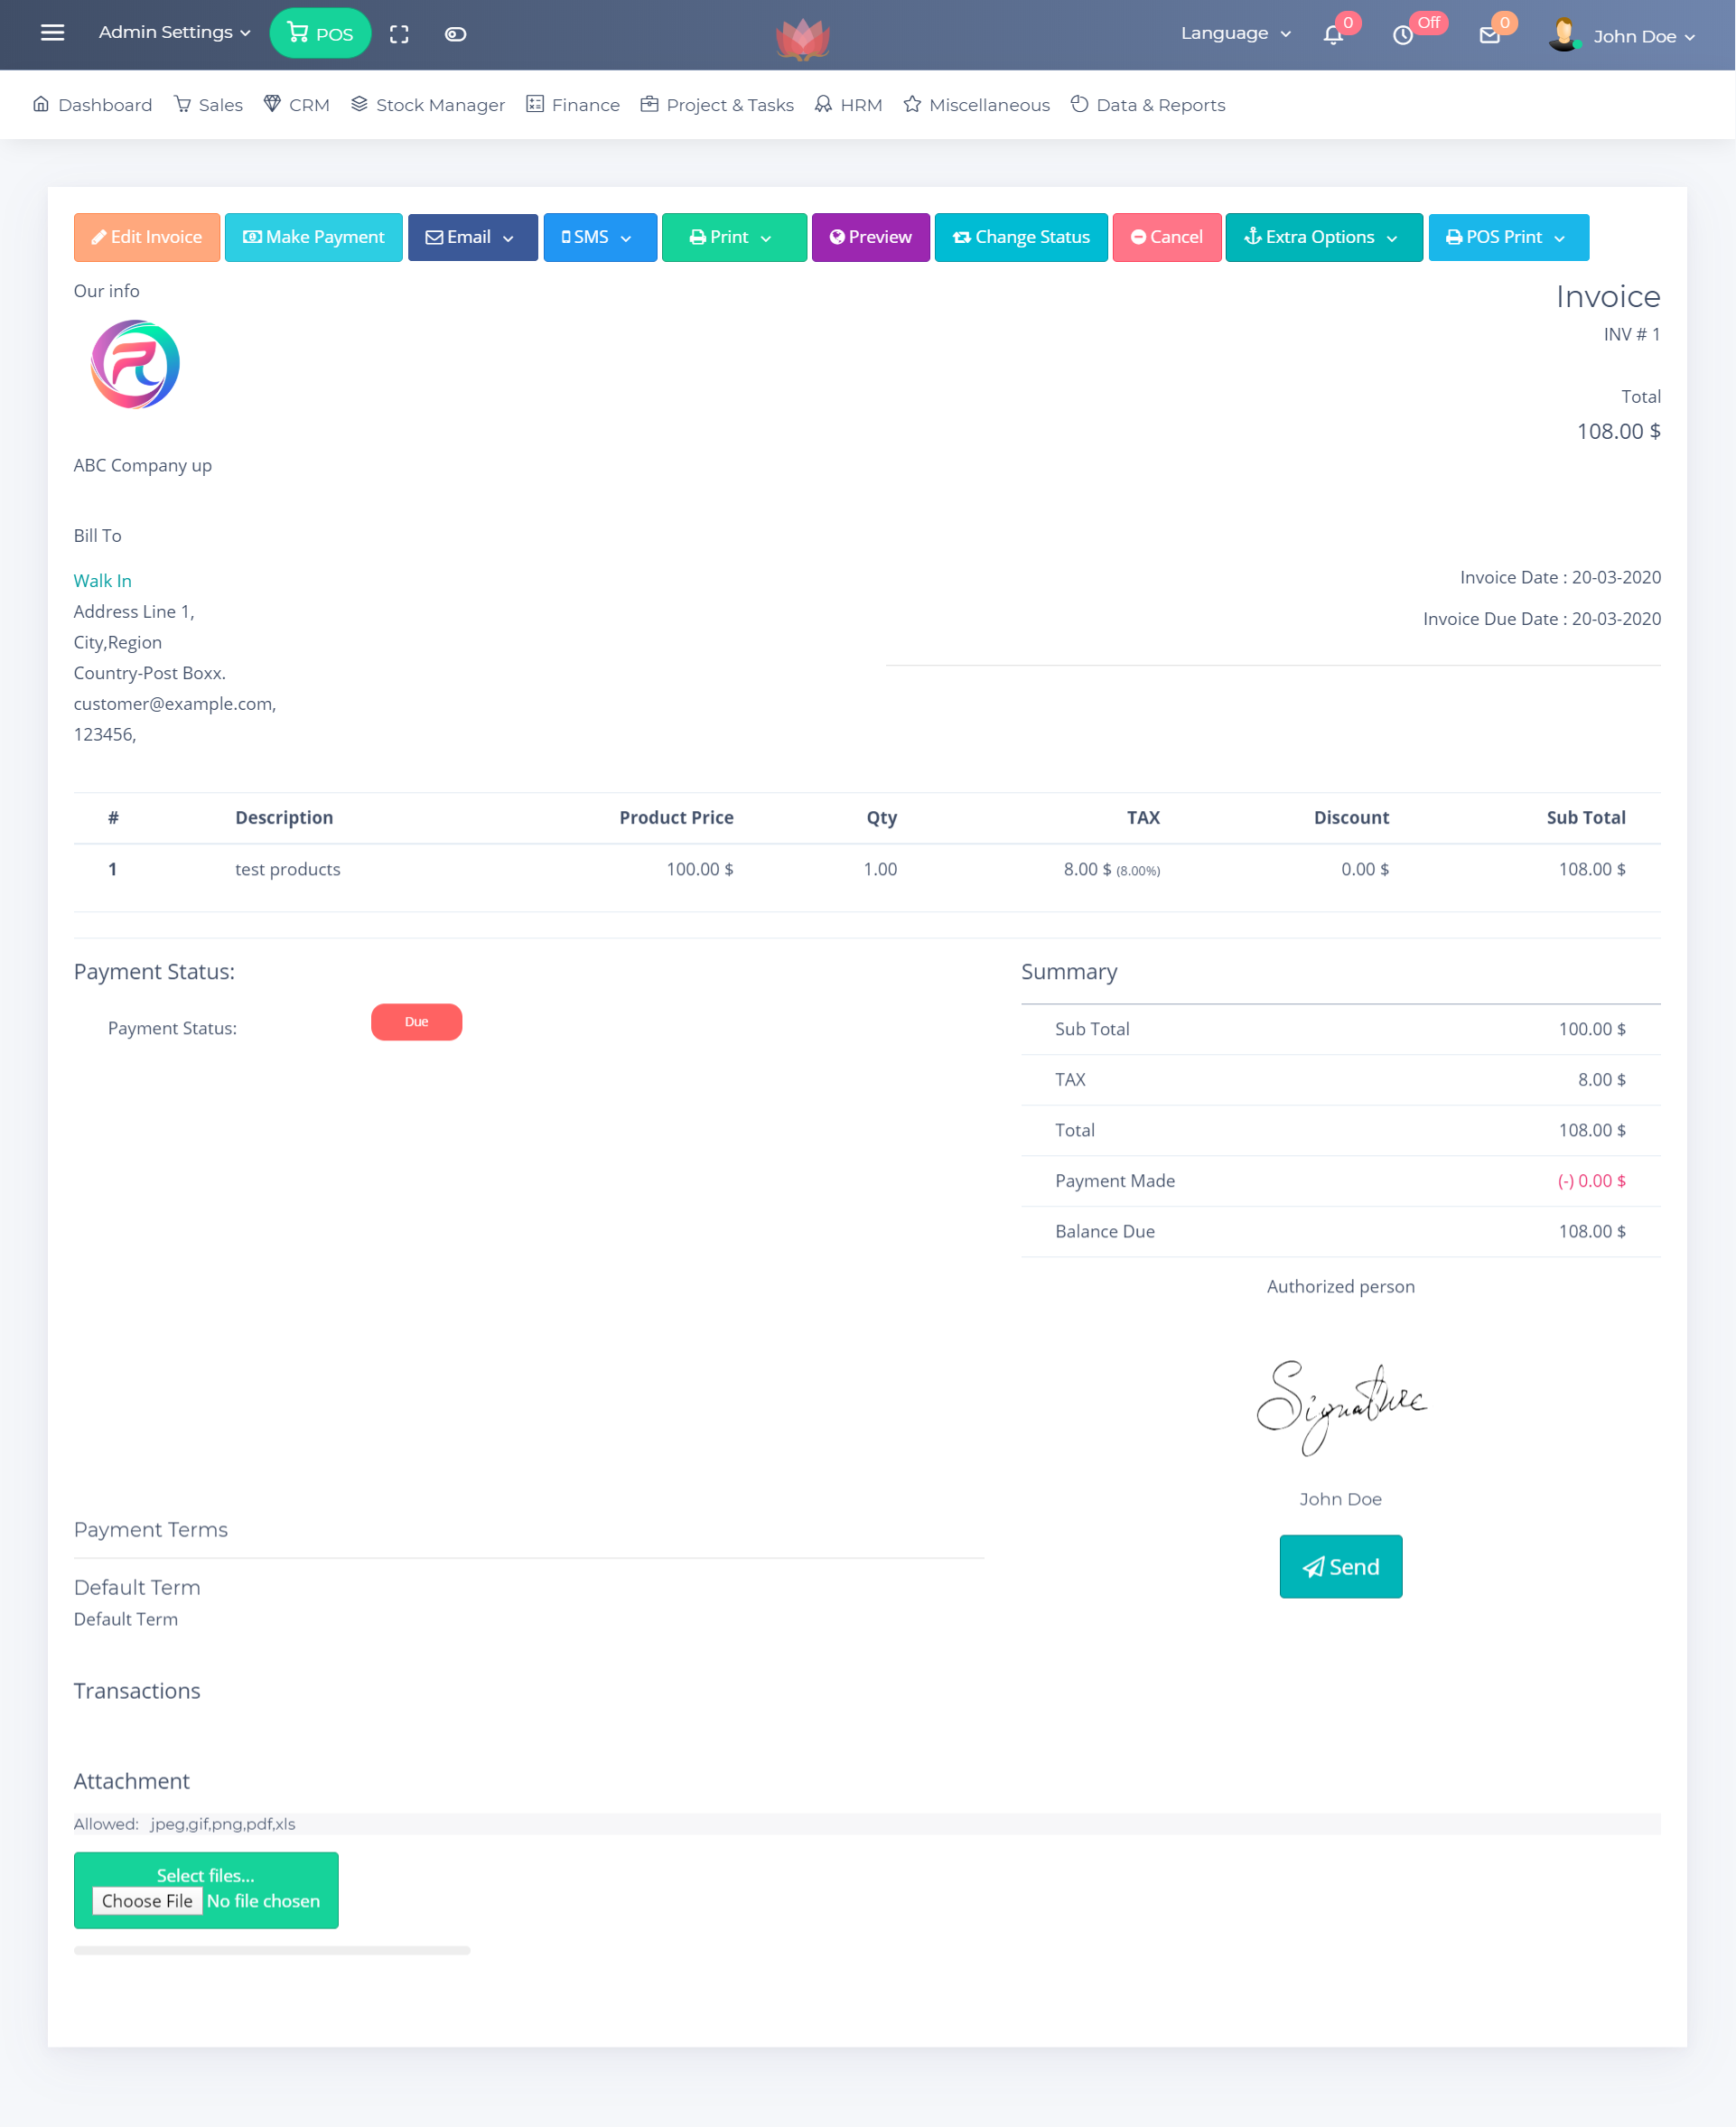
- Public Invoice View 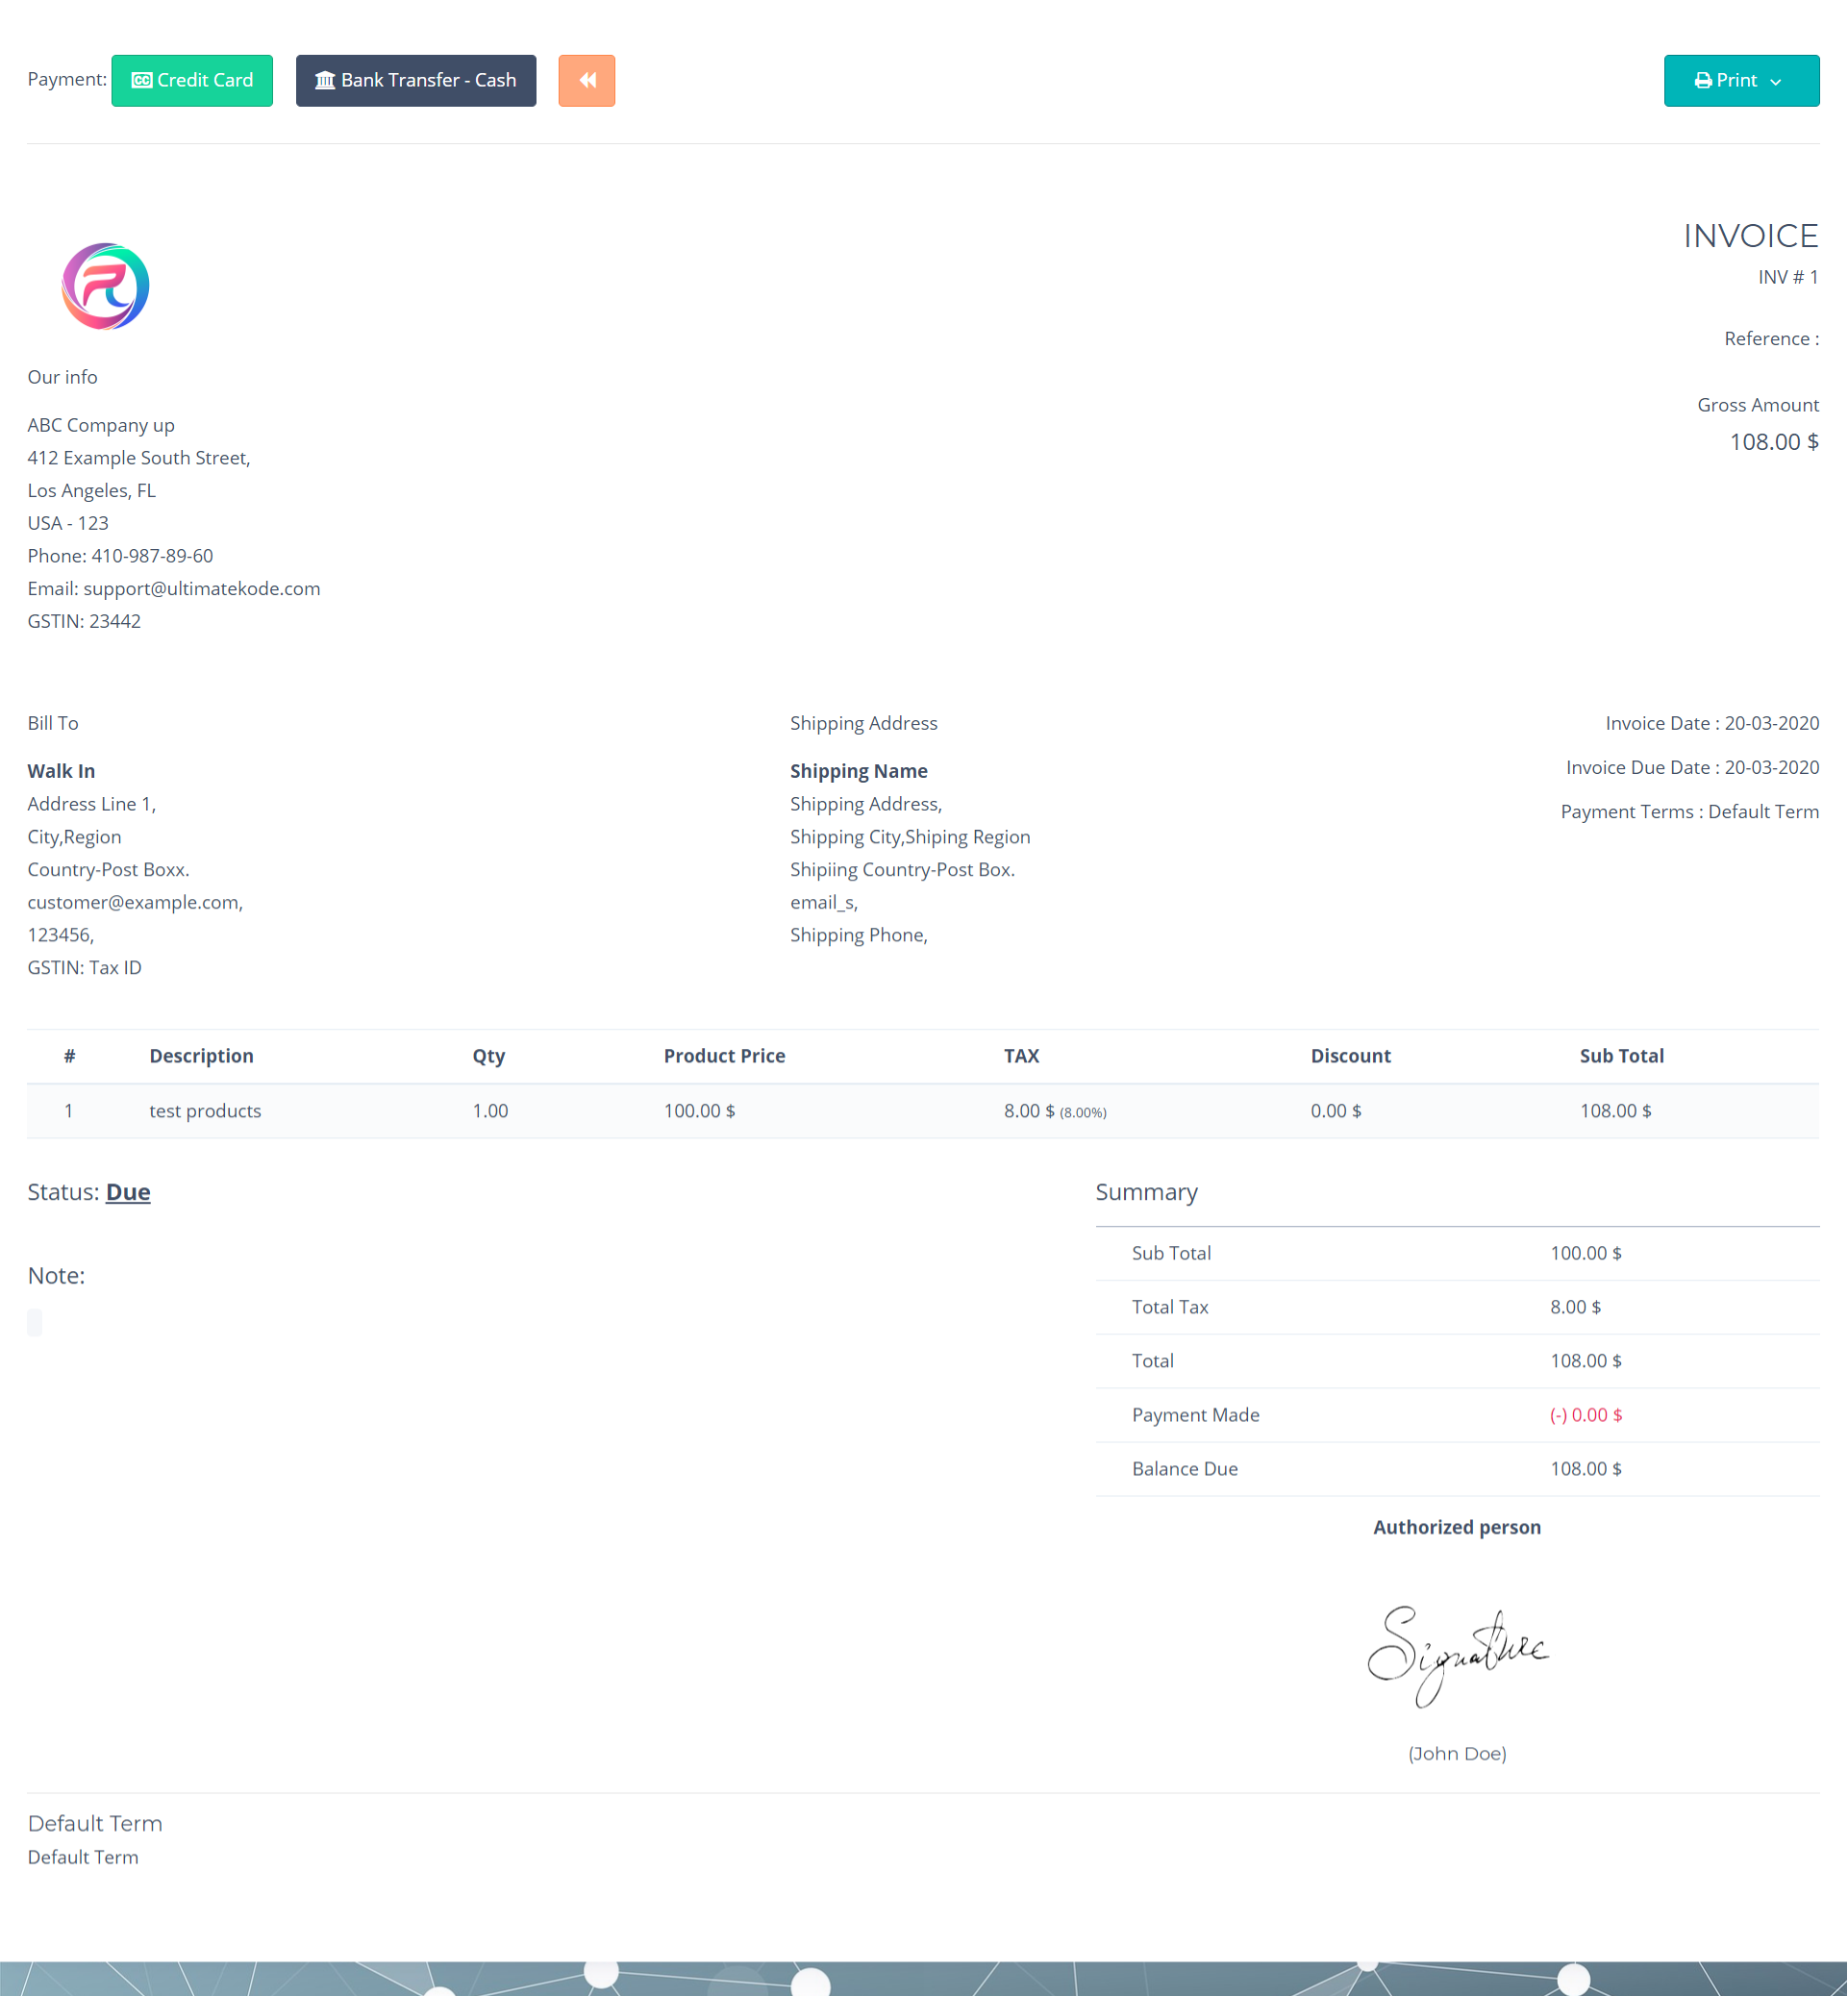
- Pay Invoice with Card 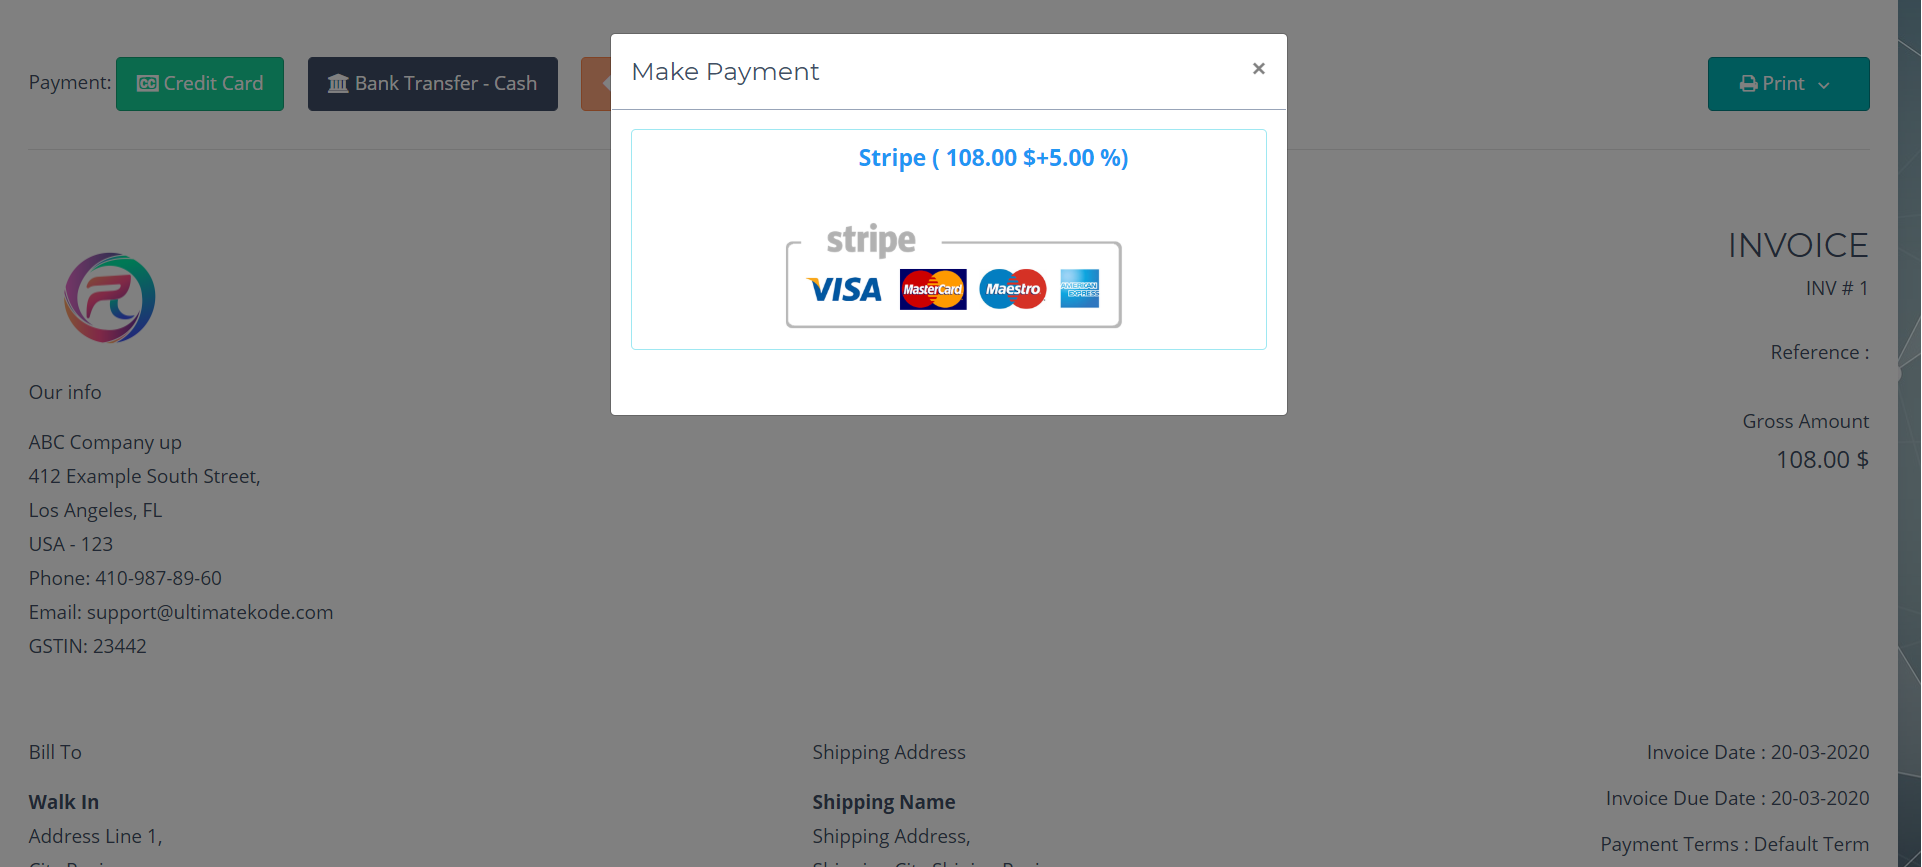
31. POS
1. To use POS panel, you need to open the drawer/register
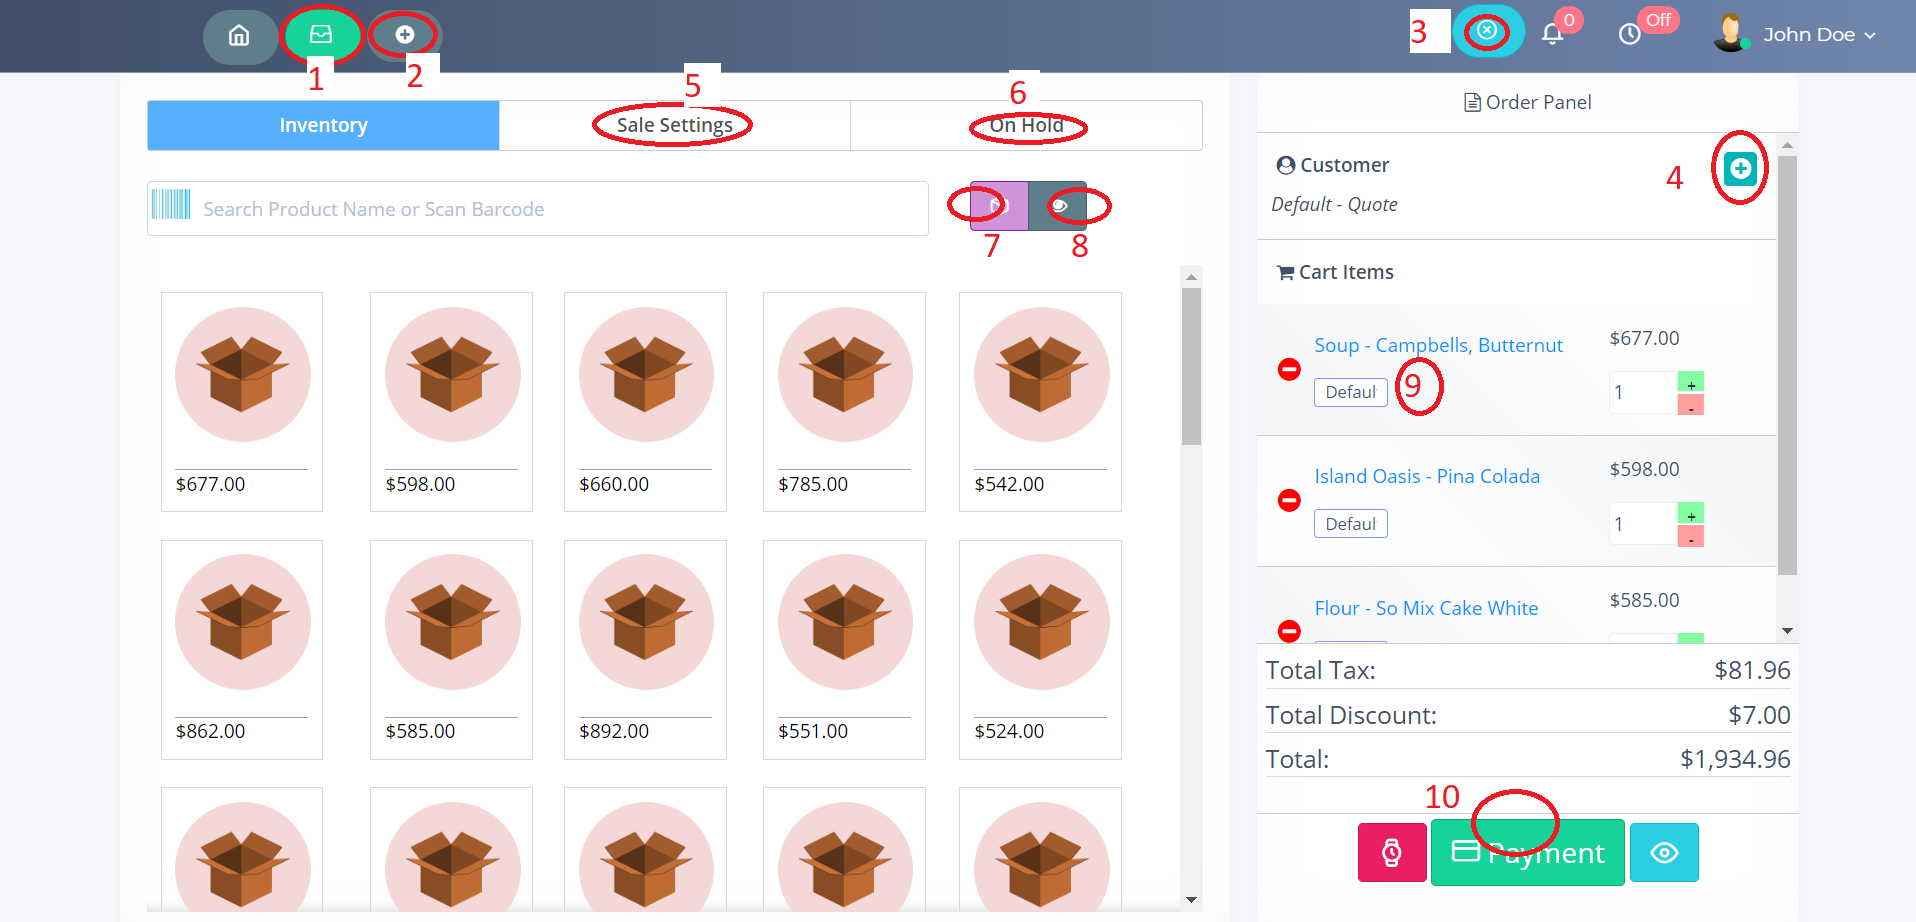
- 1 -Register/Drawer Status
- 2 - Create Fresh Invoice
- 3 - Close Register/Drawer
- 4 - Add New Customer Or Search
- 5 - Invoice Settings
- 6 - On Hold Drafts
- 7 - POS Product Search Settings
- 8 - POS Product Styles
- 9 - Product
- 10 - Payment & Print Button
- Style 1 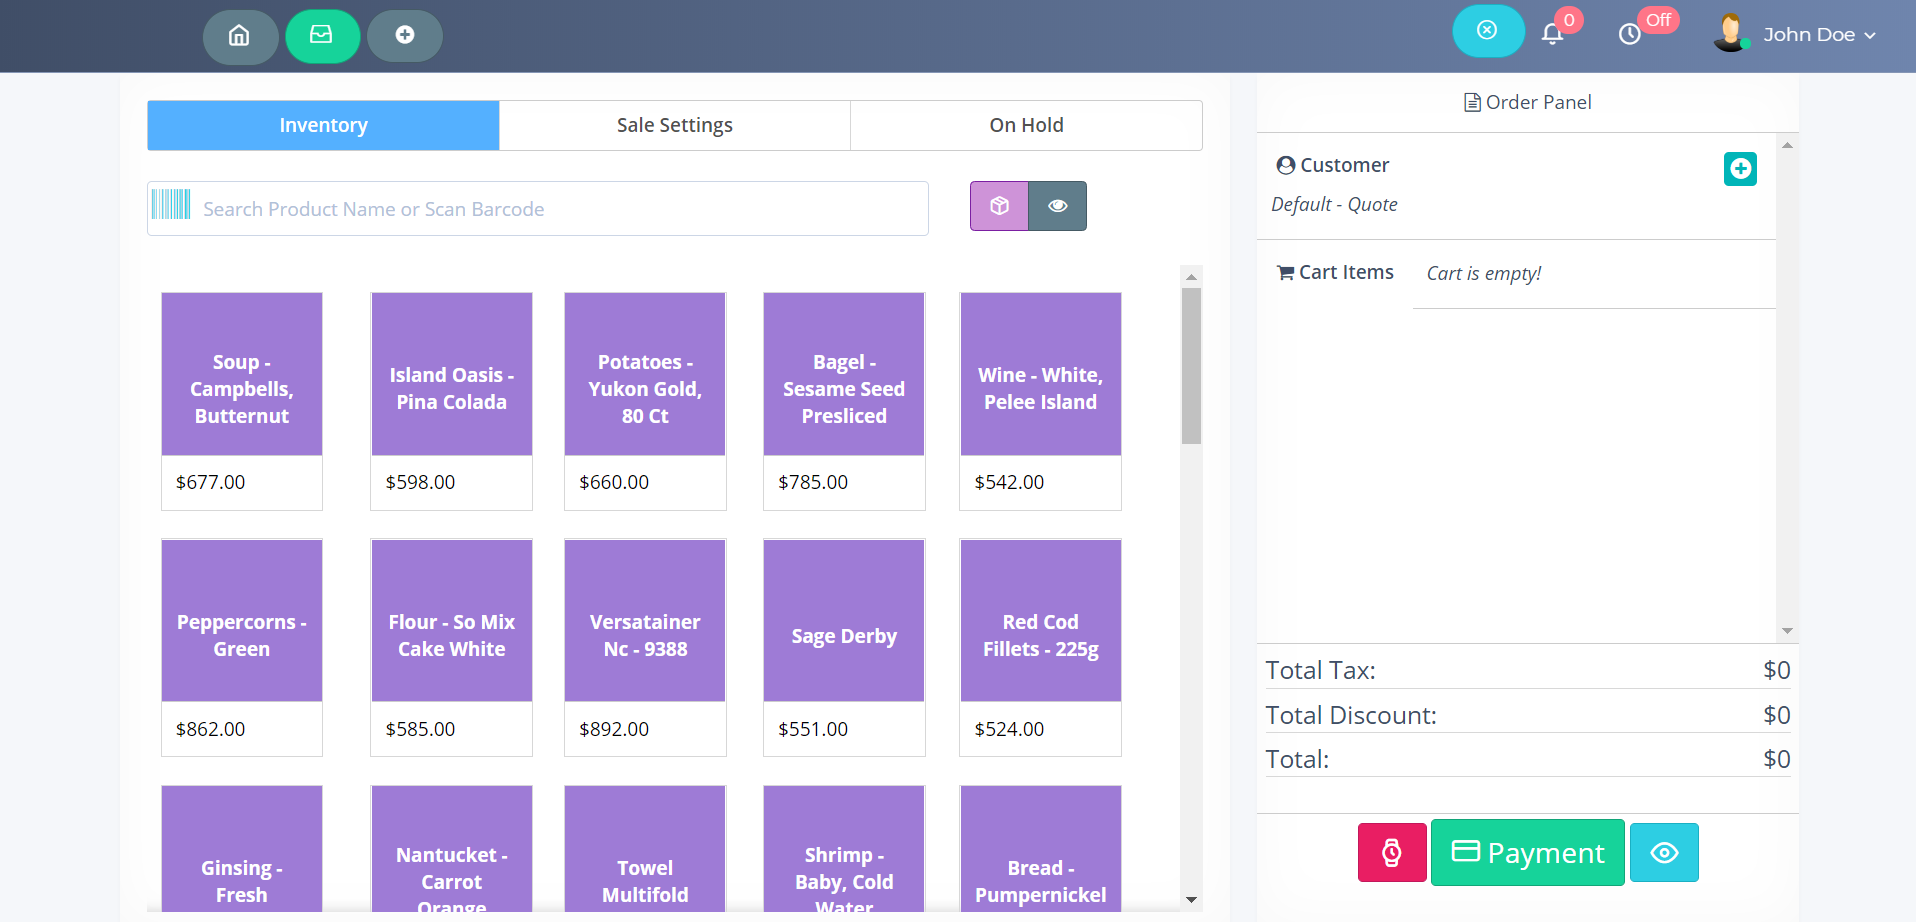
- Style 2 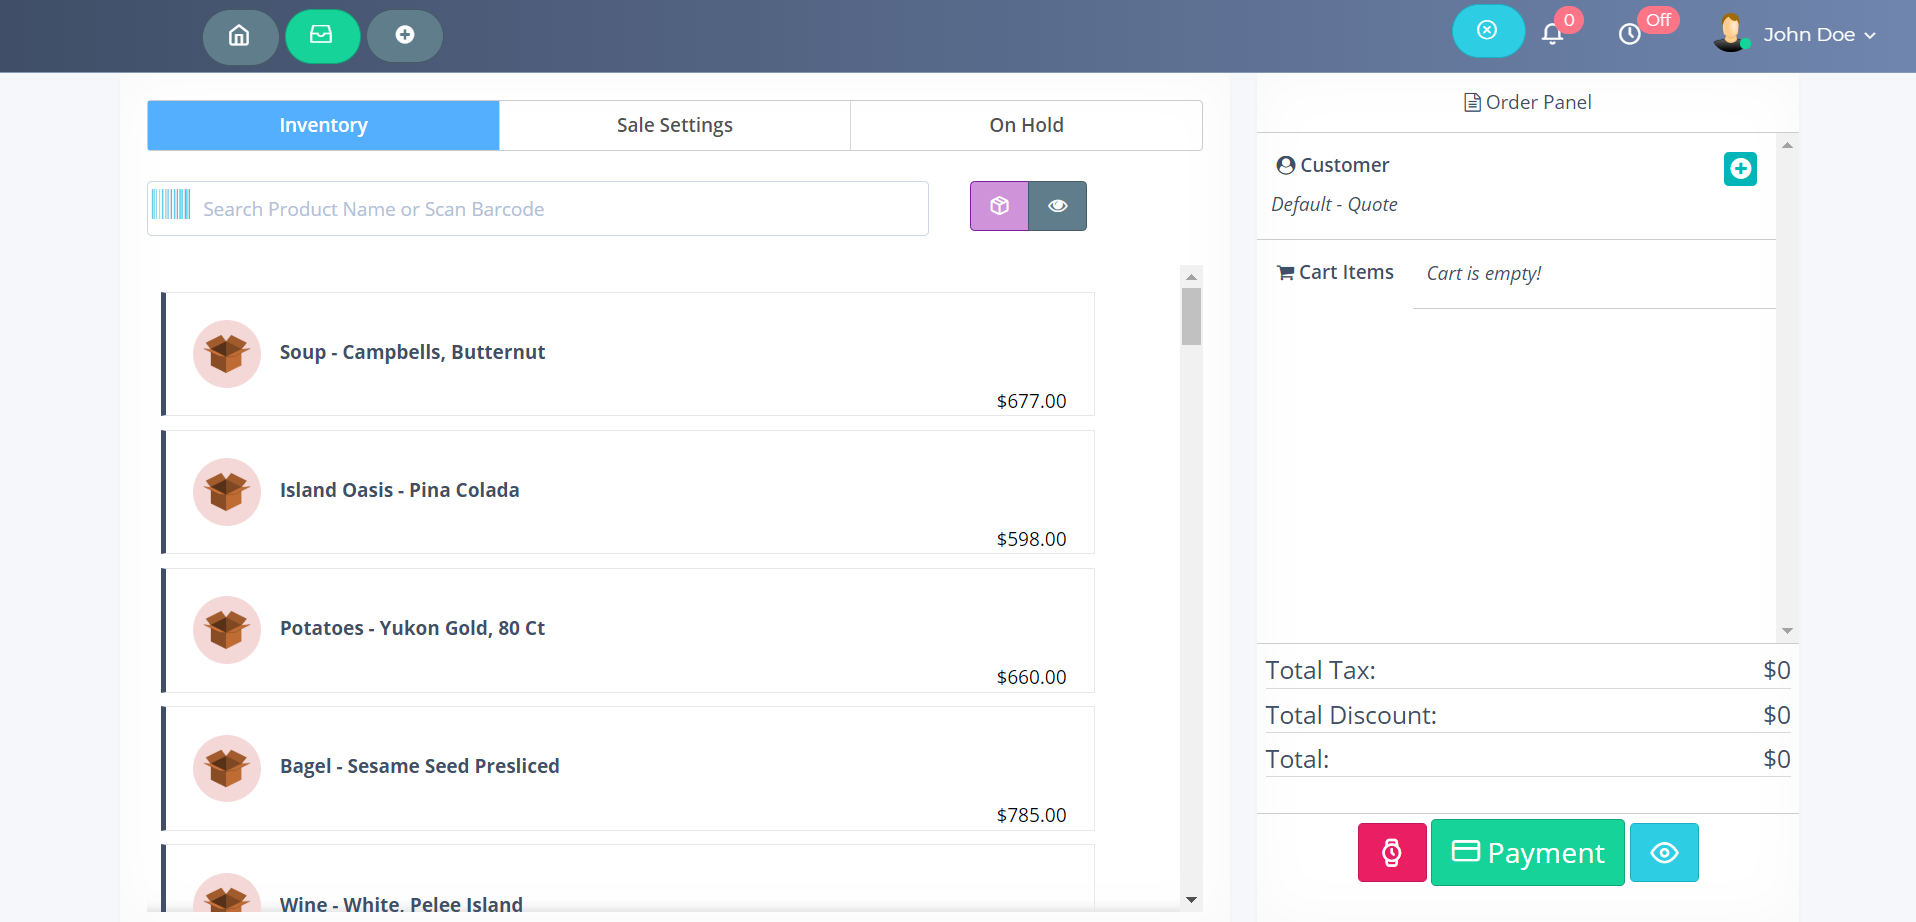
- Payment 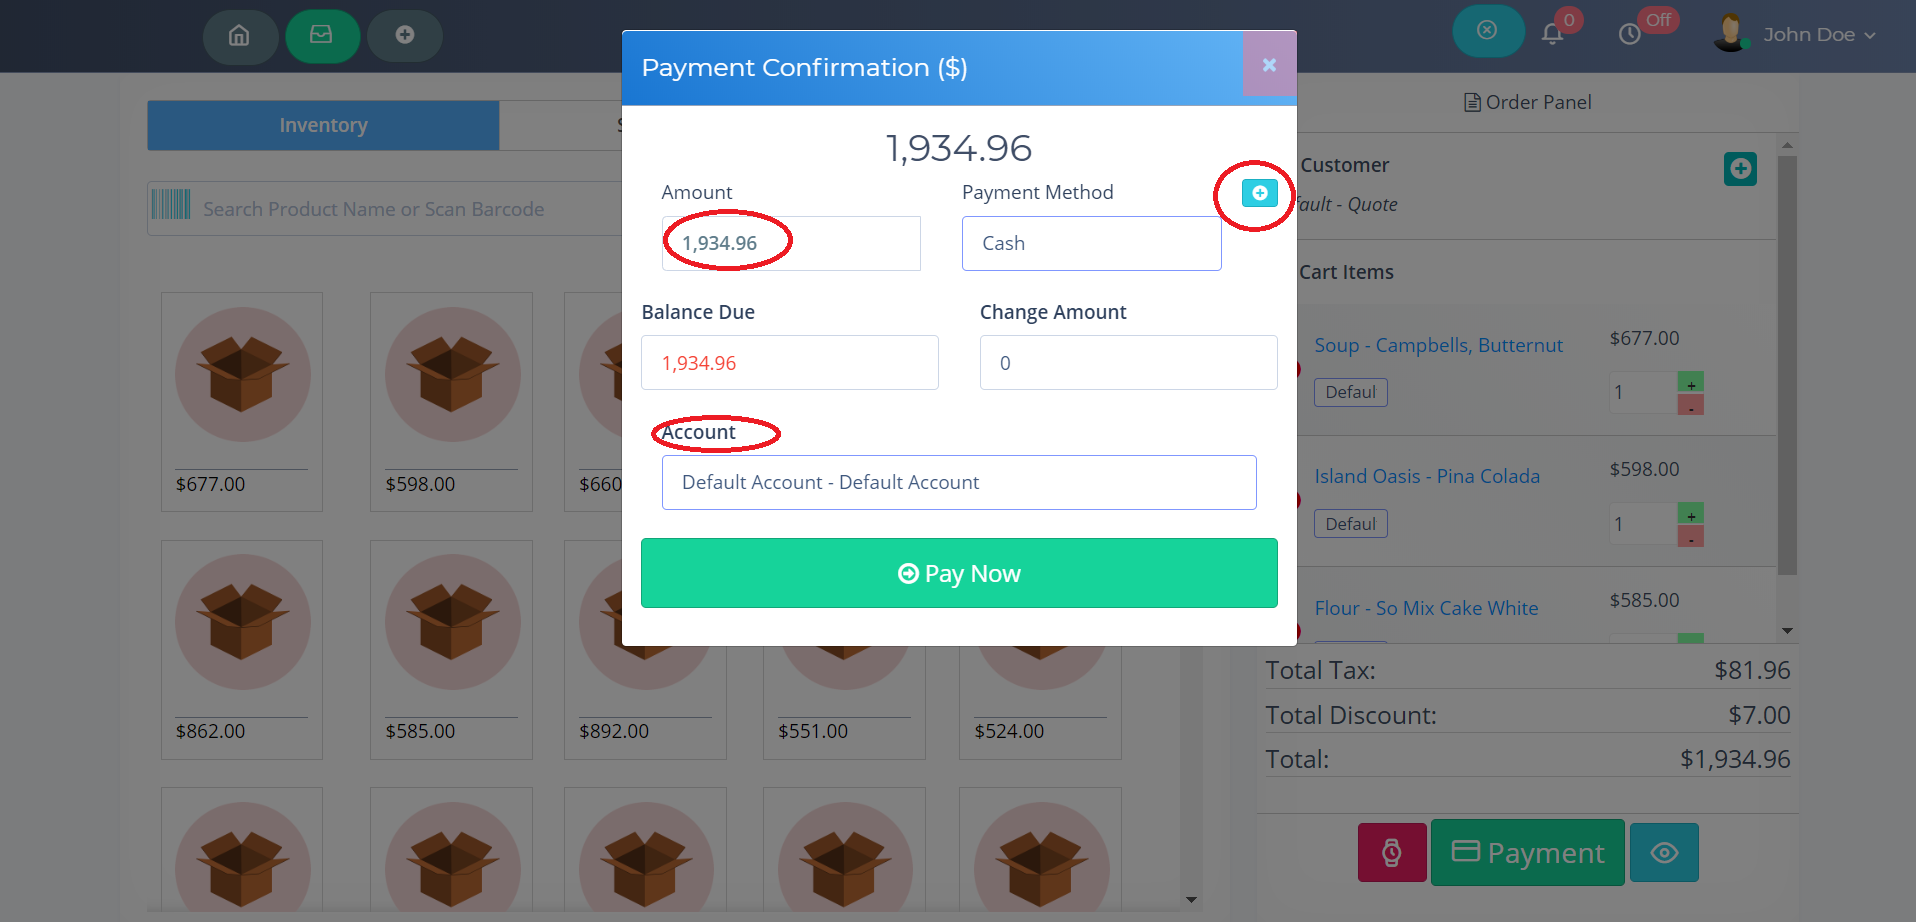
- Print 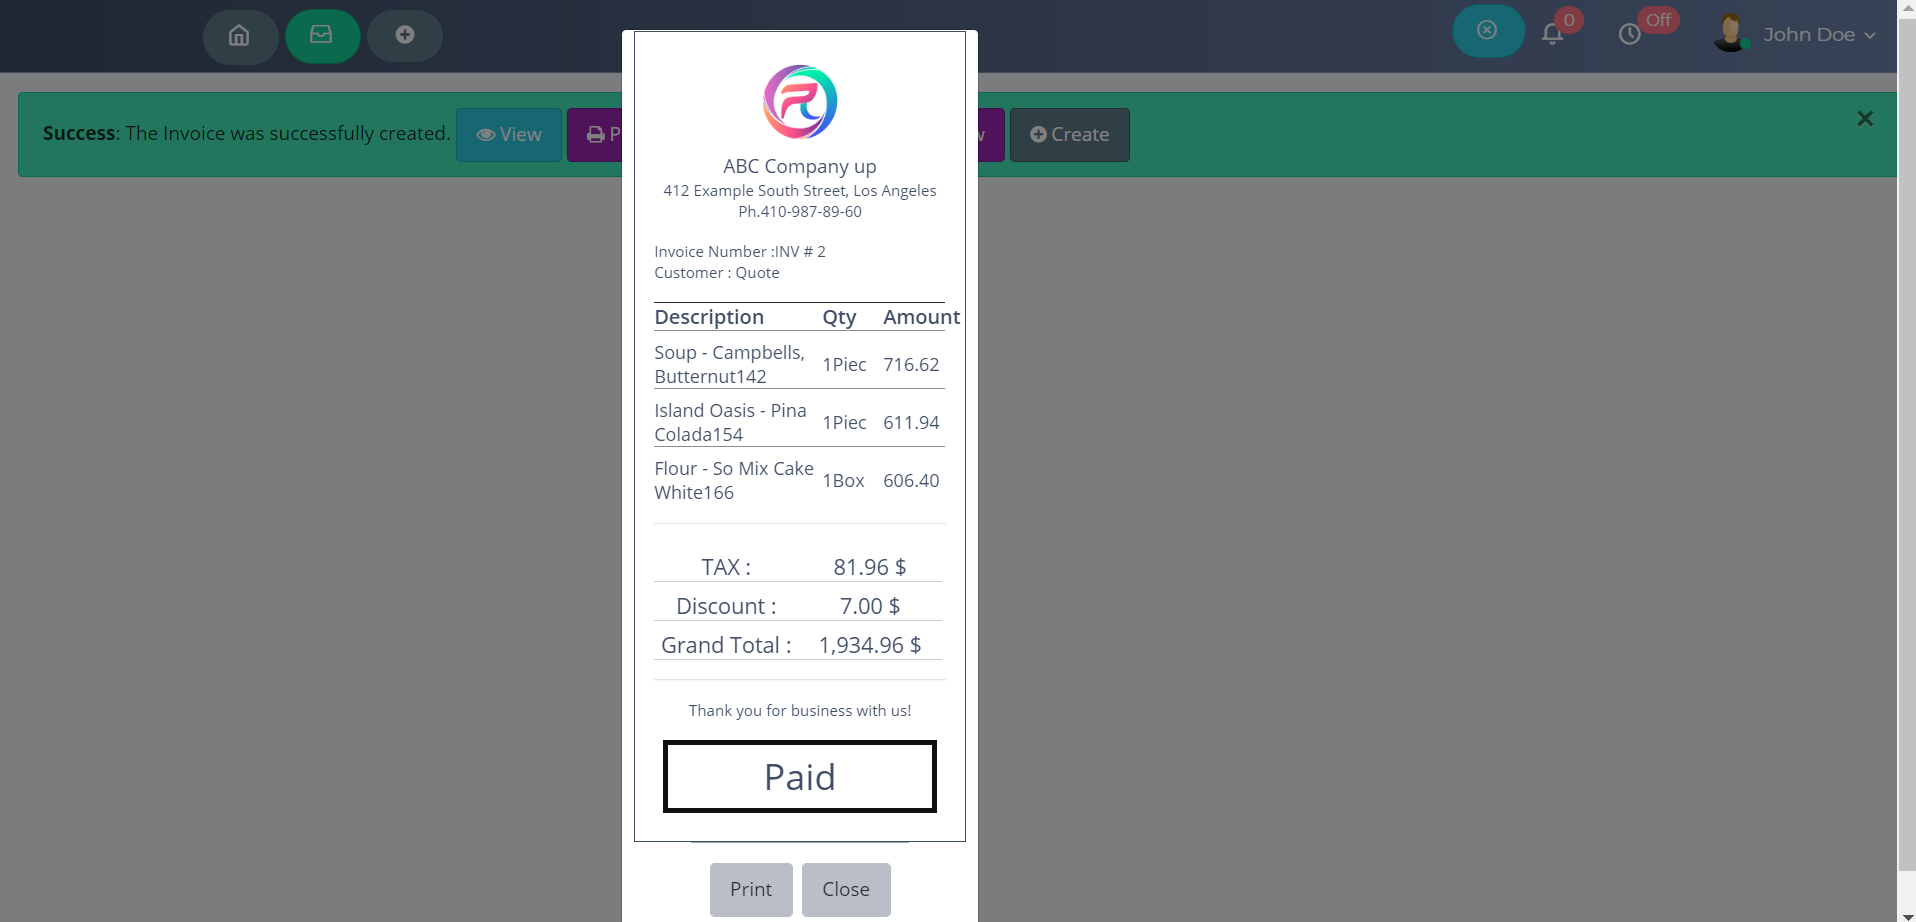
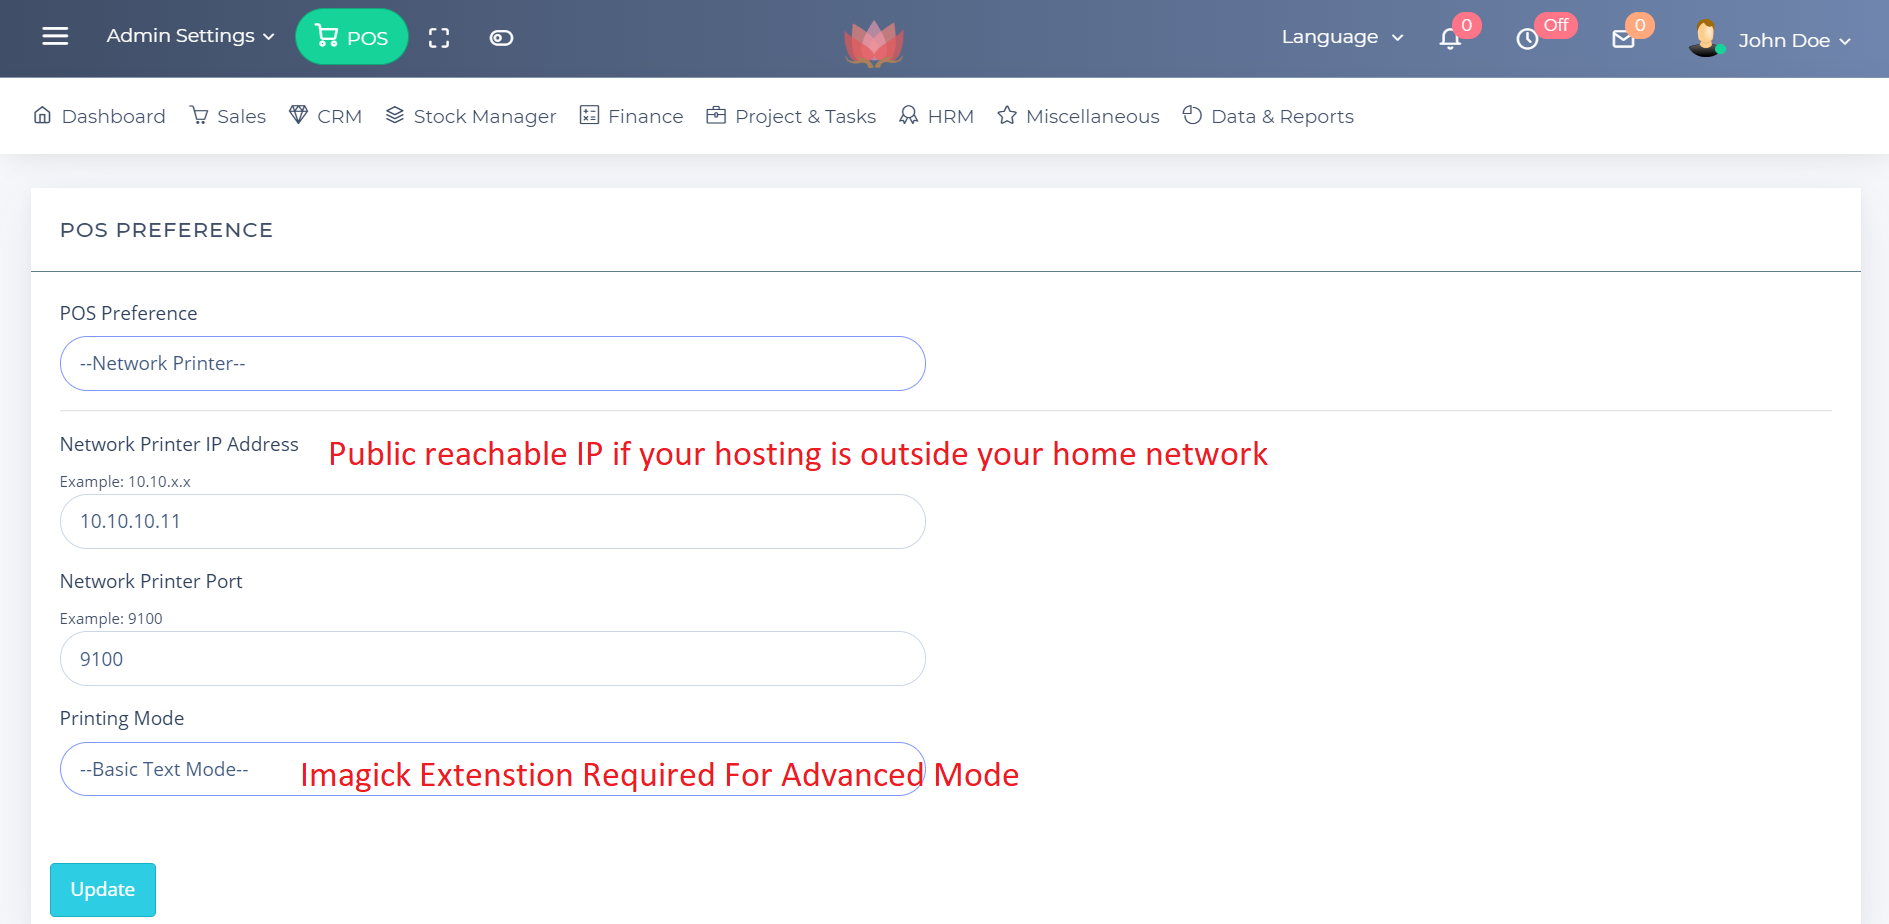
32. POS Thermal Printer
Simple: You can use browser mode to print with browser in POS Preference
Advance : You can configure your network printer
33.Customers
To manage Customers Go > Crm > Manage Customers
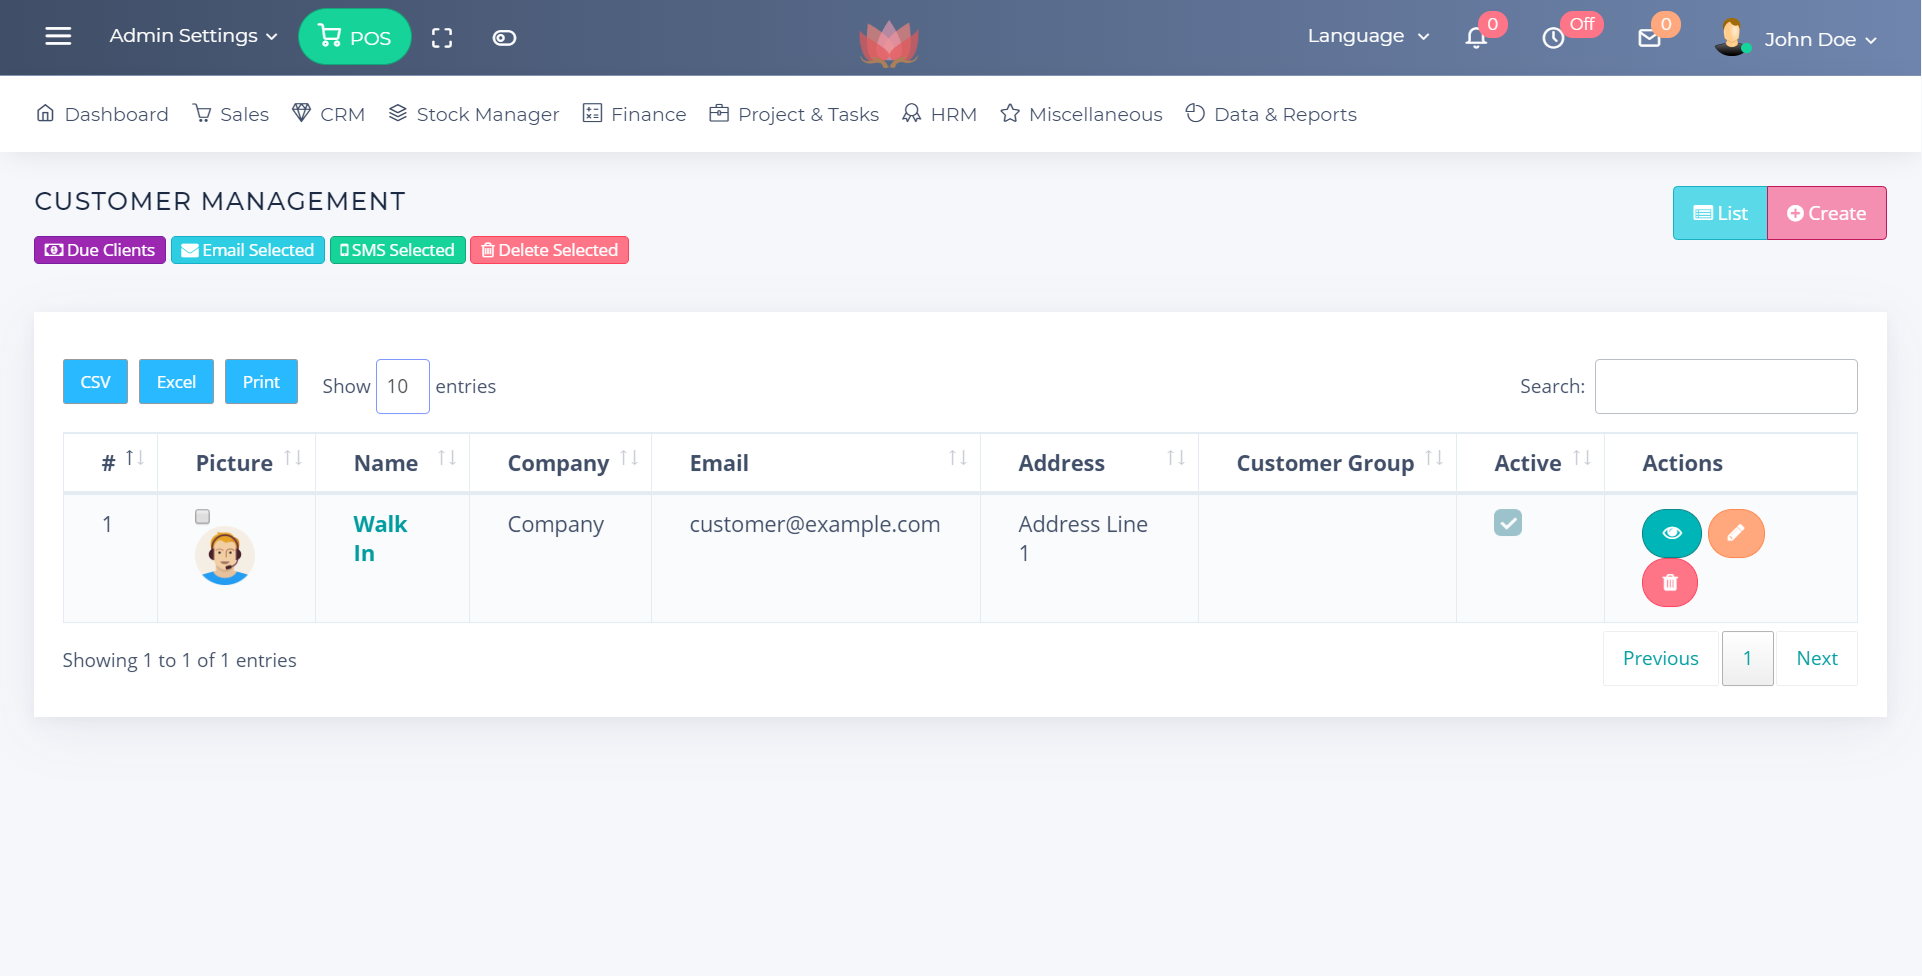
- View Customer Details 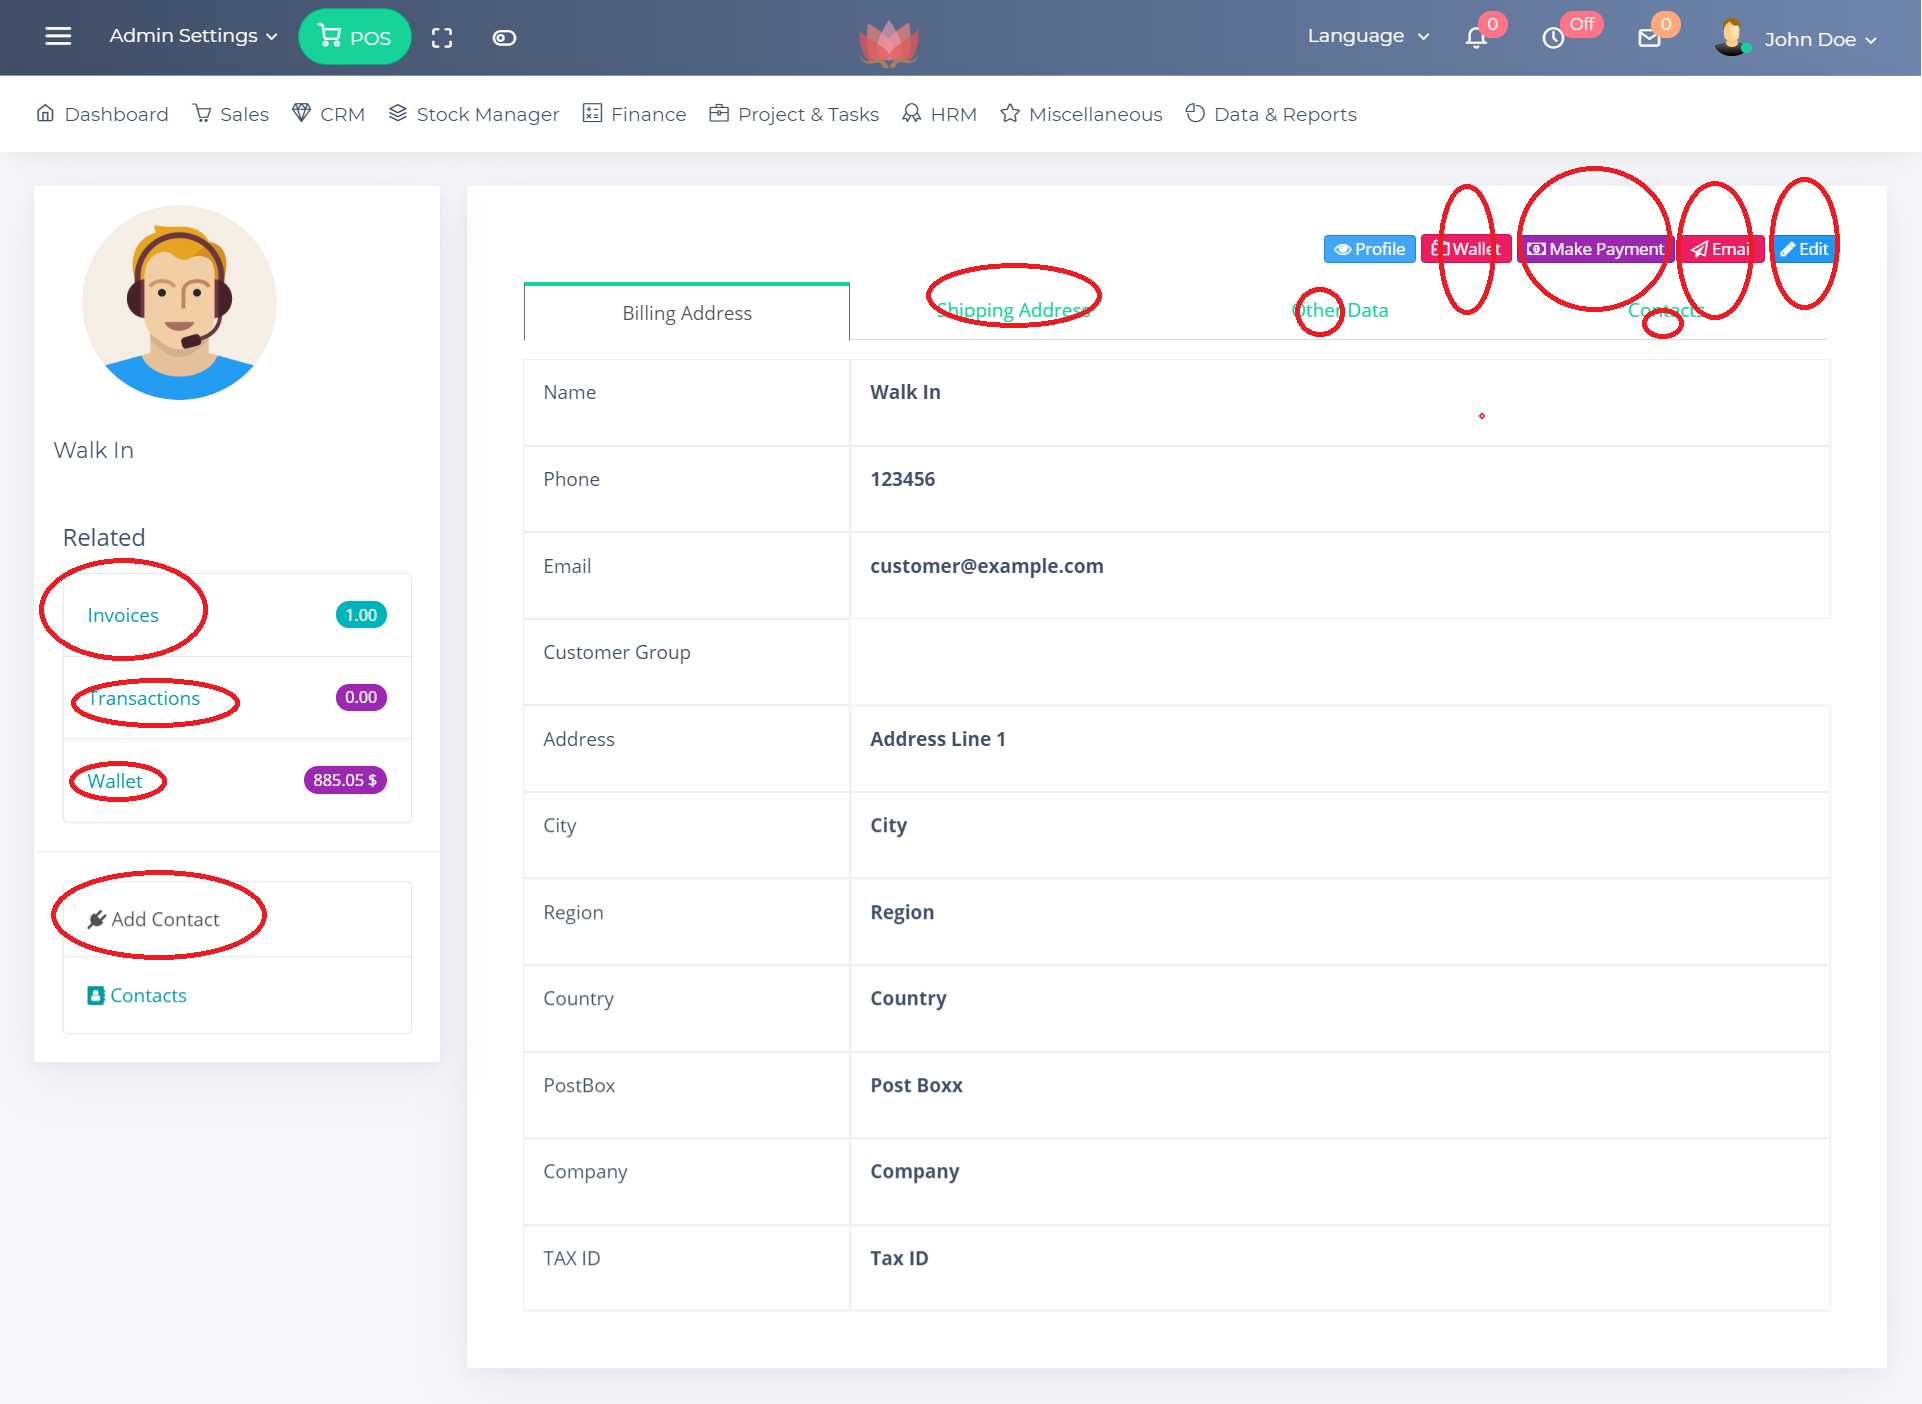
- Sub Contacts 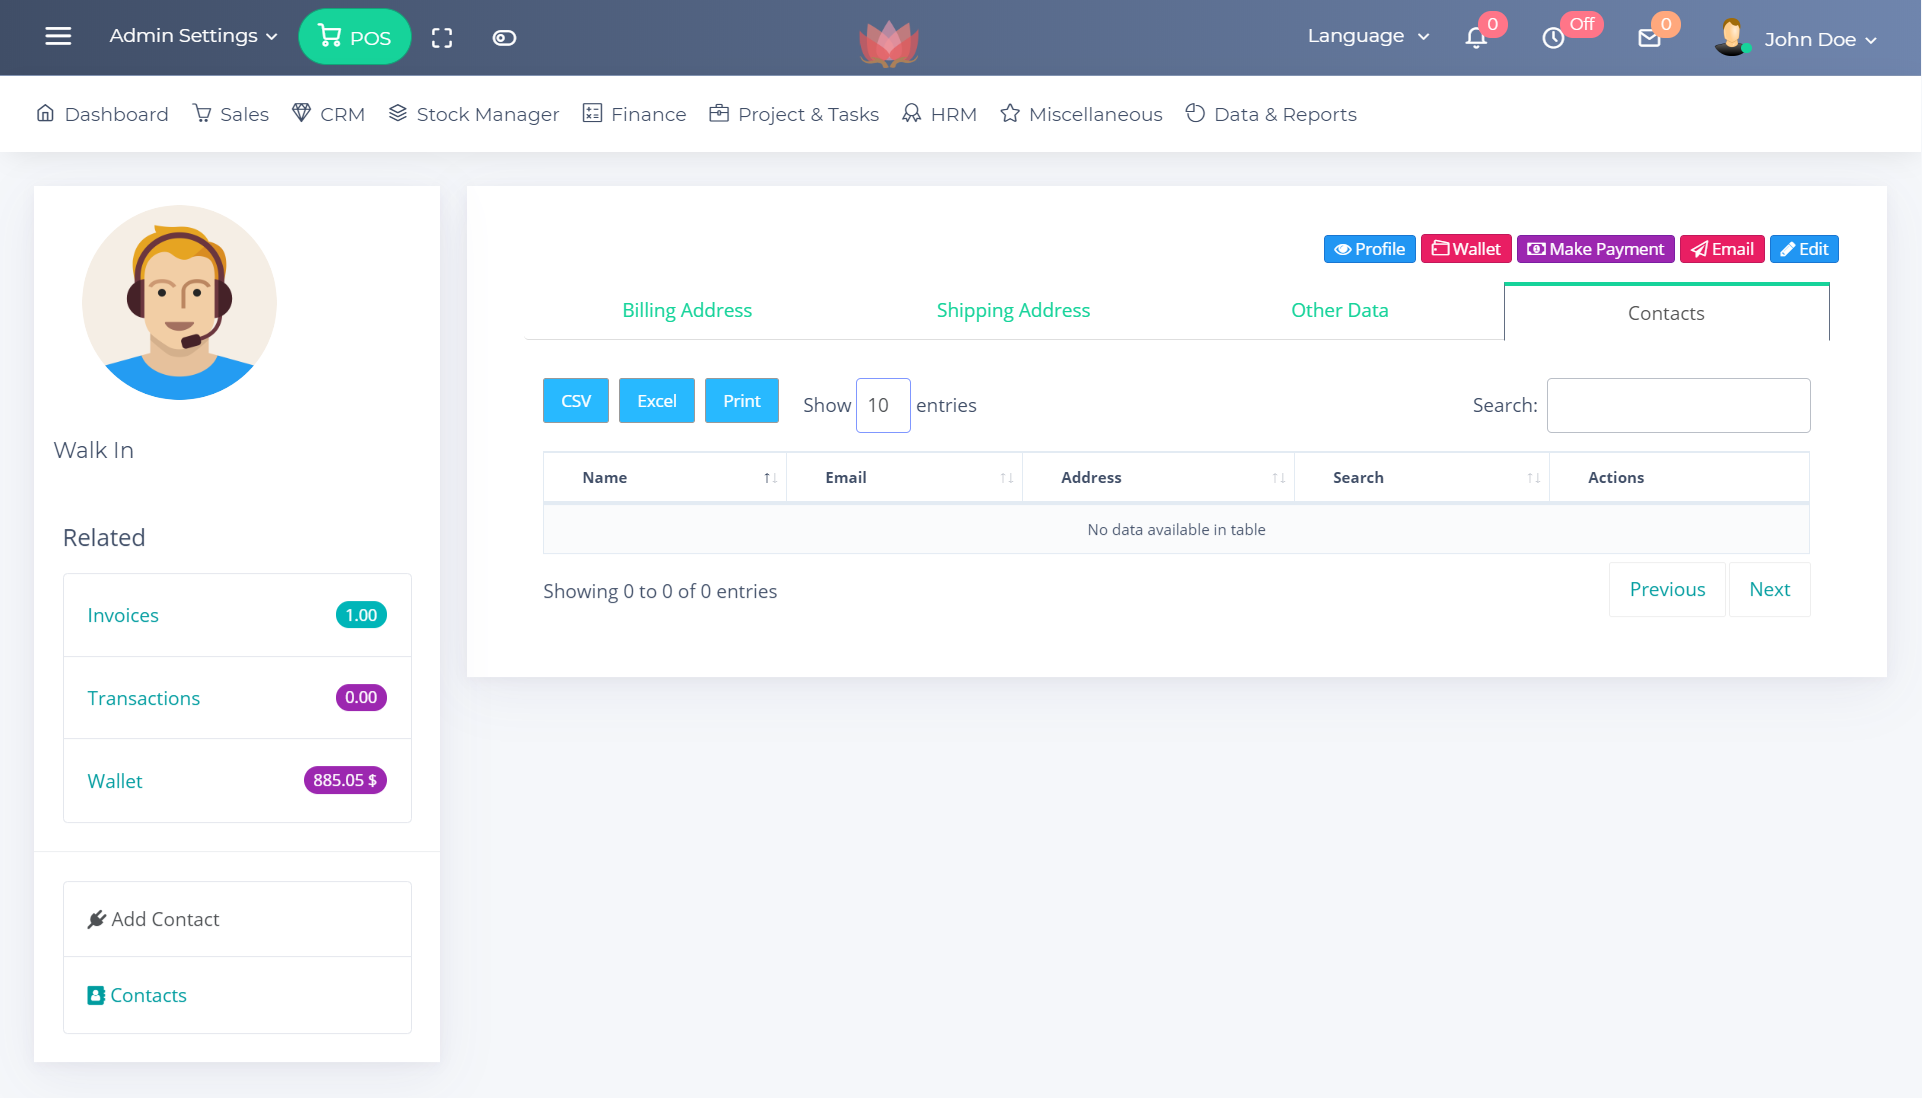
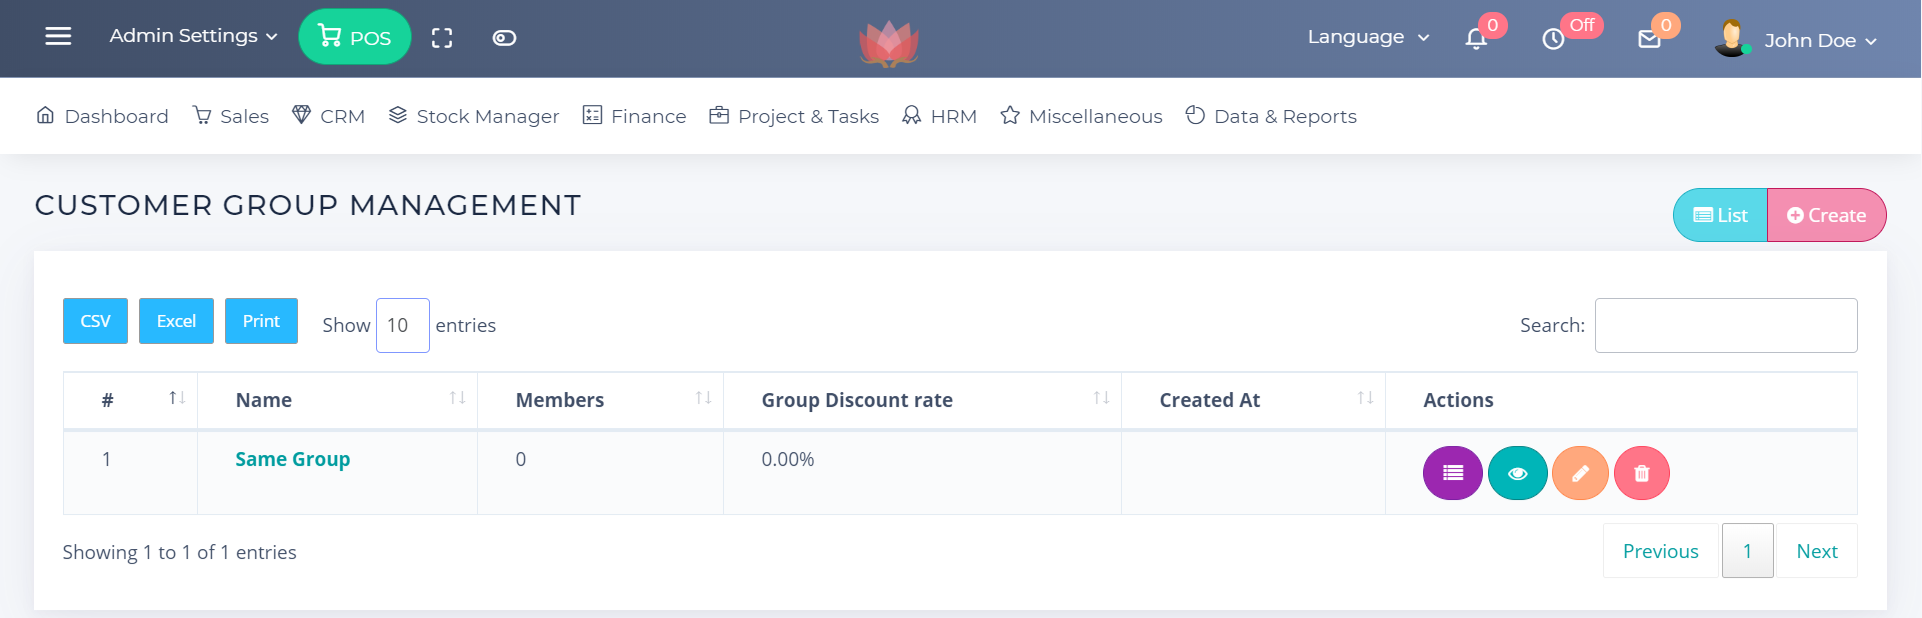
34.Customer Groups
To manage Customers Groups Go > Crm > Manage Groups Customers
35.Stock Manager Section
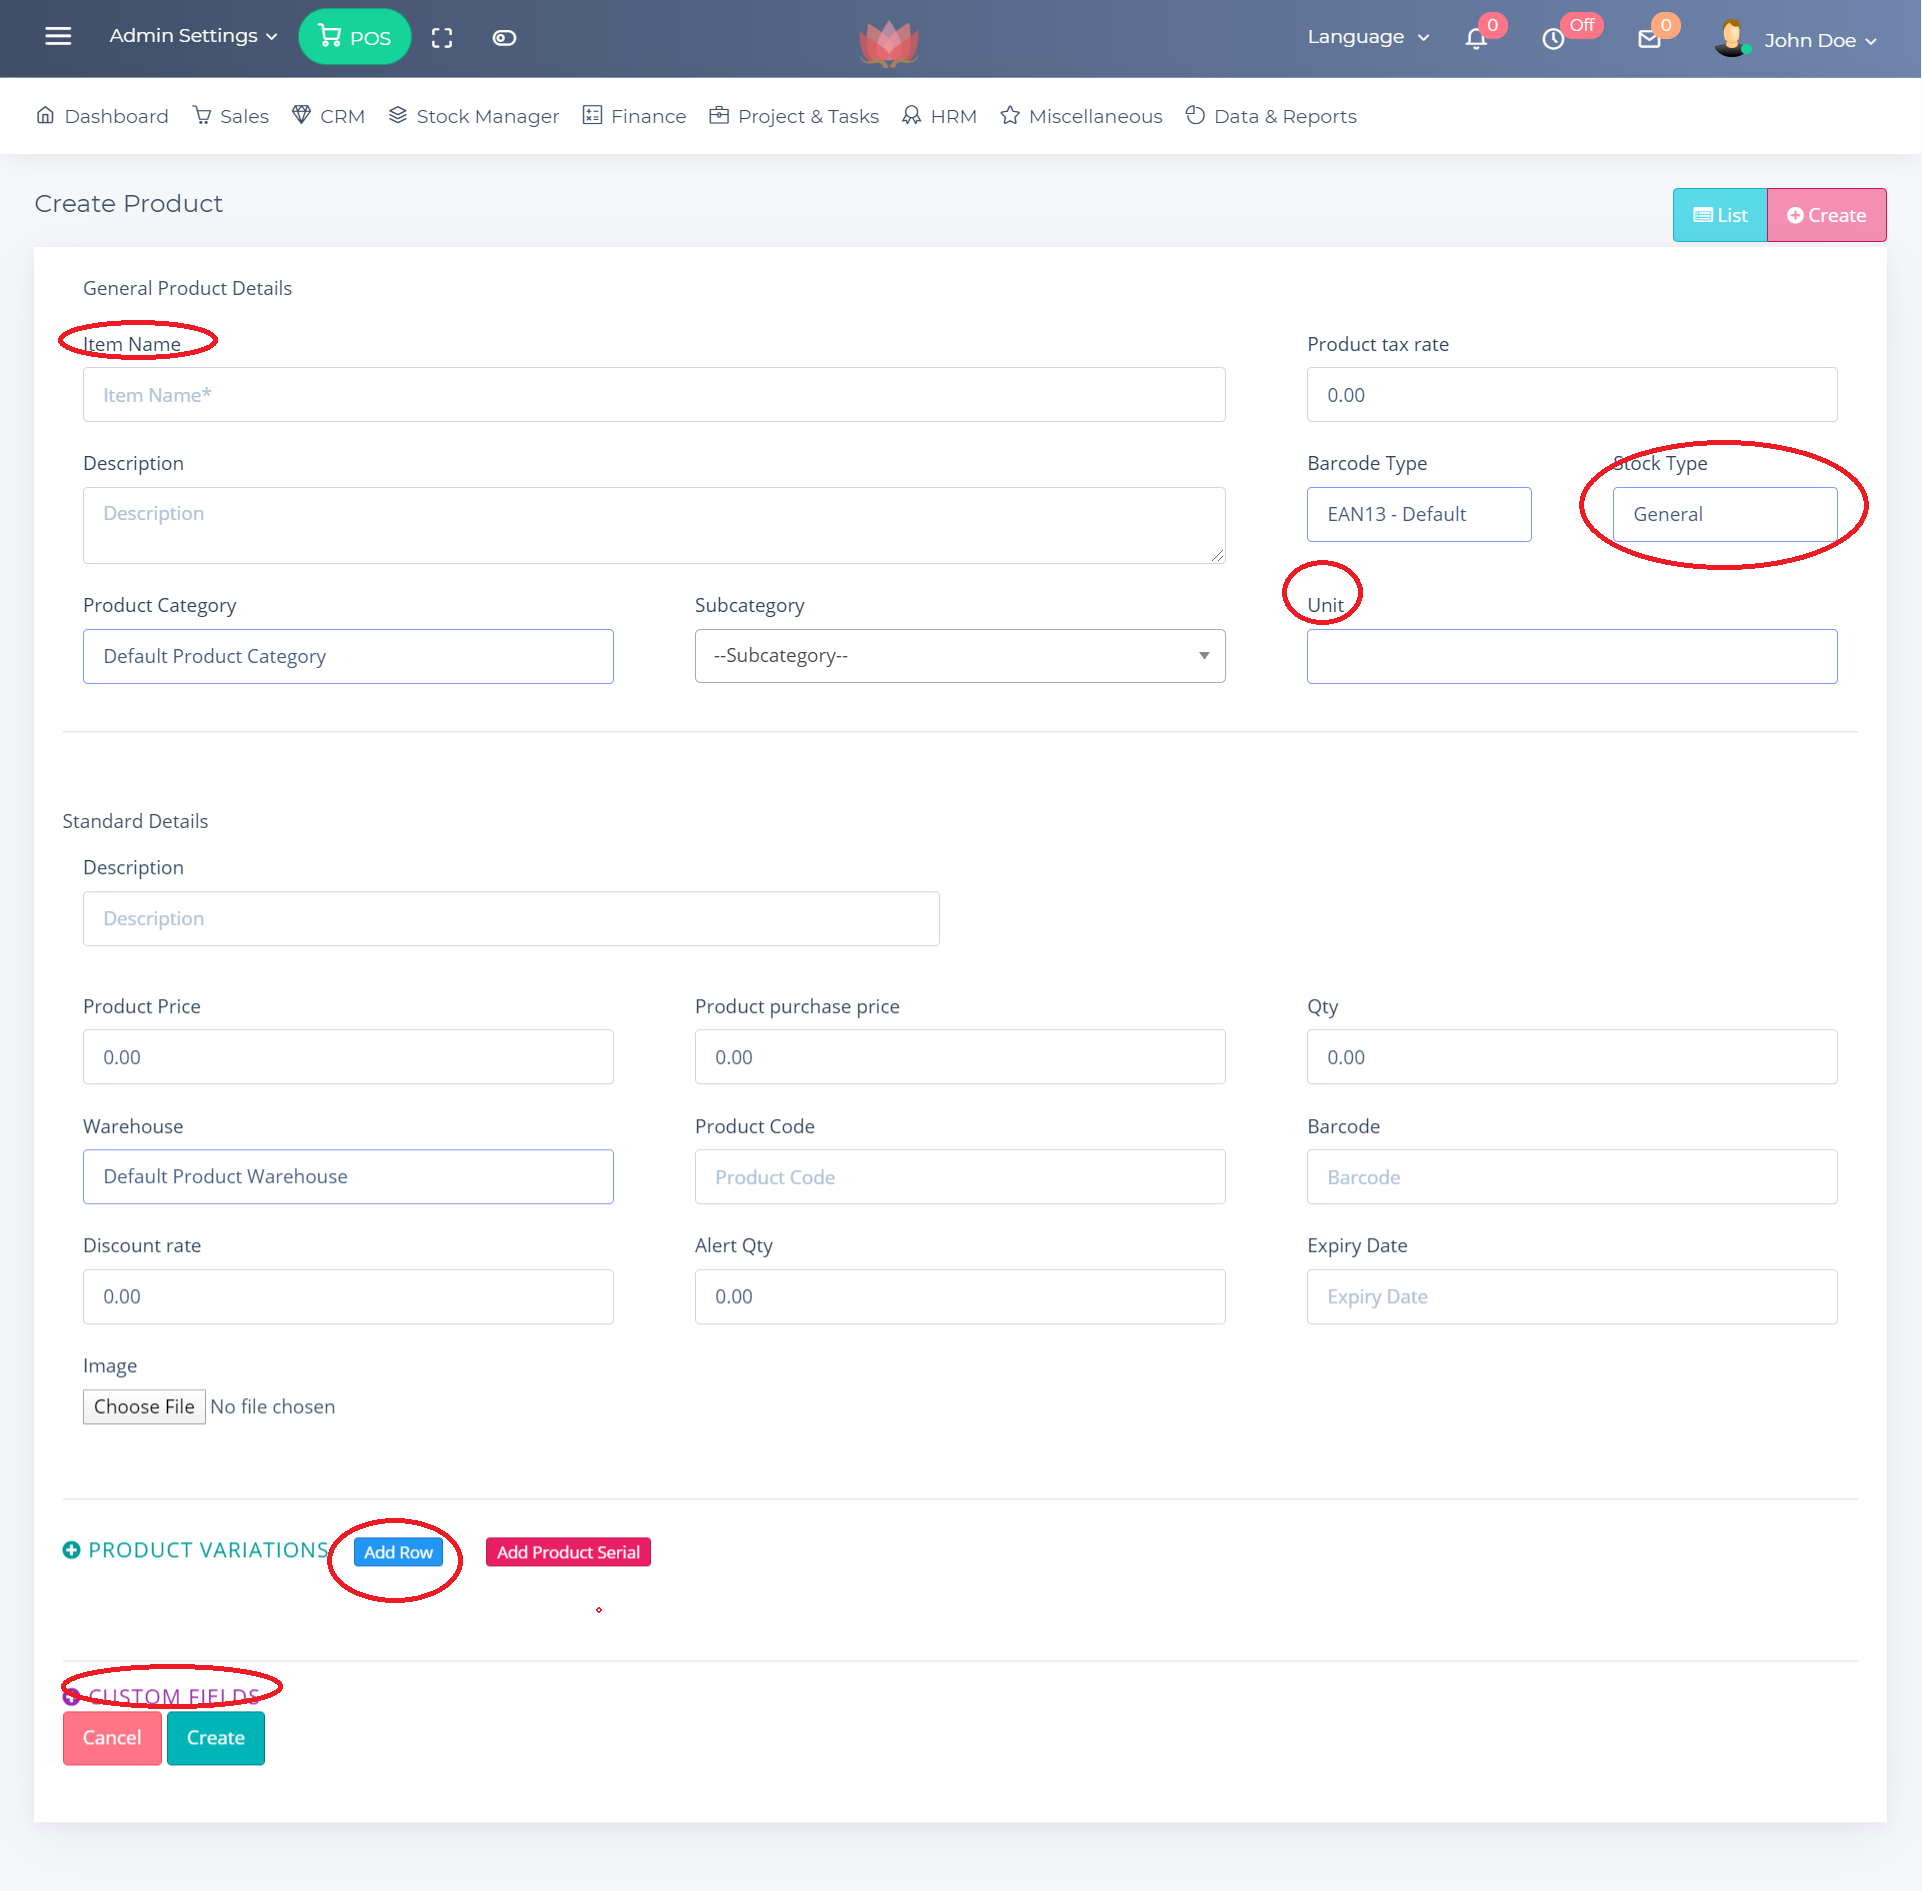
- Please check Menu > Stock manager
- To manage Products
- To manage Product Purchase Orders
- To manage Product Categories
- To WAREHOUSE MANAGEMENT
- To SUPPLIER MANAGEMENT
- To MANAGE STOCK RETURN
- To MANAGE Print Product Labels
- To MANAGE Stock Transfer
- To MANAGE Print Product Custom Labels 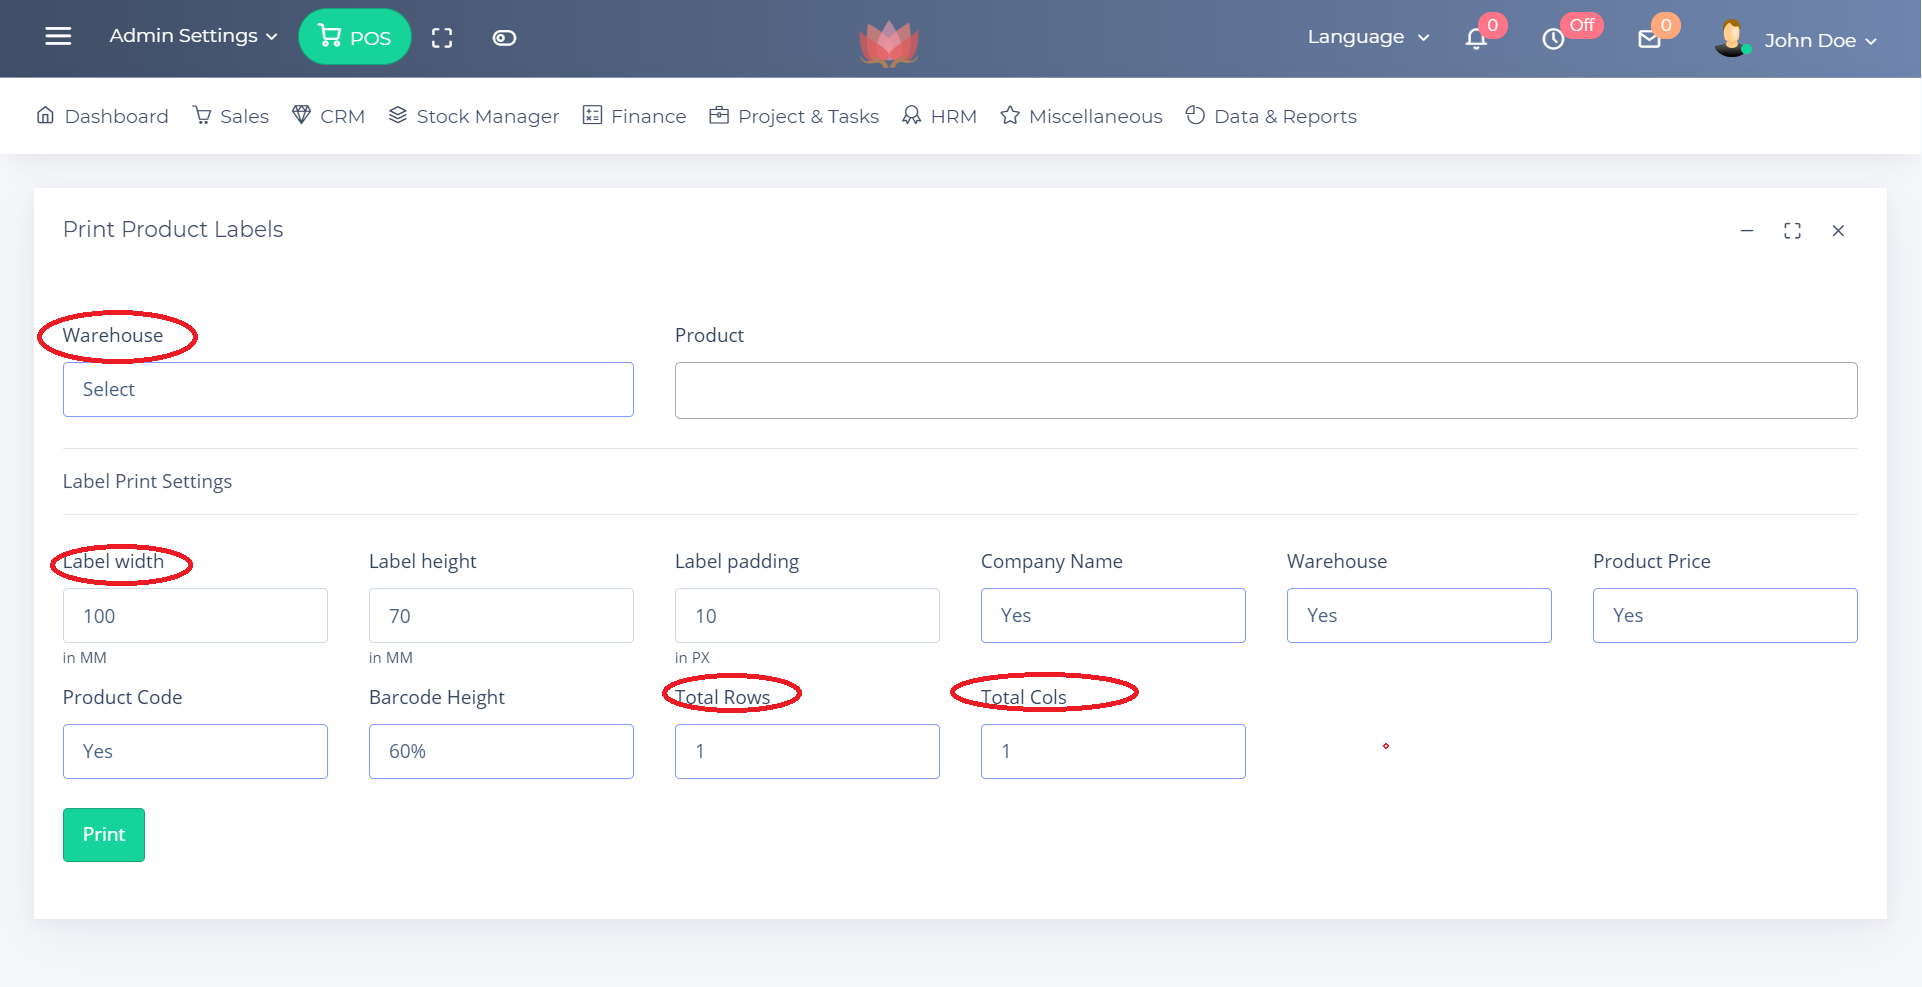
To MANAGE Print Product Standard
Labels 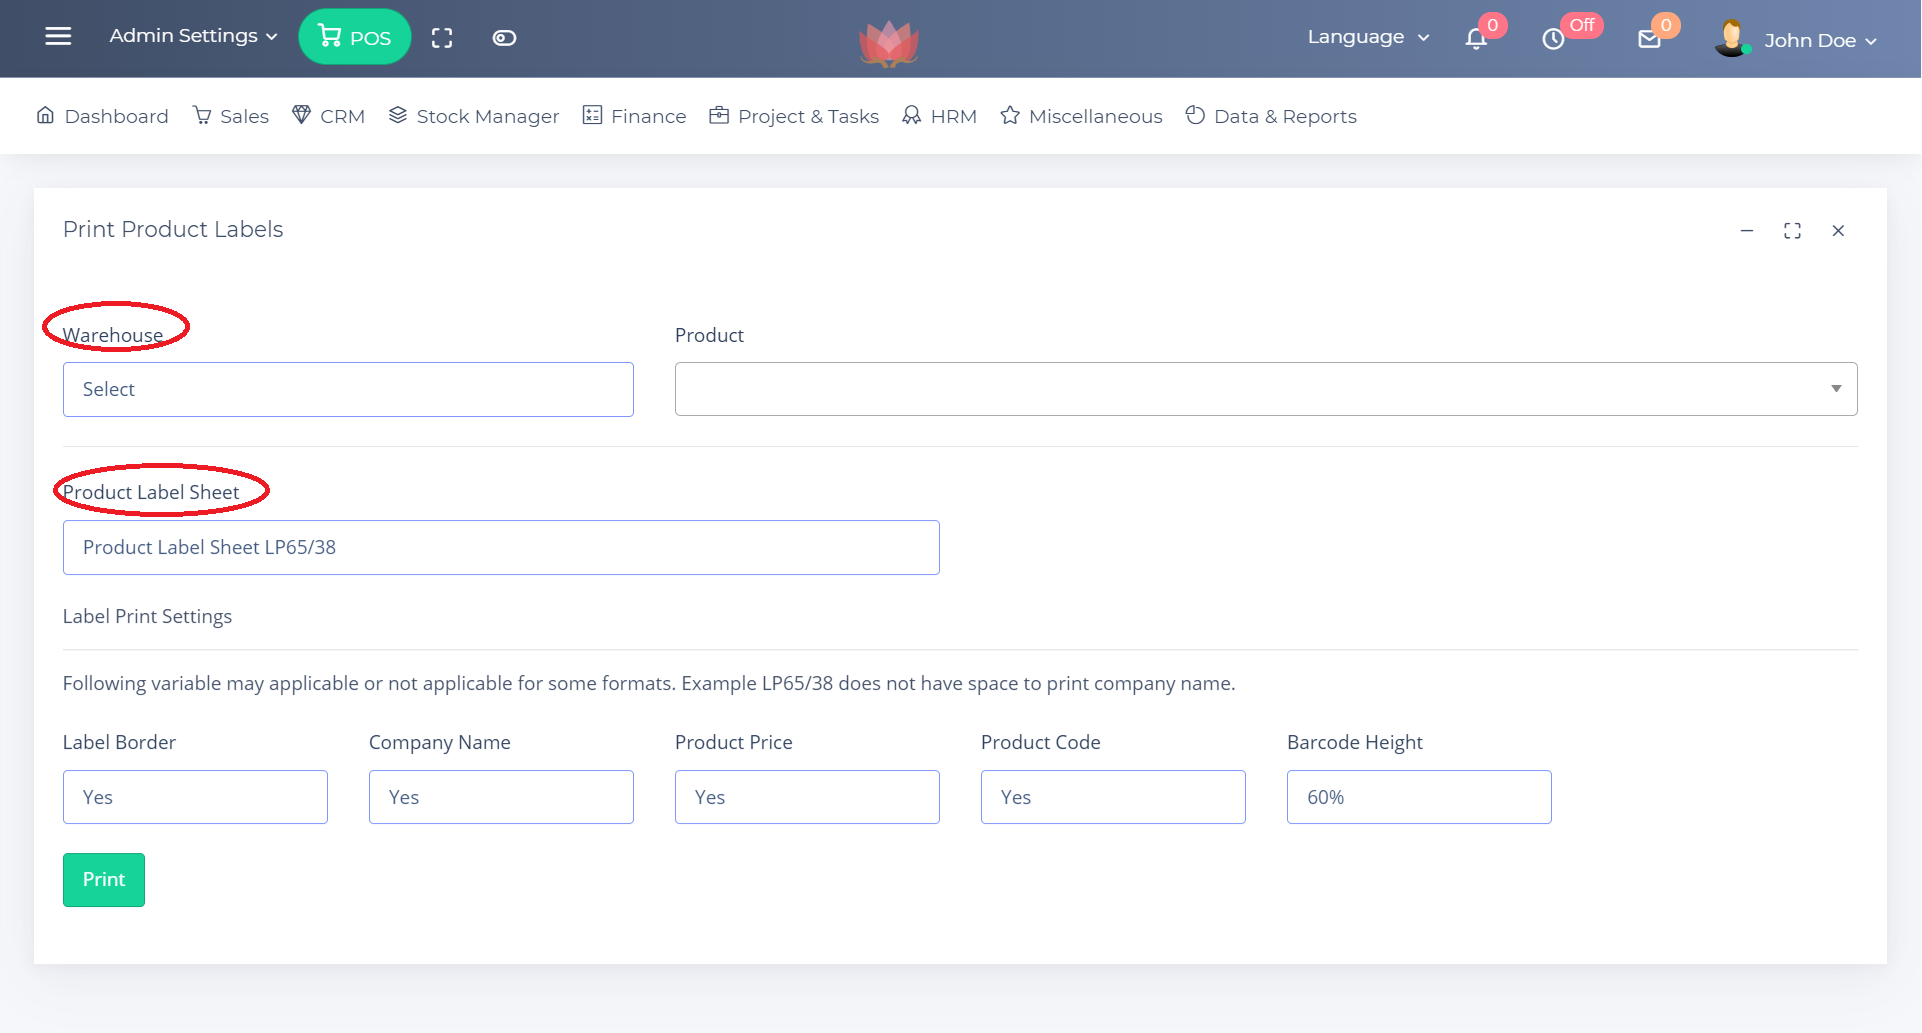
- To MANAGE Stock Transfer ![]()
36. ACCOUNT MANAGEMENT
To manage Accounts Groups Go > Finance > ACCOUNT MANAGEMENT
You can add accounts type in Admin Settings > ACCOUNTS & TRANSACTIONS PREFERENCE
Do not delete default accounts
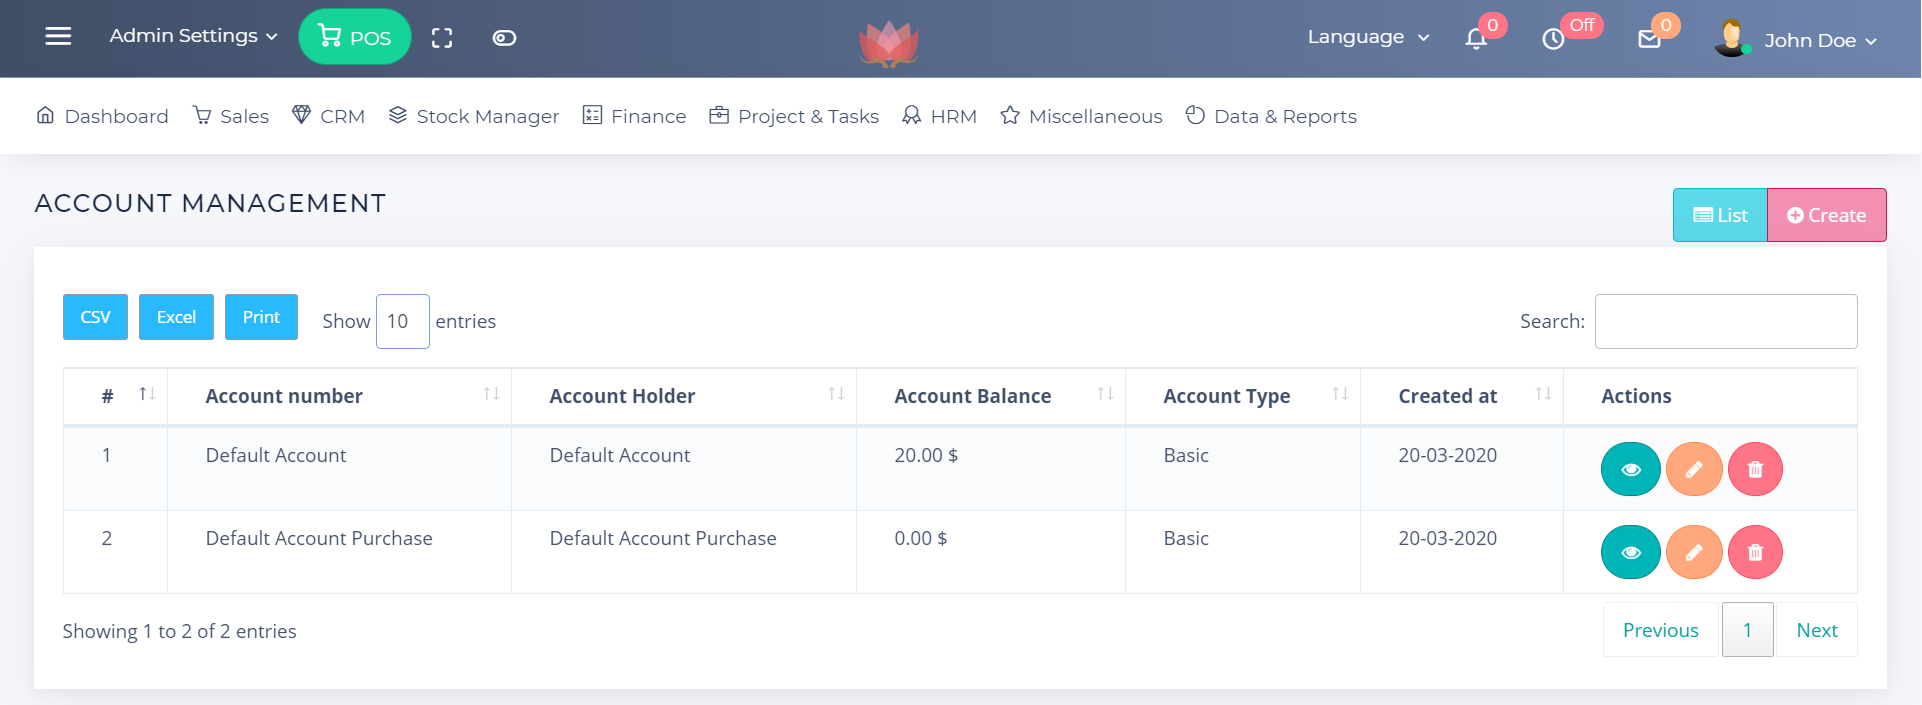
- Add Account
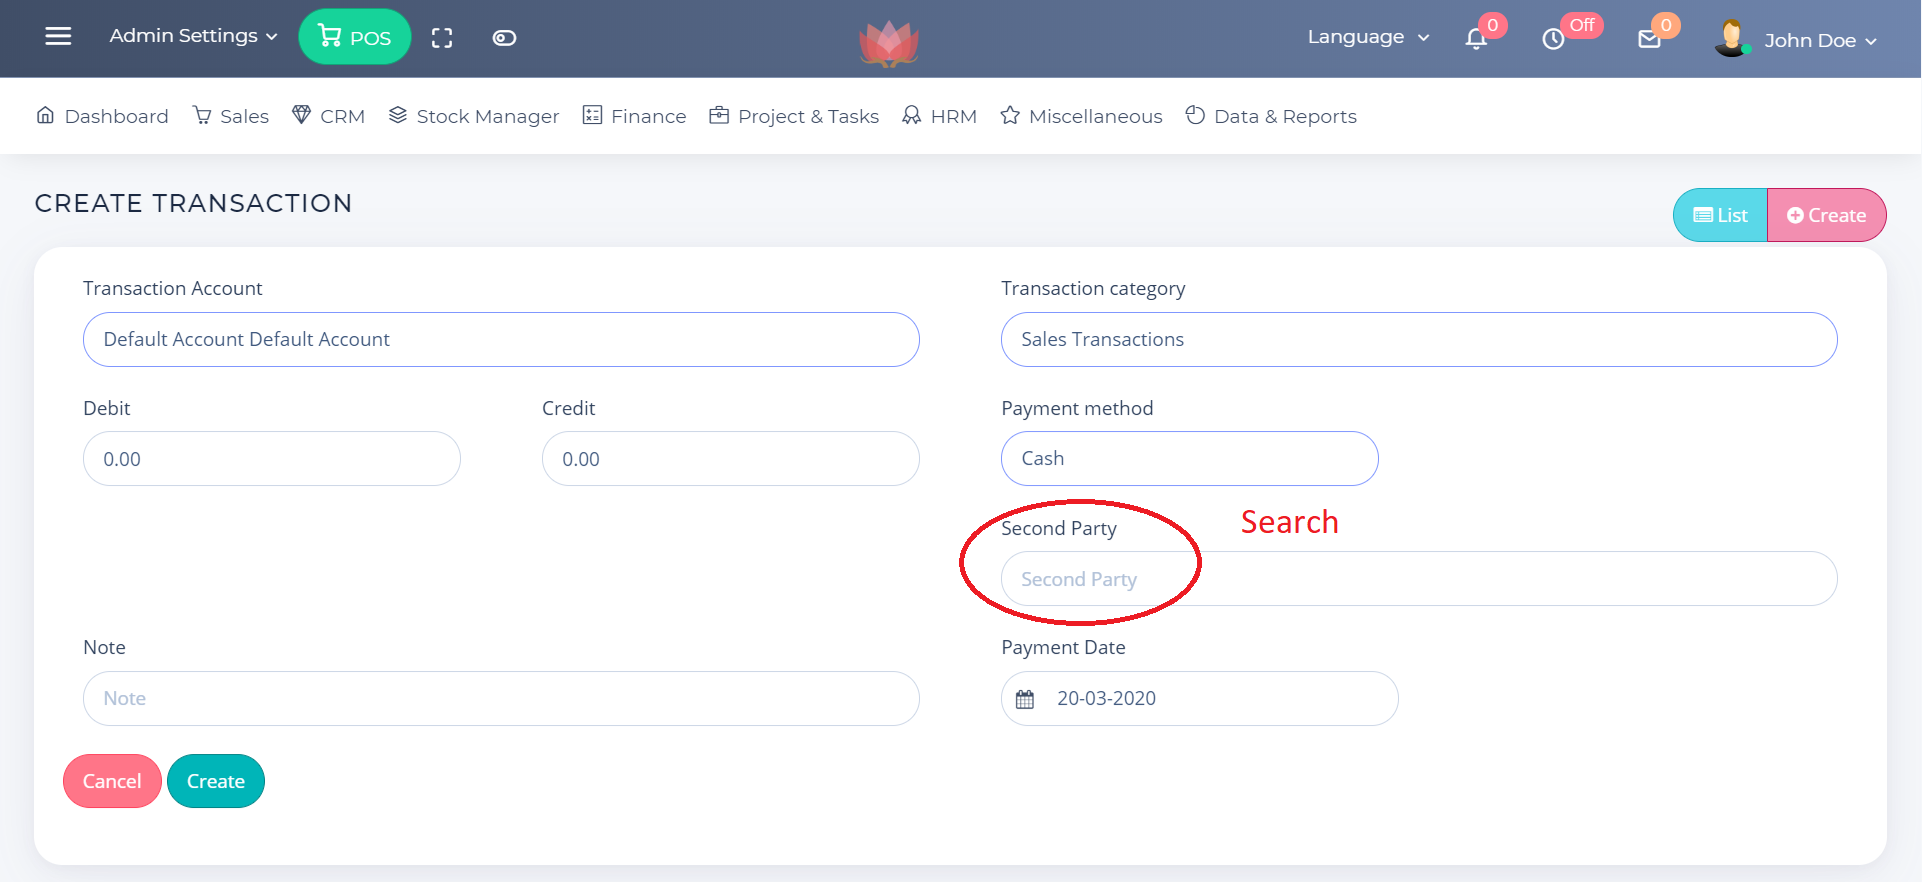
37. Transaction Management
To manage Transactions Groups Go > Finance > Transaction Management
You can create financial transaction related to your business.
![]()
38. Projects Management & Tasks
To manage Projects Groups Go > Project & Tasks > Projects Management
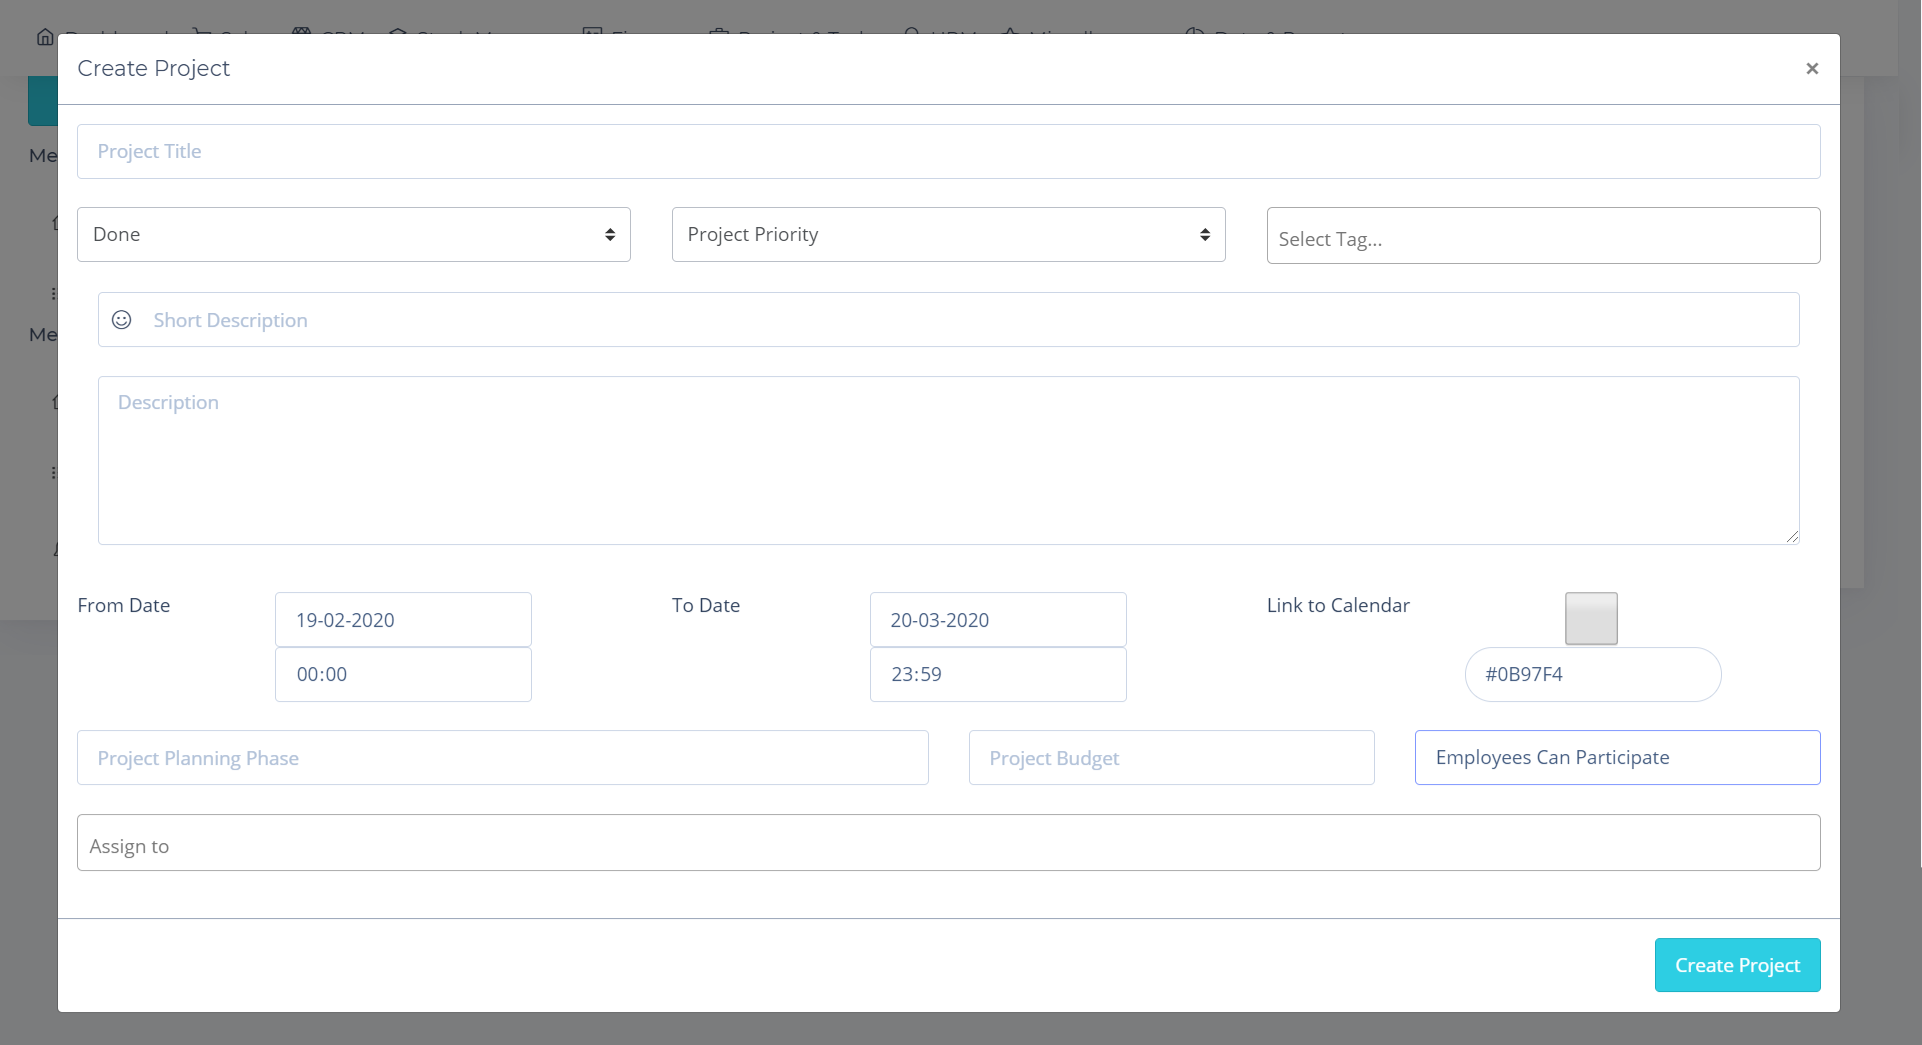
-Tasks 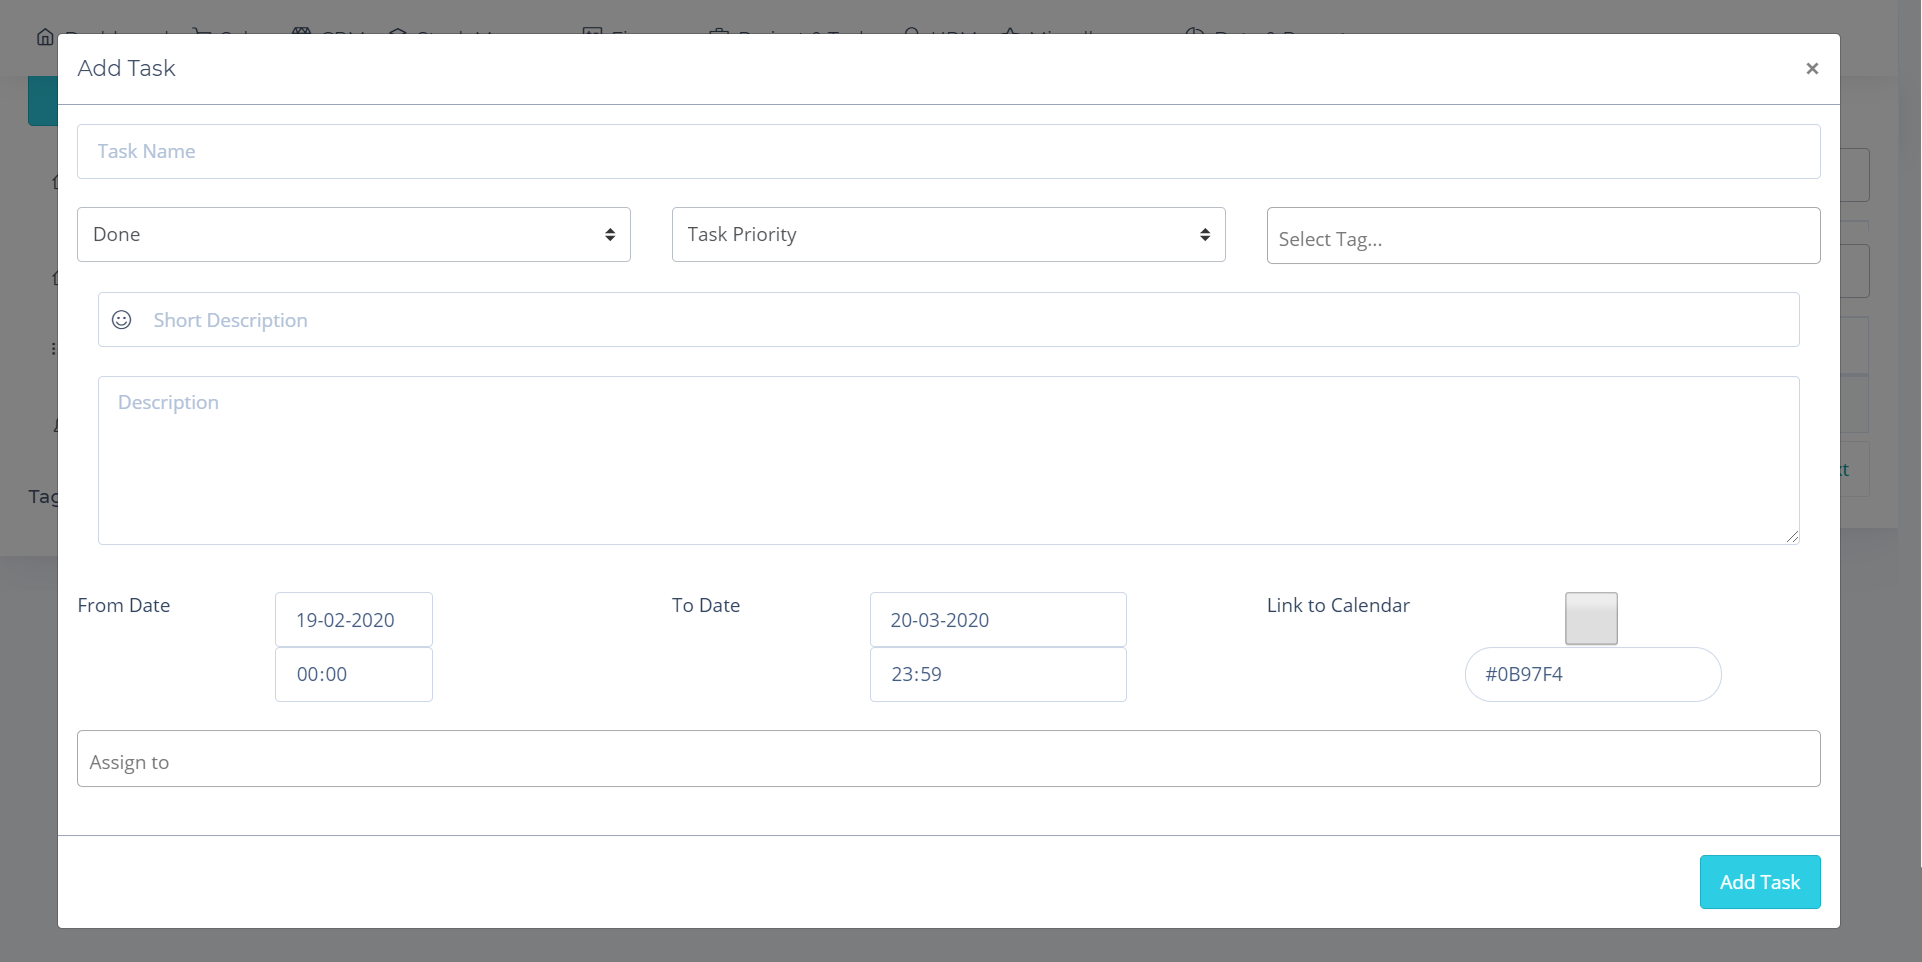
39. Status & Tags
In this section you can create projects status, tasks status and tags for it.
-Tasks 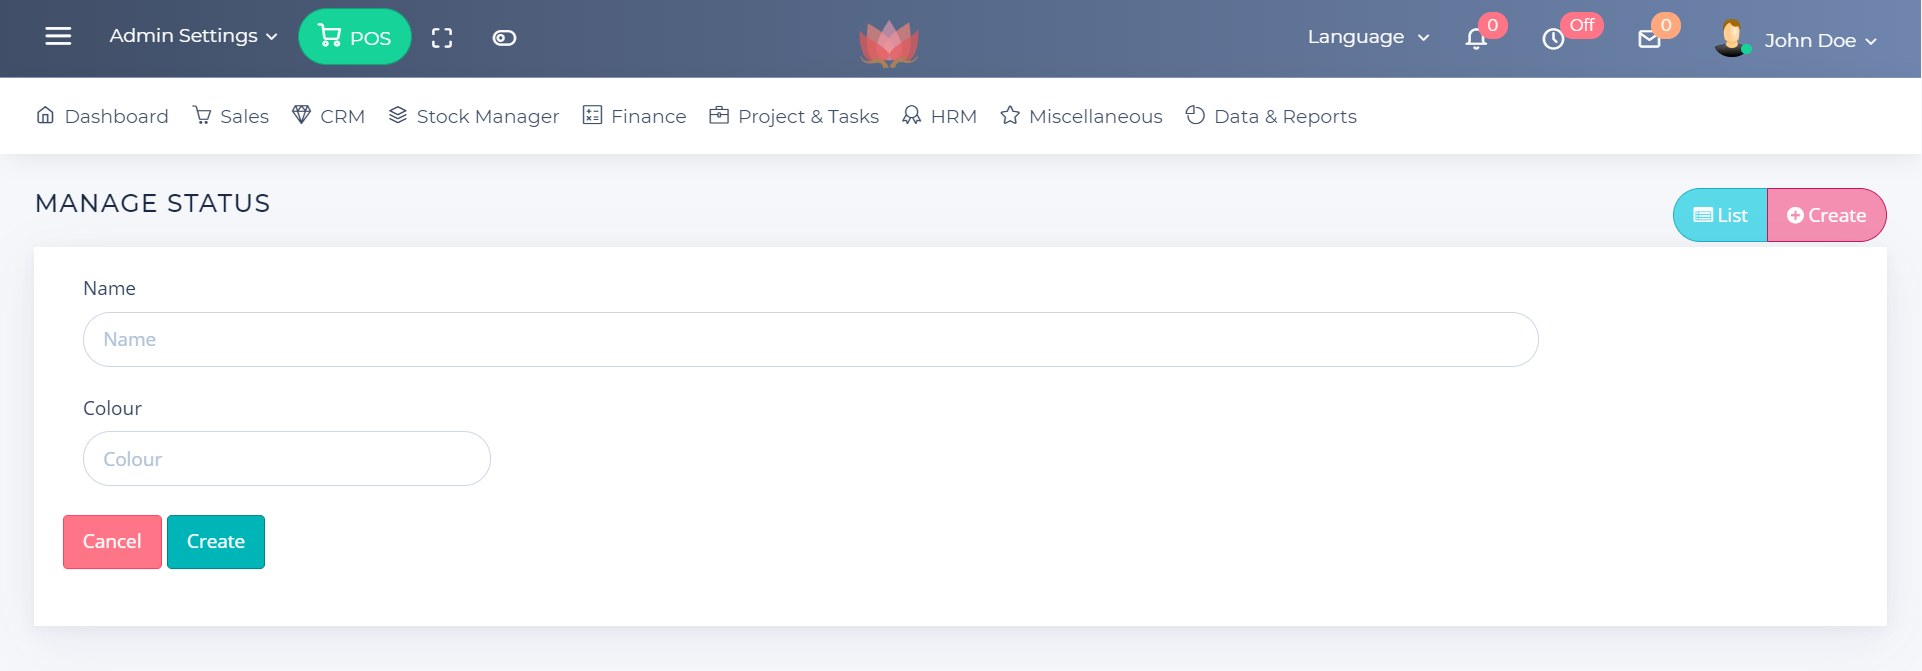
-Tasks 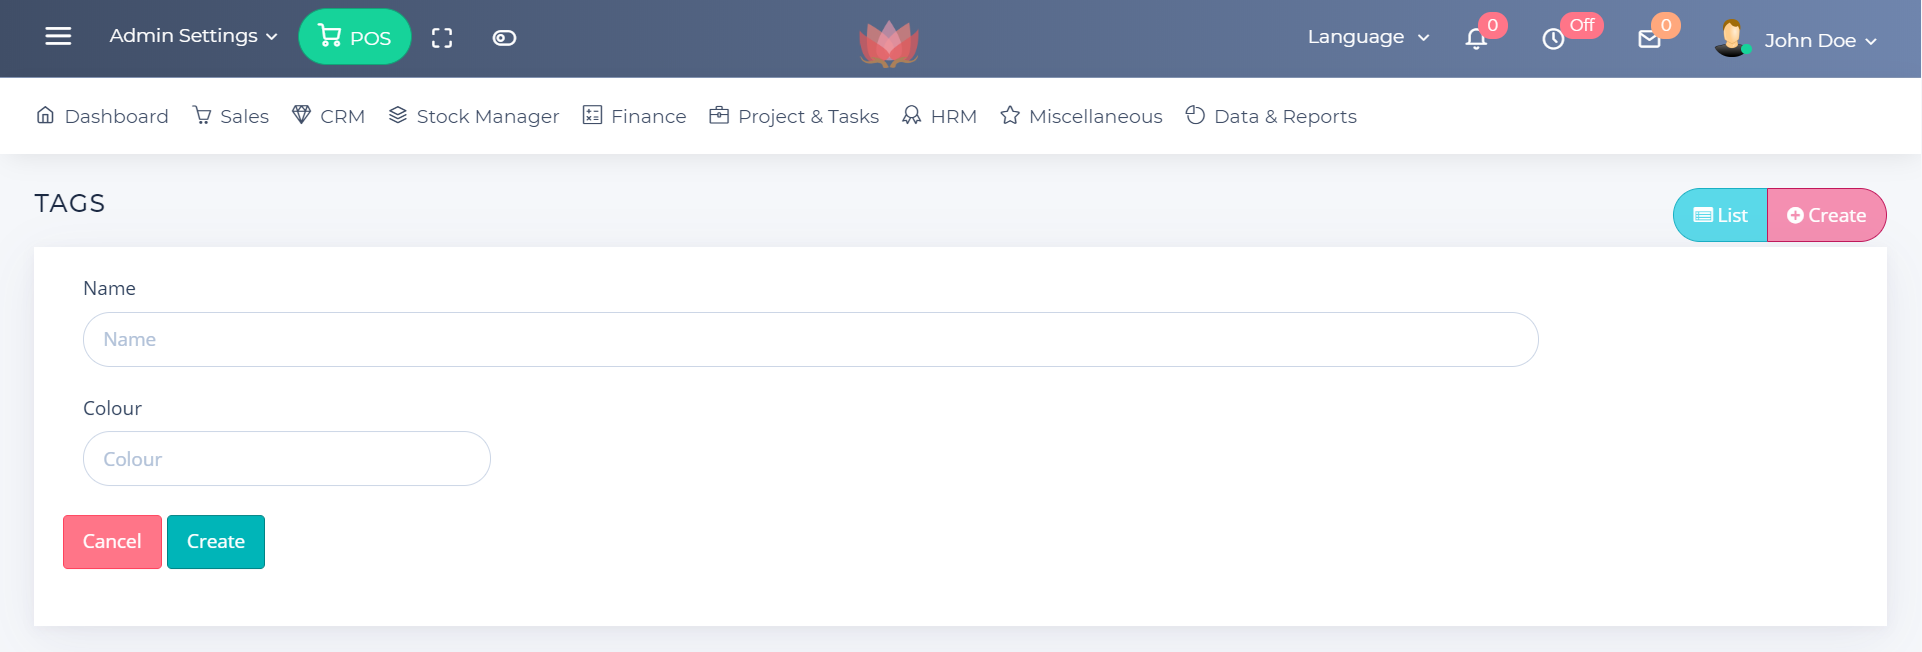
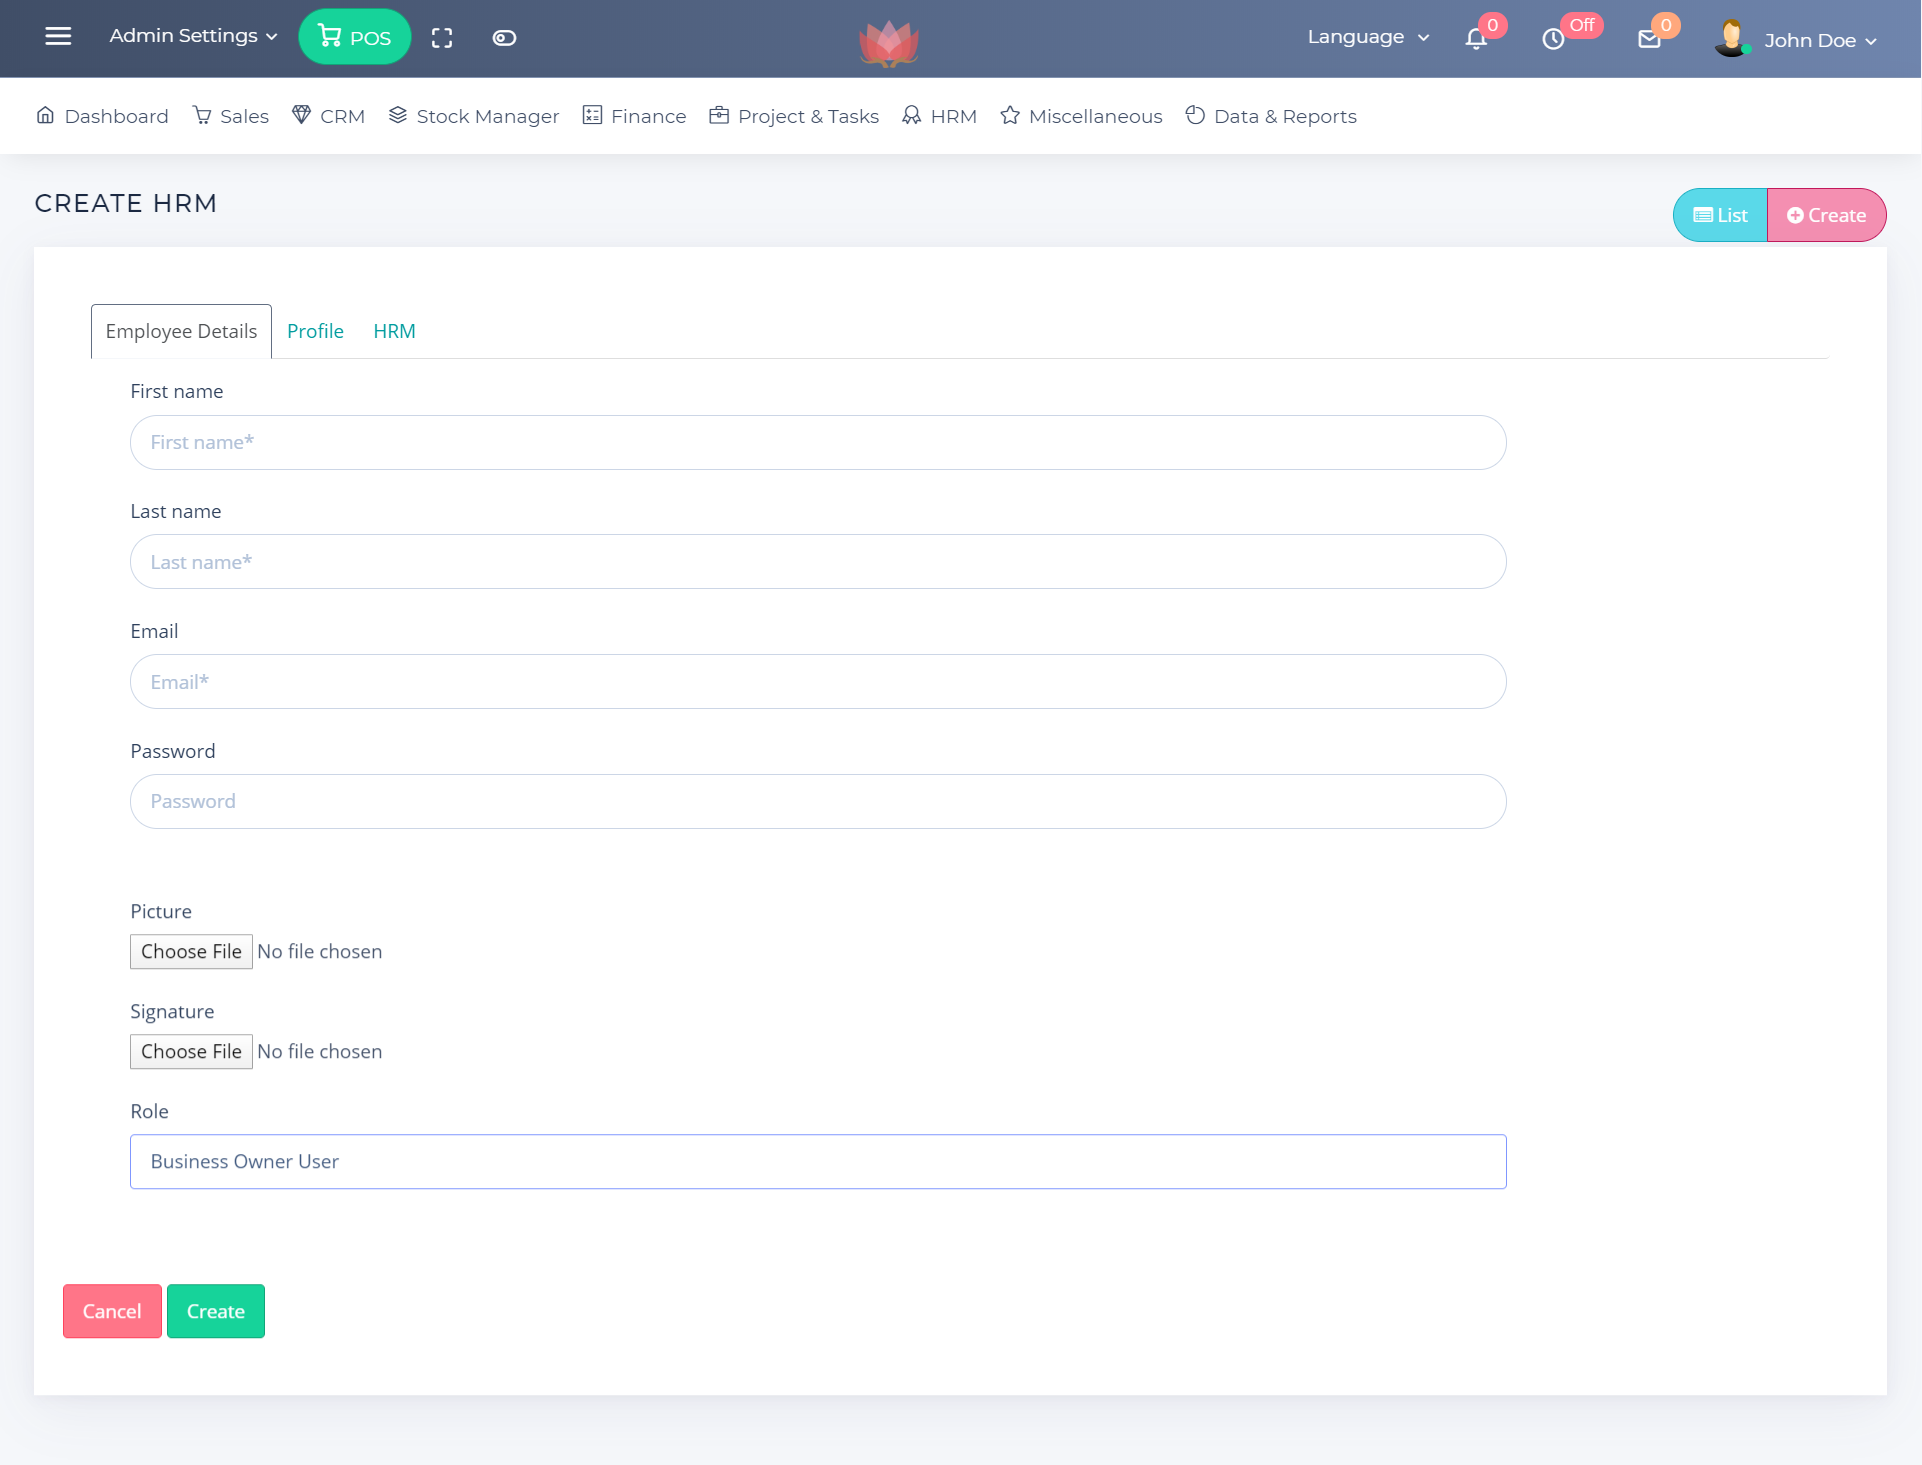
40. HRM - Employee Management
To manage Employees Groups Go > HRM > Employee Management
- Create Employee
- Edit Employee Profiles
- Create Employee Roles
-Profile 
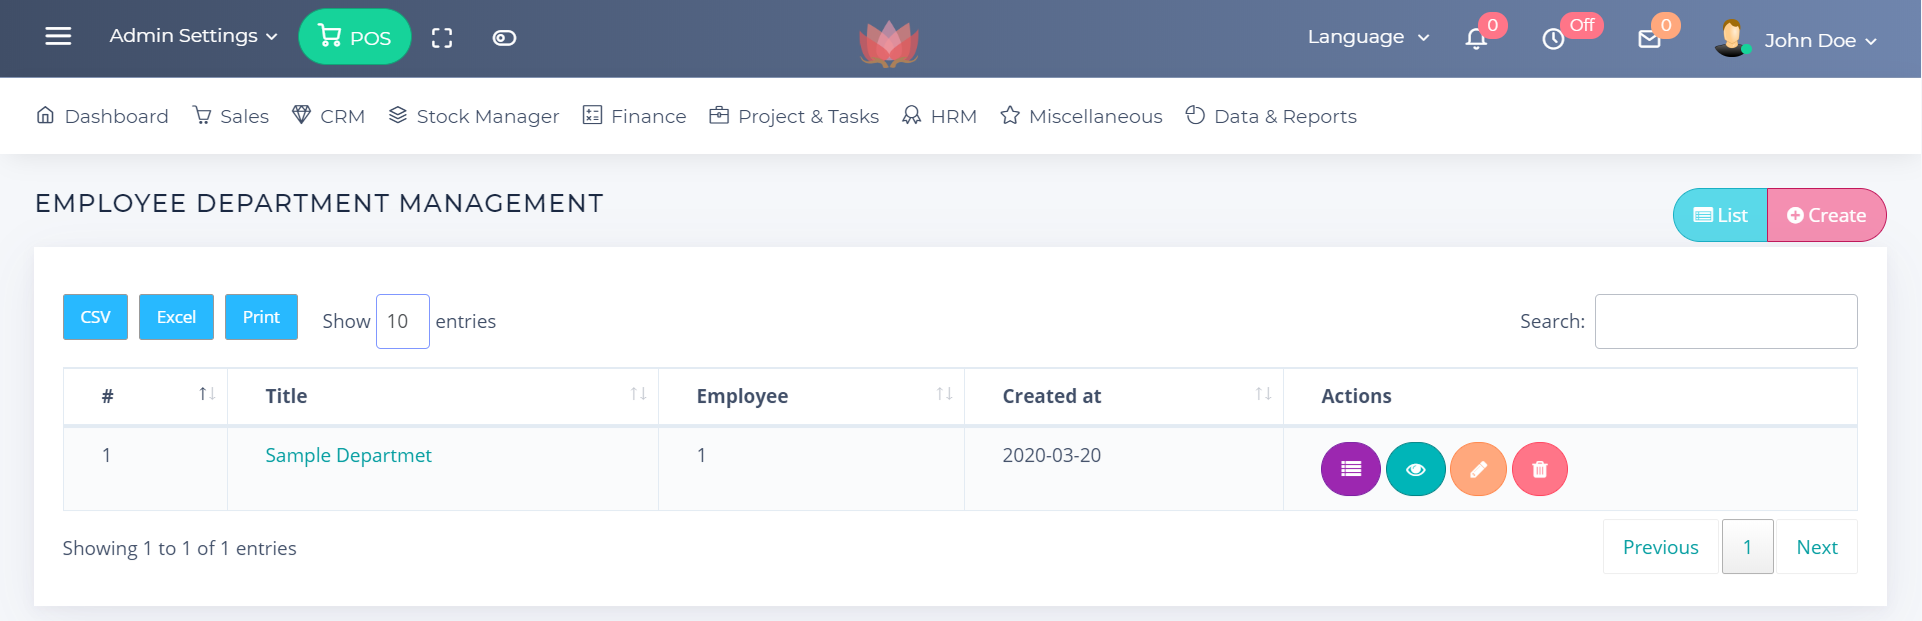
41. Departments
You can classify the employees in departments
42. Payroll
Enter the salary transactions of employees
43. Miscellaneous
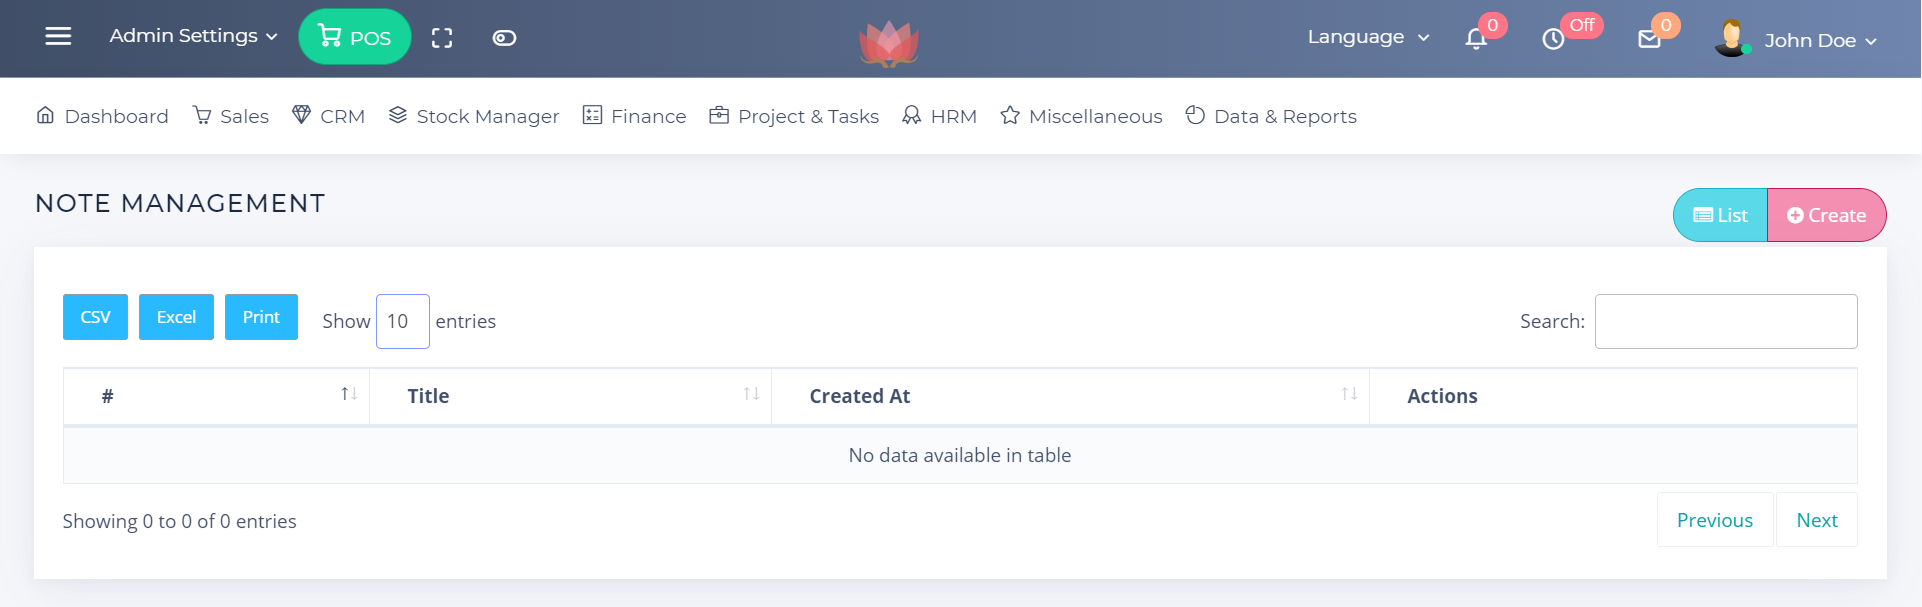
Notes
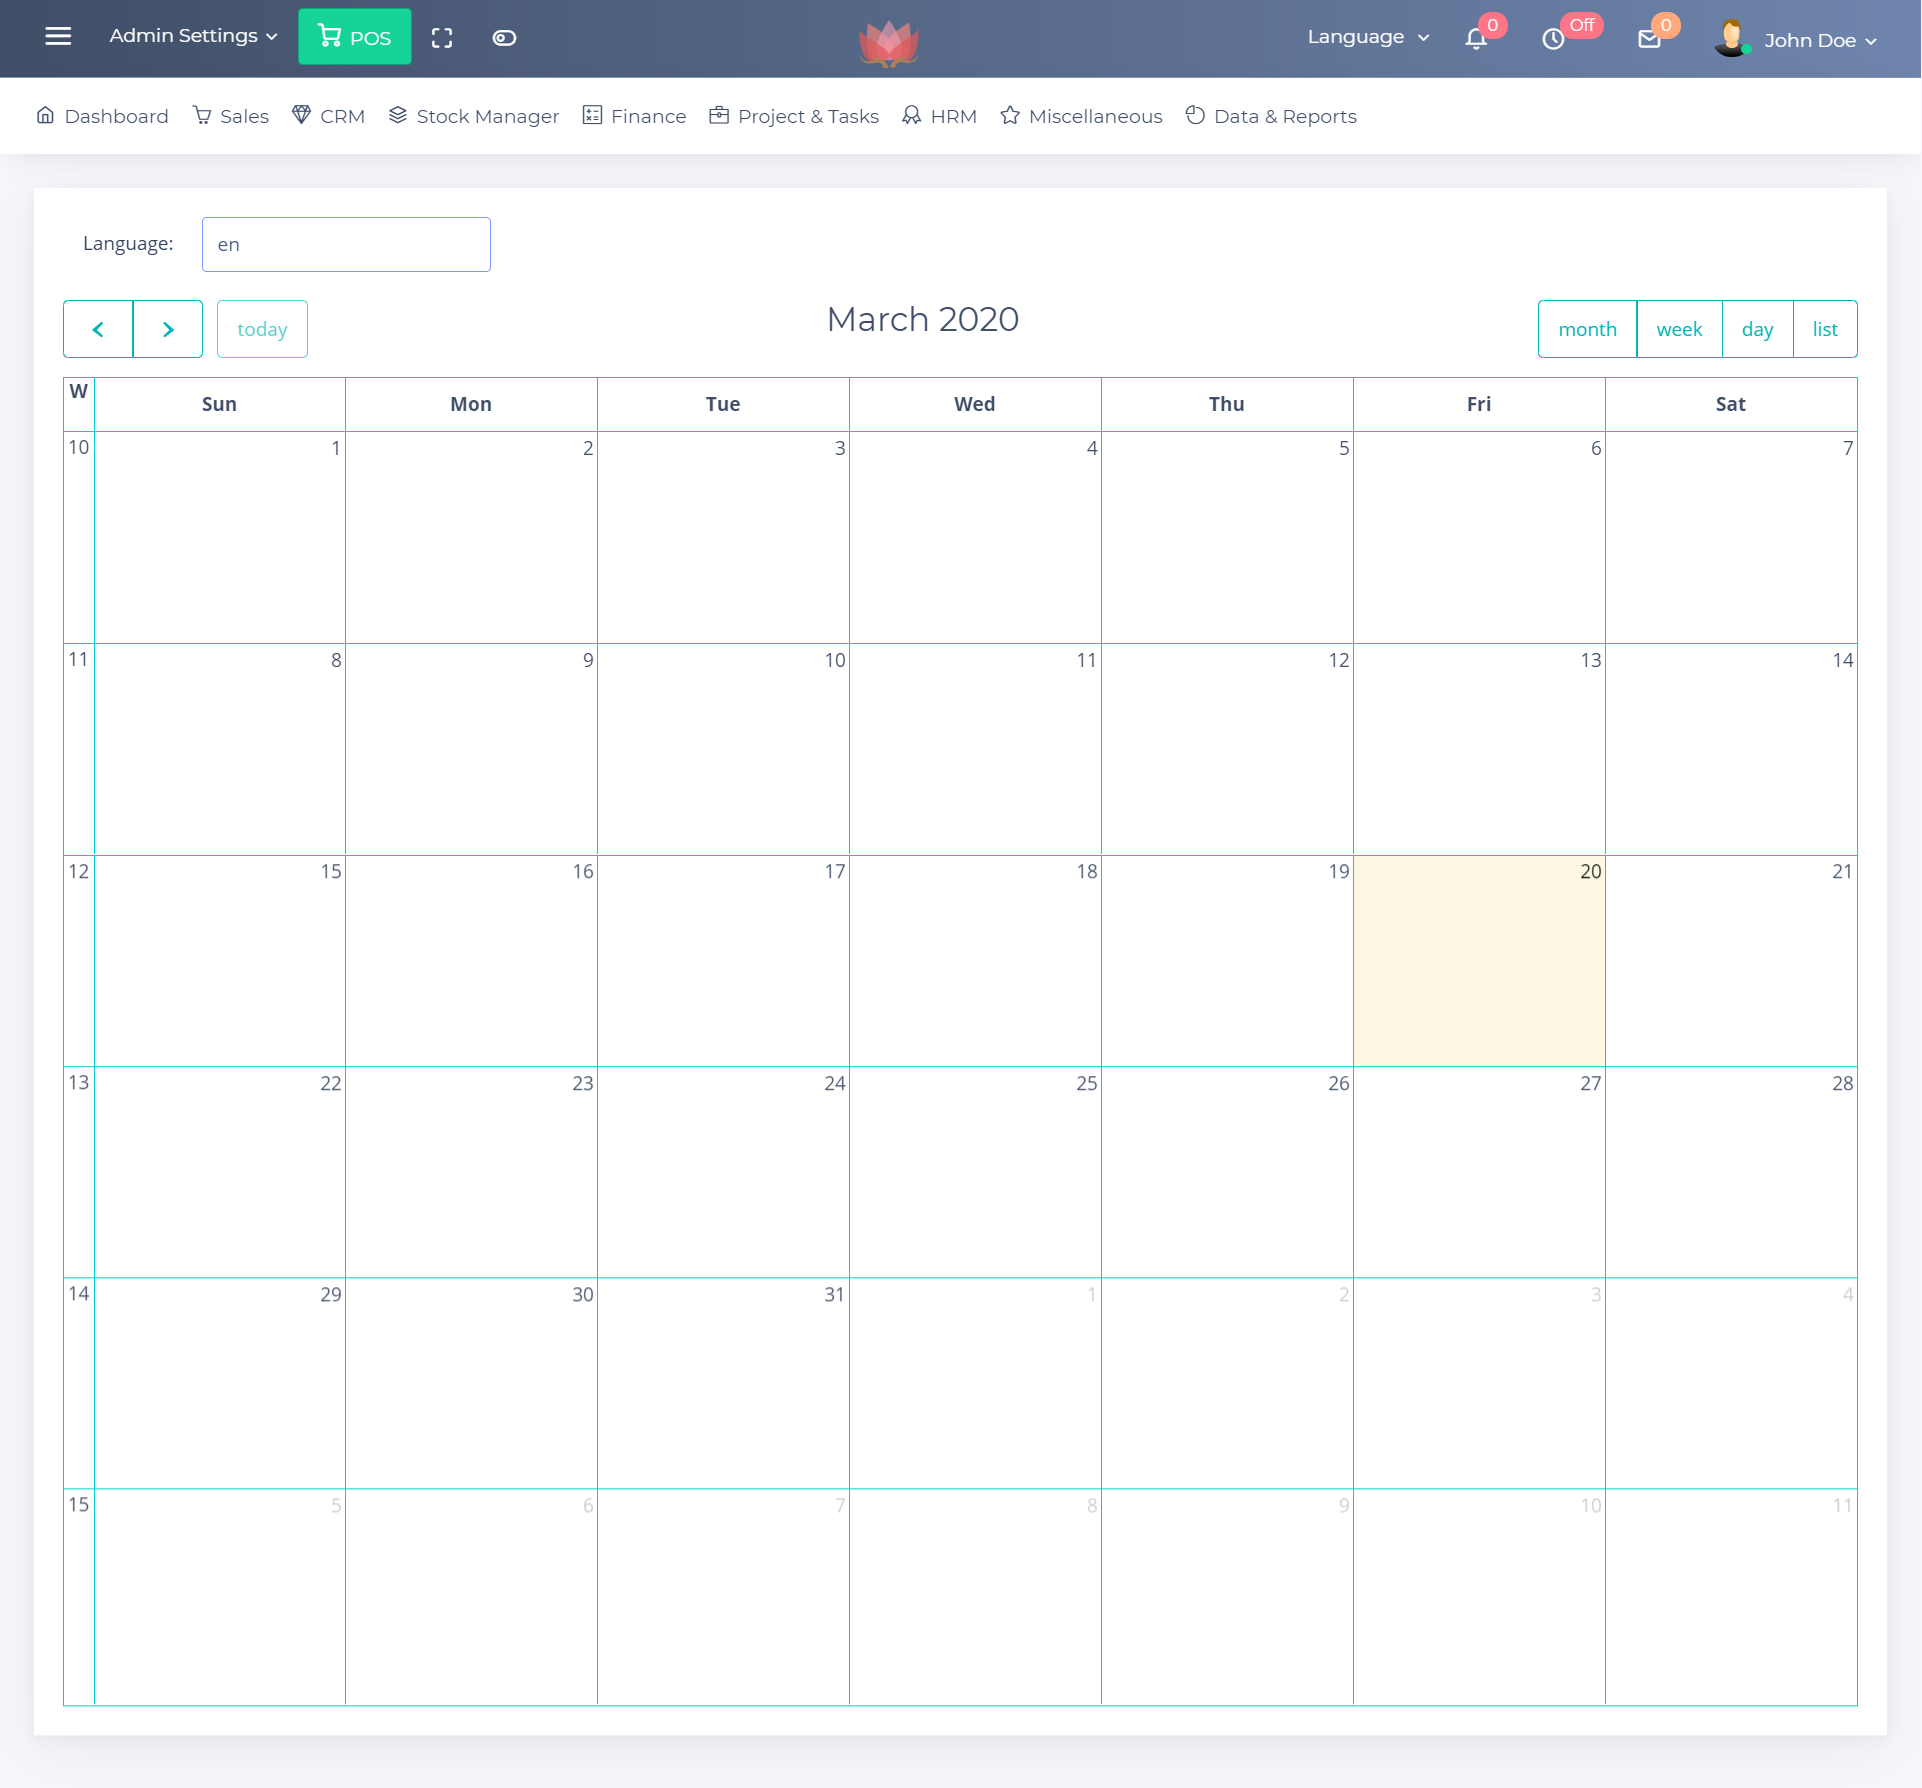
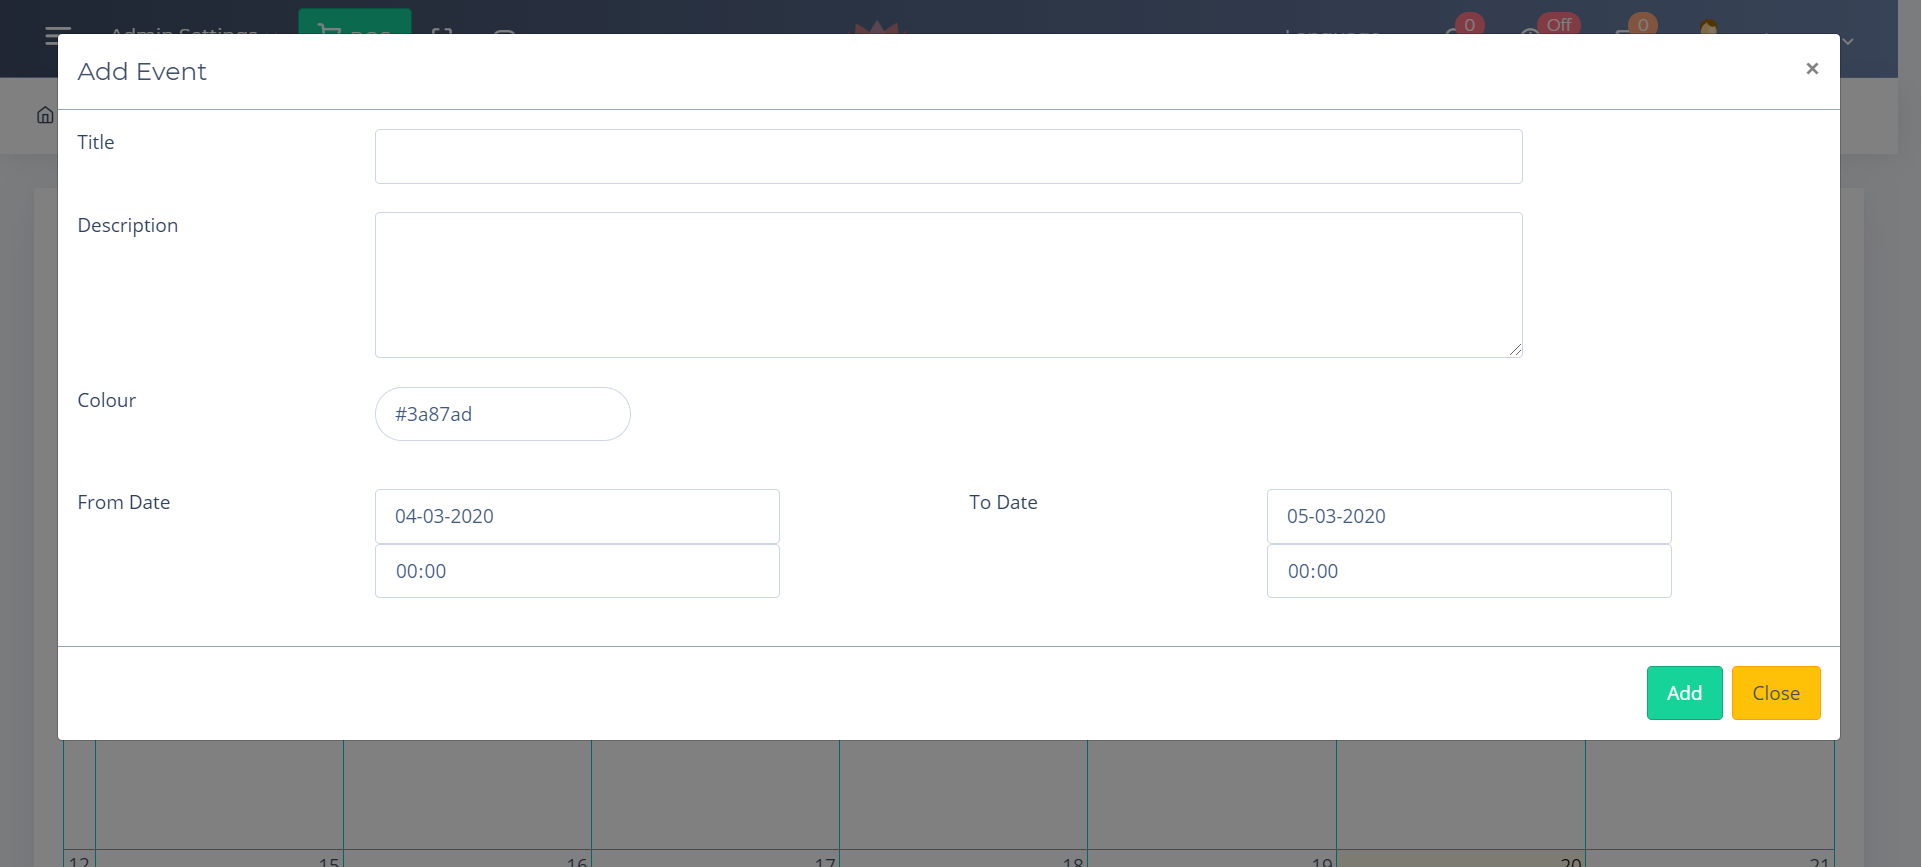
Events
Help & Support
Please remember you have purchased a very affordable application and you have not paid for a full-time web design agency. Occasionally we will help with small tweaks, but these requests will be put on a lower priority due to their nature. Support is also 100% optional and we provide it for your connivance, so please be patient, polite and respectful.
Please visit our profile page or ask question http://helpdesk.ultimatekode.com
Enter a valid email to receive ticket replies. Gmail is recommended for reliable communication. Email maybe found in SpamBox after 5 minutes (whitelist helpdesk@ulimatekode.com). If you are not receiving emails means you will not get reply notifications.
Support for our items includes:- * Responding to questions or problems regarding the item and its features
- * Fixing bugs and reported issues
- * Providing updates to ensure compatibility with new software versions
- * Customization and installation services
- * Support for third party software and plug-ins
- * Make sure you have checked the help & troubleshoot guide, attached with the app.
- * Make sure your question is a valid application Issue and not a customization request.
- * Make sure you have read through the documentation before asking support on how to accomplish a task.
- * Make sure to double check the application FAQs.
- * Try disabling any active plugins to make sure there isn't a conflict with a plugin. And if there is this way you can let us know.
- * If you have customized your application and now have an issue, back-track to make sure you didn't make a mistake. If you have made changes and can't find the issue, please provide us with your changelog.
- * Almost 80% of the time we find that the solution to people's issues can be solved with a simple "Google Search". You might want to try that before seeking support. You might be able to fix the issue yourself much quicker than we can respond to your request.
- * Make sure to state the name of the application you are having issues with when requesting support via CodeCanyon.
Files & Credits
I am not the only person who wrote these codes. I used several open-source projects. My special thanks to thousands of open source community members, I can't mention their names but, all who contributed to these communities. I've used the following libraries, icons or other files as listed. These are the primary library files used to design the application. Use these to customize your application even further.
| Name |
|---|
| Laravel Framework |
| jQuery Library |
| Bootstrap Library |
| PHP Mailer |
| Morris Chart |
| Laravel Boilerplate |
| Feather |
| Ionicons |
| FPS Line Icons |
| IcoMoon |
| Font Awesome |
| Meteocons |
| Evil Icons |
Version History (Changelog)
You can find the version history (changelog.txt) file on project folder
Once again, thank you so much for purchasing this application. As I said at the beginning, I'd be glad to help you if you have any questions relating to this application. No guarantees, but I'll do my best to assist. If you have a more general question relating to the application on Codecanyon, you might consider visiting the forums and asking your question in the "Item Discussion" section
Developers
The application is developed with Laravel 8.1
You can read the developer documentation here https://laravel.com/docs/
You can use composer to install new libraries composer require vendor/package but do not update or remove exiting libraries to avoid compatibility issues
| Version | Release | Bug Fixes Until | Security Fixes Until |
|---|---|---|---|
| 8.1 | September 8, 2020 | - | - |
Application Flow Chart
The following graphic illustrates how data flows throughout the system:
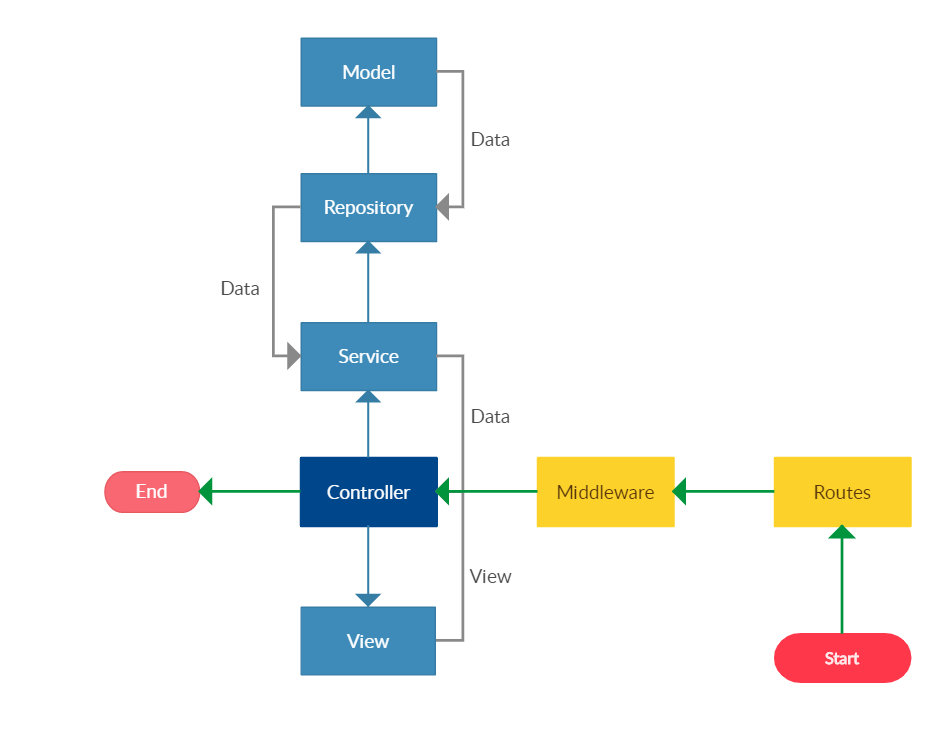
- The rote serves as the front controller, initializing the base resources needed to run CodeIgniter.
- The Router examines the HTTP request to determine what should be done with it.
- If a cache file exists, it is sent directly to the browser, bypassing the normal system execution.
- Security. Before the application controller is loaded, the HTTP Middleware request and any user submitted data is filtered for security.
- The Controller loads the model, core libraries, helpers, and any other resources needed to process the specific request.
- The finalized View is rendered then sent to the web browser to be seen. If caching is enabled, the view is cached first so that on subsequent requests it can be served.